Advertisement
Quick Links
Advertisement

Related Manuals for Eyevision Intelli Series


Summary of Contents for Eyevision Intelli Series
- Page 1 Intelli Series Smart Intercom Third Generation 4 Wire Intercom WF 7 KP 21 DS 21 REV 0.2 040221...
- Page 2 Table of Contents Page 9 This Page Keypad Programming cont. Precautions Quick Reference Diagram for simple installations Page 10 Page 1 Keypad Programming cont. Indoor Monitor Touch Button Overview Indoor Monitor overview, installation and specifications Outdoor Unit overview, installation and specifications Page 11 Using the indoor monitor (general use) Page 2...
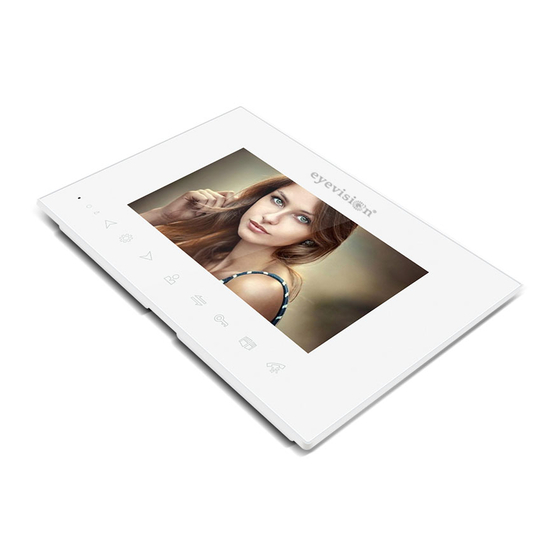
- Page 3 Indoor Monitor Specifications Indoor Monitor Overview Resolution 7" (1024*600) 1 Power Indicator LED Power Consumption Maximum 500mA 2 TFT display 3 Touch Buttons Power supply External power supply DC 12-15V 4 Microphone 5 Speaker Operating Temp 0~+50℃ 6 Menu/Settings Button 7 SD card slot SD Card Requirment 2GB~32GB Class 10 micro SD Read/Write 10MB/S Min.
- Page 4 Cabling 4C ordinary unshielded wire and shielded wiring ≤50m (4*0.2mm²) ≤80m (4*0.5mm²) 3C ordinary unshielded + video cable(RG-59) connection method ≤100 meters CAT5/CAT6 network cable connection (not recommended) ≤50 meters Power Adapter Limitations Indoor Monitor & Outdoor Unit 15V 1A Power Adapter * Max extendable distance is 3m * Recommended cable to extend length is 14/020 pair * Only one unit per power supply...
- Page 5 Cabling Topology Through the settings menu each monitor MUST be set with an ID number. The DEVICE ID Setting can be found in the monitors MODE menu. First Monitor (Master) is addressed 01 Second Monitor (Slave 1) is addressed 02 Third Monitor (Slave 2) is addressed 03 Fourth Monitor (Slave 3) is addressed 04 Fifth Monitor (Slave 4) is addressed 05...
- Page 6 Wiring Overview Red & Black Red & Black Page 4...
- Page 7 KP 21 Outdoor Station Wiring Overview Door Station LED Red (Intercom Switching Power Line to Indoor Monitor) White LED Intercom Line White (Intercom Audio Line to Indoor Monitor) Standby (Without Motion Detection) to indoor monitor Black (Intercom Ground Line to Indoor Monitor) Yellow (Intercom Video Line to Indoor Monitor) Green LED Green (Normally Open Circuit)
- Page 8 DS 21 Outdoor Station Wiring Overview Door Station LED Red (Intercom Switching Power Line to Indoor Monitor) Intercom Line White LED White (Intercom Audio Line to Indoor Monitor) Black (Intercom Ground Line to Indoor Monitor) Standby (Without Motion Detection) to indoor monitor Yellow (Intercom Video Line to Indoor Monitor) Green LED Green (Normally Open Circuit)
- Page 9 Common Door Lock Output (From monitor only) For Automatic Gates For Electric Strikers To Automatic Gate Next Monitor Next Monitor CCTV Wiring Option 1 Option 2 Acceptable cameras to connect into the system are CVBS, CVI, TVI and AHD with a max.
- Page 10 Entering and Exiting Admin 9 9 9 Default PIN is 999999, if the PIN has been changed in the past then use the current PIN Press *, * then # to exit Buzzer Alerts Successful Command Returned one step in Menu Bi! Bi! Failed Command Changing the Admin PIN...
- Page 11 Setting the Unlock Time for PIN number and Tag Users 9 9 9 Default PIN is 999999, if the PIN has been changed in the past then use the current PIN Type 4 to enter the unlock time setting menu Type the amount of seconds (00-99) then press # Press *, * then # to exit Note for the monitor its unlocking time can be set via the monitor itself...
- Page 12 Reset Process (with admin PIN) This process will reset back to default parameters as listed below • Admin PIN to 999999 • Public unlock PIN to 123456 • Unlock time to 2 seconds • Security mode to No Security 9 9 9 Default PIN is 999999, if the PIN has been changed in the past then use the current PIN Type 0 to enter the menu Type 99# to perform the reset...
- Page 13 Visitor Calls When a visitor presses the doorbell the indoor monitor(s) will ring for a total of 30 seconds before returning to standby. At anytime during the ringing time a user can answer from any of the monitors by pressing the button.
- Page 14 Setting Indoor Monitor Number (Device ID) Navigate to “Mode” then from the Device ID setting you can cycle from 01 to 06. This number directly Eingestellte Apparat-ID Device ID corelates to the call transfer and intercom function when selecting a target indoor monitor. Tür 2Status Door2 status Tür1 Entsperrzeit...
- Page 15 Language Navigate to “System” then Language. You can choose from English, Hebrew, French, Spanish, Portugese, Russian, Turkish, Chinese, Polish, Arabic and German. Language English Time and Date Navigate to “System” then Time. Here you can set the date and time (in 24 Hr format). This is critical for any system recording as well Clock Switch Format YY-MM-DD...
- Page 16 Enabling/Disabling Surveillance Cameras Navigate to “Alarm” then CAM1/CAM2 you can set each individual camera to be ON/OFF. Alarm Record Video This should only be set on the first monitor in the line (DEVICE 01). Sensor Type 1 CAM1 CAM1 Ring Time Sensor Type 2 CAM2 CAM2 Ring Time...
- Page 17 Media Menu Navigate to “Media”. You can choose from within this menu the type of file you wish to view wether it be Music for audio files, photo for images or file for general navigation along with firmware upgrade files. Music Photo Note: ALWAYS disconnect the power to the indoor monitor whenever inserting or removing the...
- Page 18 Media Menu Navigate to “Record Centre”. You can choose from within this menu the type of recording you wish to view wether it be Video or Picture (Photo). Video Picture Return Video Recordings Navigate to “Record Centre” then “Video”. From within this menu you can scroll through the list of recorded videos using the you can scroll up and down through the list to the file name then press the...
- Page 19 APP Interface ① Hang up / Exit. ① ② Audio Status ③ Snapshot: During talking/monitoring mode, press the icon snapshot image(Android system smart phone ② save snapshot picture on App; IOS system smart phone save snapshot picture on mobile phone photo albums.
- Page 20 Monitor to APP Connection (Home Owners Device) ENSURE you are connected to your home Wi-Fi 2.4GHZ network If at anytime you are prompted to accept permission including location please accept 1. Ensure you are on the 2. Select Video 3. From the top right correct home then go to Surviellance then change from QR CODE...
- Page 21 Sharing with another user (Low Privileges - No unlock feature) Note that the only way for the device to be removed from the users APP is for the user to delete it themselves, i.e no Admin Managment 4. Select Add 1.
Need help?
Do you have a question about the Intelli Series and is the answer not in the manual?
Questions and answers