Advertisement
Quick Links
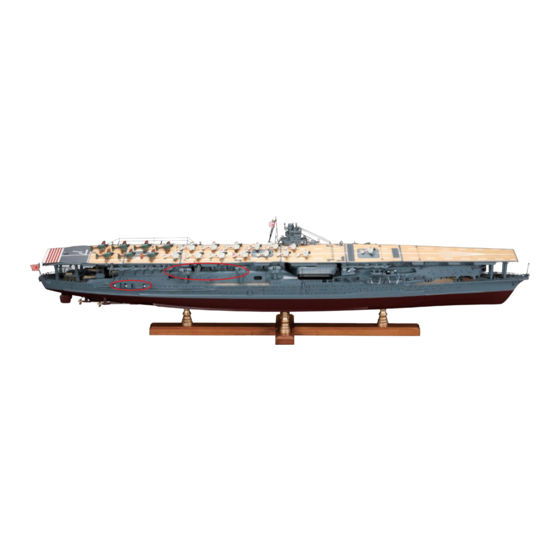
Akagi: Step by Step
The 20-cm guns and stern hangar tray
1
Making the side walls of the hangar tray: Step 1
2
Test-fitting the tray: Step 2
Pack 7
201
Tools and materials
Wet and dry paper
Metal primer
Sandpaper
Paint brush
Glue
Gray paint
Superglue
Matte black paint
Putty
White paint
Tweezers
Cardboard
Needle file
Stick
Knife
Wood primer
Double-sided tape
Pencil
Masking tape
Your parts
Hangar tray (floor)
Hangar tray (side wall) × 2
Square rod (long) × 10
Square rod (short) × 31
Door × 6
20-cm gun body × 2
20-cm gun barrel × 2
Position the two grooved walls
as shown, using the lines
highlighted by the blue arrows
as a reference, and glue the
shorter square rods into place on
the grooves, aligning the back
edges of the two.
Test-fit the hangar tray in place
as shown, between the central
and stern elevators. Align the
bow end with the stern side of
the central elevator and the aft
end with the bow side of the
stern elevator, making sure there
is a gap of 2 mm between the
outer edge and the wall of the
hangar. Make any adjustments
necessary to achieve the fit.
™
Advertisement

Related Manuals for De Agostini Model Space IJN Akagi


Summary of Contents for De Agostini Model Space IJN Akagi
- Page 1 Akagi: Step by Step Pack 7 ™ The 20-cm guns and stern hangar tray Tools and materials Wet and dry paper Metal primer Sandpaper Paint brush Glue Gray paint Superglue Matte black paint Putty White paint Tweezers Cardboard Needle file Stick Knife Wood primer...
- Page 2 Akagi: Step by Step ™ Hold the door castings, as Removing the burrs: Step 3 shown, and paint them white. Remove the tape from the gun castings and paint Remove any burrs on the uncovered areas white. the castings, likely to occur in the red circled areas, while avoiding altering the shape of...
- Page 3 Akagi: Step by Step ™ g d f e Test-fit and glue wall “d” in place. Complete this side by testing and then gluing walls “g”, “f” and “e” into place, in that order. a c Identify any gaps between the walls and fill with either spare bits Test-fit and glue into place walls “a”...
- Page 4 Akagi: Step by Step ™ As shown in the photo on Fitting the pillars: Step 18 the far left, glue two of the longer square rods together, back to back. Glue the remaining eight rods together in the same way so that you have five joined pairs.
- Page 5 Akagi: Step by Step ™ The 20-cm guns and bow hangar tray Tools and materials Wet and dry paper Masking tape Sandpaper Metal primer Glue Paint brush Superglue Gray paint Putty Matte black paint Tweezers White paint Needle file Cardboard Knife Stick Double-sided tape...
- Page 6 Akagi: Step by Step ™ Removing the burrs: Step 4 Remove any burrs on the castings, which are likely to occur in the red circled areas, while avoiding altering the shape of the blue circled area. Paint the inside of the tray wall and the uncovered area of the gun Wood primer: Step 5 body casting with white paint.
- Page 7 Akagi: Step by Step ™ Installing the 20-cm guns: Steps 10-12 Gather together the six 20-cm guns. Paint the projection on the underside of one of them white (circled). Position the hull as shown and mark the mid point between the two sides of the stern hangar flooring, as in the top photo.
- Page 8 Akagi: Step by Step ™ a c Glue the walls “a” and “c” into their places on the hangar floor, with the square rods resting on the floor and the left edges of all three aligned. Place the papers from the last step into the area behind the bow hangar and transfer the marks onto their respective sides (the starboard side and aft of the bow hangar).
- Page 9 Akagi: Step by Step ™ The bow elevator Tools and materials Wet and dry paper Metal primer Superglue Paint brush Putty Gray paint Tweezers Ruler Needle file Cardboard Knife Double-sided tape Wood primer Masking tape Your parts Gear (a) Ring Gear (b) Foundation (a) Foundation (b)
- Page 10 Akagi: Step by Step ™ Hold one of the weights Assembling the elevator components: Steps 4-24 with the two small projections facing up. Apply a small amount of glue to this area and glue into place on one of the 40 mm lengths of thread.
- Page 11 Akagi: Step by Step ™ Glue gear (b), followed by the ring, onto the end of one of the drums as shown. Once dry, file so that they are all aligned. Position the motor assembly as shown, to test-fit, joining the two gears together and placing it at a right angle to the drums.
- Page 12 Akagi: Step by Step ™ Cut the loose lengths of thread from the tops of the weights so they are no more than 3 mm above the top of the elevator walls, then tuck the ends down behind the pulleys, and glue. Holding the thread with one hand, place another pulley at the base of the elevator in between the lengths of wood.
- Page 13 Akagi: Step by Step ™ The central elevator Tools and materials Wet and dry paper Paint brush Superglue Gray paint Putty Ruler Tweezers Cardboard Needle file Knife Wood primer Double-sided tape Masking tape Metal primer Your parts Gear (a) Ring Gear (b) Foundation (a) Foundation (b)
- Page 14 Akagi: Step by Step ™ Hold one of the weights Assembling the elevator components: Steps 4-23 with the two small projections facing up. Apply a small amount of glue to this area and glue into place on of the 40 mm lengths of thread.
- Page 15 Akagi: Step by Step ™ Glue gear (b), followed by the ring, onto the end of one of the Glue the two drums in place, aligning them along the line in the drums as shown. Once dry, file the mountings so that they are center of the bow elevator, the drum with the gear and ring being all aligned.
- Page 16 Akagi: Step by Step ™ Cut the loose lengths of thread from the tops of the weights so they are no more than 3 mm above the tops of the elevator walls, then tuck the ends down behind the pulleys and glue into place. Holding each thread in position, place another pulley on top of it at the base of the elevator and between the vertical strips of wood.
- Page 17 Akagi: Step by Step ™ The stern elevator Tools and materials Wet and dry paper Masking tape Superglue Metal primer Tweezers Gray paint Needle file Cardboard Knife Stick Double-sided tape Your parts Gear (a) Ring Gear (b) Mount (a) Mount (b) Motor (a) Motor (b) Pulleys ×...
- Page 18 Akagi: Step by Step ™ Unravel the thread and lay it down so it can’t tangle. When cutting Glue these two castings together. Try to position the motor in the into lengths, hold it taut. Cut into twelve 140 mm lengths and center of the base –...
- Page 19 Akagi: Step by Step ™ As in the previous two steps, and using the inset diagram as a guide, wind a further three 140 mm lengths of thread around the drum, in the opposite direction. Glue the two drums in place, aligning them along the line in the center of the bow elevator.
- Page 20 Akagi: Step by Step ™ Cut the loose lengths of thread from the tops of the weights, so they are no more than 3 mm above the top of the elevator wall. Tuck the ends down behind the pulleys, and glue into place. Holding the thread with one hand, place another pulley at the base of the elevator in between the lengths of wood.
- Page 21 Akagi: Step by Step ™ The elevator floor and ship’s boats Tools and materials Wet and dry paper Metal primer Sandpaper Paint brush Glue Gray paint Superglue Tan paint Tweezers Tracing paper Cardboard Needle file Knife Stick Double-sided tape Wood primer Masking tape Your parts Elevator floor (a) ×...
- Page 22 Akagi: Step by Step ™ Smooth the side without the 0.5 mm steps. Spray all the metal castings with metal primer. Priming: Steps 5-7 Fitting the elevator supports: Steps 8-9 Hold the floor assembly in the bow elevator and mark the sides of the outer lengths of wood on it, as shown.
- Page 23 Akagi: Step by Step ™ Fix your stencil to some Painting the boats and elevator floor: Steps 10-18 double-sided tape and cut around it. To avoid peeling off any paint when you take off the stencil, reduce the tack of the adhesive by sticking the tape to your palm before you stick it to the boat.
- Page 24 Akagi: Step by Step ™ If any of the spray paint leaked past the tracing paper, retouch those parts using a small brush. In the same way, spray the elevator floor gray. Adding the oars: Step 19 Remove the masking tape from the floor of the launch and paint the bare metal with tan paint.
- Page 25 Akagi: Step by Step ™ The central elevator floor, jig and “Val” dive bomber Tools and materials Wet and dry paper Masking tape Sandpaper Pencil Glue Metal primer Superglue Paint brush Putty Gray paint Tweezers Red paint (hull red) Needle file Ruler Knife Cardboard...
- Page 26 Akagi: Step by Step ™ Fitting the caps: Step 5 Fitting the elevator floor supports: Step 9 Hold the floor assembly in the central elevator and mark the sides of the outer lengths of wood on it, as shown. Glue the supports in place, aligning Position the hull upside down and, one at a time, place a propeller the inside edges of the projections with the marks.
- Page 27 Akagi: Step by Step ™ Position the hull, as Drawing the waterline: Steps 13-14 shown, on a flat surface. Turn the jig assembly on its side and draw a line around the hull. Apply masking tape to the hull, aligning the bottom edge of the tape with the mark made in 1 mm...
- Page 28 Akagi: Step by Step ™ Arrange the parts as they are shown in the photograph. You will notice that the molding sprues are labeled “L” and “R” (circled) – left and right. To remove them, score along the areas marked Fix the wingtips to the rest of the wing one at a time, to ensure here with red lines, then snap each one out –...
- Page 29 Akagi: Step by Step ™ The stern elevator floor and Zero fighter plane Tools and materials Wet and dry paper Metal primer Sandpaper Paint brush Glue Gray paint Superglue Ruler Tweezers Cardboard Needle file Stick Knife Double-sided tape Hand drill Masking tape 1.5 mm drill bit Pencil...
- Page 30 Akagi: Step by Step ™ Painting: Step 8 Cover the bottom of the hull with paper, below the line of the masking tape. Spray the elevator floor assembly with gray paint. Fitting the hangar plates: Steps 9-14 Spray the exposed part of the hull with gray paint, applying a few coats for evenness, but letting the paint dry between each coating.
- Page 31 Akagi: Step by Step ™ Hold hangar plate (a) in place and mark the edge of the hangar on Repeat Steps 10-12 for hangar plate (b), located on the starboard the underside. side of the central elevator. Cut along the line marked in the previous step and then hold Repeat Steps 10-12 for hangar plate (c), located on the starboard hangar plate (a) in place to test-fit.
- Page 32 Akagi: Step by Step ™ Mark this shaped area on the plan onto the hull at the bow with a knife, lightly scoring along the points marked by the dotted red lines in the inset. Then remove the plan. Use a pin to pierce the hull at all the dots on the plan. Try to keep the pin at a right angle to the hull when piercing (inset).
Need help?
Do you have a question about the Model Space IJN Akagi and is the answer not in the manual?
Questions and answers