Advertisement
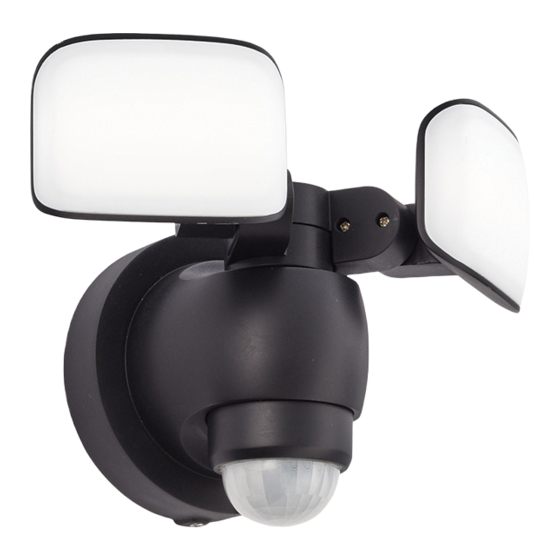
PIR Adjustment
• The unit must be installed in a vertical position, and
fitted between 1.8m and 2.5m above the ground.
• The PIR sensor can be adjusted, allowing the
detection distance to be altered to suit the location.
The detection angle is set at 180 degrees. The
duration that the lamp stays on can be altered from
Adjustable up to 10 metres
Detection range can be adjusted
by turning 'SENS' screw
Fitting/replacing bulbs
• This system contains non-replaceable parts and cannot be serviced. If damage occurs the part should
be scrapped.
We recommend cleaning with a soft dry cloth.
Do not use solvents or abrasive cleaners as these could damage the finish.
Recycling advice
Waste electrical products should not be disposed of with household waste. Please recycle where facilities
exist. Check with your Local Authority or retailer for recycling advice.
Safety information
For your safety, always switch off the supply before cleaning.
www.saxbylighting.com
10±5 seconds to 60±10 seconds. The detection
distance "SENS" can be adjusted up to 10m Use a
small screwdriver to adjust the 'TIME' and 'SENS'
screws. When adjusting the sensitivity (detection
distance) in daylight it will be necessary to cover the
sensor to simulate night time.
Base of product
Duration the bulb stays on is
adjustable by turning 'TIME' screw
The sensor trigger point is adjust-
able by turning the 'LUX' screw.
Iss.1 21062018
Saxby Lighting Ltd. BH23 3PE
Instruction leaflet
Sentinel Battery PIR Wall Light
75270
Advertisement
Table of Contents

Related Manuals for Saxby Lighting 75270


Summary of Contents for Saxby Lighting 75270
- Page 1 The detection angle is set at 180 degrees. The sensor to simulate night time. duration that the lamp stays on can be altered from 75270 Adjustable up to 10 metres Base of product Duration the bulb stays on is adjustable by turning 'TIME' screw...
- Page 2 Installation Thank you for purchasing this light fitting. Please read the instructions carefully before use to ensure safe and satisfactory operation of this product. Please retain these instructions for future reference. • Decide on the optimum location for the product. Ensure the wall is capable of holding the weight of the product. • Place the product in an upright position. • Detach the wall back by removing the screw from the bottom of the product. Set screw aside for refitting later (Fig. 1). Warning •. Push button on top of product and remove wall back (Fig. 1). This unit cannot be dimmed. Battery Care:- •. Using the wall back as a template, mark and drill the position of the fixing holes. This product contains non-replaceable parts and - Do not recharge non-rechargeable batteries. • Fix the wall back to the wall using the screws and wall plugs. Take care to avoid damaging any concealed cannot be serviced. If damage occurs the product wiring and pipes. The correct fixings should be used for brick or cavity walls. - Do not mix old and new batteries or batteries of should be scrapped. different types/brands. • Remove the battery case cover and fit the batteries. Ensure the "Battery Care" warnings on the previous page Waste electrical products should not be disposed of are followed (Fig. 2). - Do not use rechargeable batteries. Always remove with household waste. Please recycle where facilities exhausted batteries from the product. • Refit the battery case cover and then Refit the screws set aside earlier secure in place. exist. Check with your local authority or retailer for - Always insert batteries with the correct polarity. recycling advice. • Switch on the product using the push switch on the front of the product and adjust the PIR sensor as detailed overleaf. Please note the sensor rotates for easy access to the controls. Line the white dots up at the front of - Do not short the supply terminals.
Need help?
Do you have a question about the 75270 and is the answer not in the manual?
Questions and answers