
Related Manuals for KaVo INTRA LUX head 66 LU


Summary of Contents for KaVo INTRA LUX head 66 LU
- Page 1 Instructions for use INTRA LUX head 66 LU - REF 1.004.4587 | INTRA LUX head 68 LU - REF 1.003.7191...
- Page 2 Distributed by: Manufacturer: KaVo Dental GmbH Kaltenbach & Voigt GmbH Bismarckring 39 Bismarckring 39 D-88400 Biberach D-88400 Biberach Tel. +49 7351 56-0 www.kavo.com Fax +49 7351 56-1488...
-
Page 3: Table Of Contents
Contents Contents User instructions ..............6 1.1 Warranty terms and conditions ........9 Safety ................12 2.1 Description of safety instructions ........12 2.2 Purpose – Intended use ..........17 2.3 Safety instructions ............19 Product description ............. 25 3.1 Technical Data 66 LU ........... 27... - Page 4 Contents 3.2 Technical Data 68 LU ........... 28 3.3 Transportation and storage conditions ......29 First use ................31 Operation ................. 32 5.1 Attaching the medical device ......... 32 5.2 Removing the medical device ........34 5.3 Inserting contra-angle handpiece drill bits or endodon‐ tic files ..............
- Page 5 Contents Preparation methods according to ISO 17664 ......45 6.1 Preparations at the site of use ........45 6.2 Cleaning ..............47 6.2.1 Cleaning: Manual cleaning - external ....48 6.2.2 Cleaning: Automated external cleaning ....50 6.2.3 Cleaning: Manual cleaning of the inside ....51 6.2.4 Cleaning: Automated internal cleaning ....
- Page 6 6.4 Drying ............... 60 6.5 Care products and systems - Servicing ......62 6.5.1 Care products and systems - Servicing: Care with KaVo Spray ..........65 6.5.2 Care products and systems - Servicing: Care of the KaVo SPRAYrotor ........68...
- Page 7 Contents 6.5.3 Care products and systems - Servicing: Care with KaVo QUATTROcare ......... 70 6.6 Packaging ..............73 6.7 Sterilisation ..............74 6.8 Storage ..............77 Tools ................79...
-
Page 8: User Instructions
User instructions 1 User instructions Dear User Congratulations on purchasing this KaVo quality product. By following the instructions below you will be able to work smoothly, economically and safely. © Copyright by KaVo Dental GmbH... - Page 9 User instructions Symbols See the Safety/Warning Symbols chapter Important information for users and technicians Disinfectable by heat Steriliseable in steam up to 135°C (275°F)
- Page 10 User instructions CE mark (European Community). A product with this mark meets the requirements of the applicable EC directive. Call to Action Target group This document is intended for dentists and their assistants. The section on starting up is also intended for service technicians.
-
Page 11: Warranty Terms And Conditions
12 months from data of invoice, subject to the following conditions: In case of justified complaints, KaVo will honour its warranty with a free replacement or repair. Other claims of any nature whatsoever, in particular with respect to compensation, are excluded. - Page 12 User instructions KaVo cannot be held liable for defects and their consequences that have arisen or may arise from to natural wear, improper handling, cleaning or maintenance, non-compliance with operating, maintenance or connection instructions, calcination or corrosion, contaminated air or water supplies or chemical or electrical factors deemed abnormal or impermissible in ac‐...
- Page 13 User instructions Service warranty claims will only be accepted if the product is submitted along with proof of purchase in the form of a copy of the invoice/delivery note.
-
Page 14: Safety
Safety 2 Safety 2.1 Description of safety instructions Warning symbol... - Page 15 Safety Structure DANGER The introduction describes the type and source of the danger. This section describes the potential consequen‐ ces of non-observance. ▶ The optional step covers measures necessary for avoiding hazards.
- Page 16 Safety Description of danger levels The safety instructions listed here, together with the three levels of danger will help avert property damage and injury. CAUTION CAUTION indicates a hazardous situation that can cause damage to property, or mild or moderate phys‐ ical harm.
- Page 17 Safety WARNING WARNING indicates a hazardous situation that can cause death or serious injury.
- Page 18 Safety DANGER DANGER indicates the maximum hazard level. indicates a directly hazardous situation that can cause death or serious injury.
-
Page 19: Purpose - Intended Use
Safety 2.2 Purpose – Intended use This medical device is ▪ Only intended for dental treatment. Any other type of use or alteration to the product is impermissible and can be hazardous. The medical device is intended for the following uses: Endodontics and cavity preparation. - Page 20 Safety According to these regulations, this medical device may only be used for the described application by a knowledgeable user. The following must be observed: ▪ the applicable health and safety regulations ▪ the applicable accident prevention regulations ▪ these instructions for use According to these regulations, the user is required to: ▪...
-
Page 21: Safety Instructions
Safety 2.3 Safety instructions WARNING Hazards for the care provider and the patient. In the case of damage, irregular running noise, excessive vibration, un-typical warming or when the drill bit or bur cannot be held. ▶ Do not use further and notify Service. - Page 22 Safety CAUTION Failure to put instruments away properly can re‐ sult in hazards. Injury and infection caused by chucked contra- angle handpiece drill bits or files. Damage can be caused to the chucking system if the instrument is dropped. ▶ After treatment, place the instrument properly in the cradle without the contra-angle handpiece drill bit or file.
- Page 23 Safety CAUTION Burning hazard from hot instrument head and instrument cover. If the instrument overheats, burns may arise in the oral area. ▶ Never touch soft tissue with the instrument head.
- Page 24 Safety CAUTION Premature wear and malfunctioning from im‐ proper storage during long periods of nonuse. Reduced product life. ▶ The medical device should be cleaned, serviced and stored in a dry location, according to instruc‐ tions, before long periods of nonuse.
- Page 25 ▪ Technicians at KaVo branches throughout the world ▪ Technicians specially trained by KaVo To ensure proper function, the medical device must be set up according to the methods described in the KaVo instructions for use, and the care prod‐...
- Page 26 Safety ucts and care systems listed there must be used. KaVo recommends spec‐ ifying a service interval at the dental office for a licensed shop to clean, service and check the functioning of the medical device. This service in‐ terval should take into account the frequency of use.
-
Page 27: Product Description
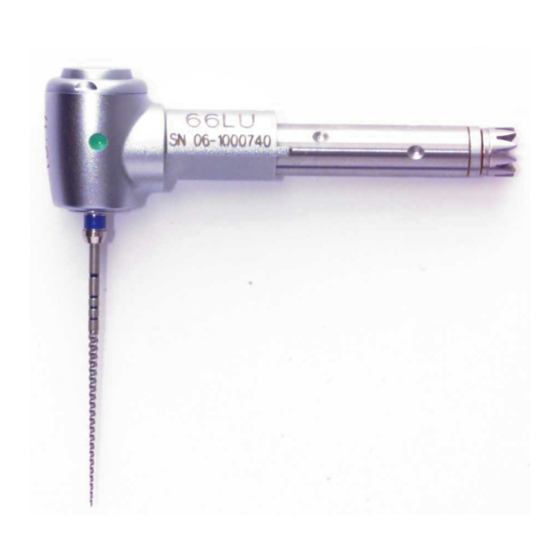
Product description 3 Product description INTRA LUX reducing head 66 LU ( Mat. no. 1.004.4587... - Page 28 Product description INTRA LUX Head 68 LU ( Mat. no. 1.003.7191...
-
Page 29: Technical Data 66 Lu
3.1 Technical Data 66 LU Drive speed max. 20,000 rpm Identification green Transmission 3 : 1 With press-button chuck. Contra-angle handpiece drill bits and root canal instruments can be used. The head can be inserted in all KaVo reducing shanks. -
Page 30: Technical Data 68 Lu
Product description 3.2 Technical Data 68 LU Drive speed max. 40,000 rpm identification blue Transmission 1 : 1 With press-button chuck. Contra-angle handpiece bits can be used. The head can be inserted in all KaVo reducing shanks. -
Page 31: Transportation And Storage Conditions
Product description 3.3 Transportation and storage conditions CAUTION Starting up the medical device can be hazard‐ ous after it has been stored in an excessively cold location. The medical device can malfunction. ▶ Products that are very cold must be warmed to 20 °C to 25 °C (68 °F to 77 °F) before use. - Page 32 Product description Temperature: -20°C to +70°C (-4°F to +158°F) Relative humidity: non-condensing 5% to 95% Air pressure: 700 hPa to 1060 hPa (10 psi to 15 psi) Protect from moisture...
-
Page 33: First Use
First use 4 First use WARNING Hazard from non-sterile products. Infection danger to the care provider and pa‐ tient. ▶ Before first use and after each use, sterilise the medical device. -
Page 34: Operation
Operation 5 Operation 5.1 Attaching the medical device CAUTION Loosening of the medical device during treat‐ ment. If the head is not properly locked in place, it can fall out during treatment. - Page 35 Operation ▶ Do not mount or remove the head while rotating. Before each treatment, check that the head is firmly seated and that the clamping ring is tight. ▶ Rotate the clamping ring in the direction of the arrow to the stop. ▶...
-
Page 36: Removing The Medical Device
Operation ▶ Rotate the clamping ring in the opposite direction and tighten it. 5.2 Removing the medical device ▶ Hold the clamping ring tight, turn it all the way in the direction of the arrow, and pull the medical device off while twisting slightly. -
Page 37: Inserting Contra-Angle Handpiece Drill Bits Or Endodontic Files
Operation 5.3 Inserting contra-angle handpiece drill bits or endodontic files Note Only use contra-angle drill bits or Endo files that corre‐ spond to ISO 1797-1 type 1 and ISO 3630-1: - shaft diameter: 2.334 to 2.35 mm Contra-angle drill bit for INTRA LUX reducing head 66 - overall length: max. - Page 38 Operation - cutting diameter max. 5 mm Contra-angle drill bit for INTRA LUX head 68 U: - overall length: max. 22 mm Endo-file for INTRA LUX reducing head 66 LU: - overall length: max. 45 mm - shaft clamping length: min. 12 mm...
- Page 39 Operation WARNING Use of non-approved contra-angle handpiece drill bits or files. Injury to the patient or damage to the medical device. ▶ Only use contra-angle handpiece drill bits or files that match the indicated data.
- Page 40 Operation CAUTION Injury from using worn contra-angle handpiece drill bits or files. Contra-angle handpiece drill bits or files can fall out during treatment and injure the patient. ▶ Never use contra-angle handpiece drill bits or files with worn shafts.
- Page 41 Operation CAUTION Danger of injury from contra-angle handpiece drill bits or files. Infections or cuts. ▶ Wear gloves or finger protection.
- Page 42 Operation CAUTION Hazard from defective chucking system. The contra-angle handpiece drill bit or file can fall out and cause injury. ▶ Pull on the contra-angle handpiece drill bit or file to check if the chucking system is okay and the contra-angle handpiece drill bit or file is securely held.
- Page 43 Operation ▶ Insert the contra-angle handpiece drill bit or file into the segment of the head drive by twisting the tool slightly, and push to the stop. ▶ Check that the tool is seated by pulling on it.
-
Page 44: Removing Contra-Angle Handpiece Drill Bits Or Files
Operation 5.4 Removing contra-angle handpiece drill bits or files WARNING Hazard from rotating drill bit or file. Lacerations and damage to the chucking sys‐ tem. ▶ Do not touch rotating contra-angle drill bit or file. ▶ Do not press the pushbutton while the contra-an‐ gle drill bit or file is rotating. - Page 45 Operation ▶ Remove the contra-angle drill bit or file from the contra-angle handpiece after treatment to avoid injury and infection during storage.
- Page 46 Operation ▶ After the contra-angle handpiece drill bit or file has stopped rotating, forcefully press the pushbutton with your thumb and simultaneously remove the contra-angle handpiece drill bit or file.
-
Page 47: Preparation Methods According To Iso 17664
Preparation methods according to ISO 17664 6 Preparation methods according to ISO 17664 6.1 Preparations at the site of use WARNING Hazard from non-sterile products. There is a risk of infection from contaminated medical devices. ▶ Observe suitable personal protective measures. - Page 48 Preparation methods according to ISO 17664 ▶ Remove residual cement, composite or blood at the site of use. ▶ Dry the medical device before transporting it to be prepared. ▶ Do not place it in a solution or the like. ▶...
-
Page 49: Cleaning
Preparation methods according to ISO 17664 6.2 Cleaning CAUTION Malfunctions from cleaning in an ultrasonic unit. Defects in the product. ▶ Only clean manually or in a thermodisinfector. -
Page 50: Cleaning: Manual Cleaning - External
Preparation methods according to ISO 17664 6.2.1 Cleaning: Manual cleaning - external Required accessories: ▪ Tap water 30 °C ± 5 °C (86 °F ± 10 °F) ▪ Brush such as a medium-hard toothbrush... - Page 51 Preparation methods according to ISO 17664 ▶ Brush off under flowing tap water.
-
Page 52: Cleaning: Automated External Cleaning
"neodisher mediclean", the neutraliser "neodisher Z" and rinse "neodish‐ ® ® mielclear" and only refers to the material compatibility with KaVo prod‐ ® ucts.) ▶ The program settings and cleansers and disinfectants that must be used can be found in the instructions for use of the thermodisinfector. -
Page 53: Cleaning: Manual Cleaning Of The Inside
Can only be done with KaVo CLEANspray or KaVo DRYspray. ▶ Cover the medical device with the KaVo CLEANpac bag, and place it on the corresponding care adapter. Press the spray button three times for 2 seconds each time. Remove the medical device from the... - Page 54 Preparation methods according to ISO 17664 ▶ Afterwards, rinse for 3-5 seconds with KaVo DRYspray. See also: KaVo CLEANspray / KaVo DRYspray Instructions for Use...
- Page 55 Preparation methods according to ISO 17664 Note KaVo CLEANspray and KaVo DRYspray for manual in‐ terior cleaning are only available in the following coun‐ tries: Germany, Austria, Switzerland, Italy, Spain, Portugal, France, Luxembourg, Belgium, Netherlands, United Kingdom, Denmark, Sweden, Finland and Norway.
-
Page 56: Cleaning: Automated Internal Cleaning
"neodisher mediclean", the neutraliser "neodisher Z" and rinse "neodish‐ ® ® mielclear" and only refers to the material compatibility with KaVo prod‐ ® ucts.) ▶ The program settings and cleansers and disinfectants that must be used can be found in the instructions for use of the thermodisinfector. -
Page 57: Disinfection
Preparation methods according to ISO 17664 ▶ Directly after automated cleaning, treat the medical device with the care products and systems provided by KaVo. 6.3 Disinfection CAUTION Malfunctioning from using a disinfectant bath or disinfectant containing chlorine. Defects in the product. -
Page 58: Disinfection: Manual Disinfection - External
Preparation methods according to ISO 17664 6.3.1 Disinfection: Manual disinfection - external KaVo recommends the following products based on material compatibility. The microbiological efficacy must be ensured by the disinfectant manufac‐ turer. - Page 59 Preparation methods according to ISO 17664 ▪ Microcide AF by Schülke&Mayr (liquid or cloths) ▪ FD 322 from Dürr ▪ CaviCide from Metrex Tools required: ▪ Cloths for wiping off the medical device. ▶ Spray the disinfectant on a cloth, then thoroughly wipe down the medical device and leave the disinfectant to soak in according to the instructions of the disinfectant manufacturer.
-
Page 60: Disinfection: Manual Disinfection - Internal
Preparation methods according to ISO 17664 Note Observe the instructions for use for the disinfectant. 6.3.2 Disinfection: Manual disinfection - internal For the effective re-preparation, the inside of the device must be cleaned automatically in a cleaning and disinfection unit in accordance with ISO 15883-1. -
Page 61: Disinfection: Automatic External And Internaldisinfection
"neodisher mediclean", the neutraliser "neodisher Z" and rinse "neodish‐ ® ® mielclear" and only refers to the material compatibility with KaVo prod‐ ® ucts.) ▶ The program settings and cleansers and disinfectants that must be used can be found in the instructions for use of the thermodisinfector. -
Page 62: Drying
Preparation methods according to ISO 17664 ▶ Directly after automated cleaning, treat the medical device with the care products and systems provided by KaVo. 6.4 Drying Manual drying ▶ Blow off the outside and inside with compressed air until water drops... - Page 63 Preparation methods according to ISO 17664 Machine drying The drying procedure is normally part of the cleaning program of the ther‐ modisinfector. Note Please observe the instructions for use of the thermo‐ disinfector.
-
Page 64: Care Products And Systems - Servicing
Preparation methods according to ISO 17664 6.5 Care products and systems - Servicing CAUTION Sharp contra-angle handpiece drill bits or files in the medical device. Injury hazard from sharp and/or pointed contra- angle handpiece drill bits or files. ▶ Removing contra-angle handpiece drill bits or files. - Page 65 Preparation methods according to ISO 17664 CAUTION Premature wear and malfunctions from improp‐ er servicing and care. Reduced product life. ▶ Perform proper care regularly!
- Page 66 Preparation methods according to ISO 17664 Note KaVo only guarantees that its products will function properly when the care products used are those listed as accessories, as they were tested for proper use on our products.
-
Page 67: Care Products And Systems - Servicing: Care With Kavo Spray
Preparation methods according to ISO 17664 6.5.1 Care products and systems - Servicing: Care with KaVo Spray KaVo recommends servicing the project after each time it used, i.e. after each automatic cleaning and before each sterilisation. ▶ Remove head from shank. - Page 68 Preparation methods according to ISO 17664 ▶ Remove the contra-angle drill bit or file ▶ Cover the product with the CLEANpac bag. ▶ Place the product on the cannula and press the spray button for one second. Chuck care...
- Page 69 Preparation methods according to ISO 17664 KaVo recommends cleaning and servicing the chuck system once a week. ▶ Remove the drill bit or file, and spray into the opening with the tip of the spray nipple. Note Carry out servicing according to instructions in the sec‐...
-
Page 70: Care Products And Systems - Servicing: Care Of The Kavo Sprayrotor
Preparation methods according to ISO 17664 6.5.2 Care products and systems - Servicing: Care of the KaVo SPRAYrotor KaVo recommends servicing the project after each time it used, i.e. after each automatic cleaning and before each sterilisation. ▶ Remove head from shank. - Page 71 Preparation methods according to ISO 17664 ▶ Place the product on the appropriate coupling of the KaVo SPRAYrotor and cover it with a CLEANpac bag. ▶ Servicing the product. See also: Instructions for use KaVo SPRAYrotor...
-
Page 72: Care Products And Systems - Servicing: Care With Kavo Quattrocare
6.5.3 Care products and systems - Servicing: Care with KaVo QUATTROcare Cleaning and care unit with expansion pressure for effective cleaning and care. KaVo recommends servicing the project after each time it used, i.e. after each automatic cleaning and before each sterilisation. - Page 73 Preparation methods according to ISO 17664 ▶ Remove head from shank. ▶ Remove the contra-angle drill bit or file ▶ Servicing the product. Chuck care KaVo recommends cleaning and servicing the chuck system once a week. See also: Instructions for use KaVo QUATTROcare...
- Page 74 Preparation methods according to ISO 17664 ▶ Remove the drill bit or bur, place the spray nipple tip in the opening and spray. ▶ Subsequently treat with the care products and systems specified. See also: Care with KaVo QUATTROcare...
-
Page 75: Packaging
The quality and use of the sterilised product packaging must satisfy applicable standards and be suitable for the sterilisation procedure. ▶ Individually weld the medical device in the sterilised item packaging (such as KaVo STERIclave bags Mat. no. 0.411.9912)! -
Page 76: Sterilisation
Preparation methods according to ISO 17664 6.7 Sterilisation Sterilisation in a steam steriliser (Autoclave) EN 13060/ISO 17665-1 CAUTION Premature wear and malfunctions from improp‐ er servicing and care. Reduced product life. - Page 77 Preparation methods according to ISO 17664 ▶ Before each sterilisation cycle, service the medi‐ cal device with KaVo care products. CAUTION Contact corrosion due to moisture. Damage to product. ▶ Immediately remove the product from the steam steriliser after the sterilisation cycle!
- Page 78 Preparation methods according to ISO 17664 The medical device is resistant to temperatures up to 138℃ (280.4°F). KaVo recommends, for example - STERIclave B 2200/ 2200P from KaVo - Citomat/ K-series from Getinge Depending on the device, select a suitable process from the following ster‐...
-
Page 79: Storage
Preparation methods according to ISO 17664 Autoclave with a triple pre-vacuum for least four minutes at 134°C ± 1°C (273°F ± 1.8°F) Autoclave with gravitation process for least ten minutes at 134°C ± 1°C (273°F ± 1.8°F) Autoclave with gravitation process for at least 60 minutes at 121°C ± 1°C (250°F ±... - Page 80 Preparation methods according to ISO 17664 Note Observe the expiration date of the sterilised item.
-
Page 81: Tools
Tools 7 Tools Obtainable from dental and medical suppliers Material summary Mat. no, Instrument stand 2151 0.411.9501 Cleanpac 10 units 0.411.9691 Cellulose pad 100 units 0.411.9862 Material summary Mat. no. KaVo CLEANspray 1.007.0579 KaVo DRYspray 1.007.0580... - Page 82 Tools Material summary Mat. no. KaVo Spray 2112 A 0.411.9640 ROTAspray 2142 A 0.411.7520 QUATTROcare plus Spray 2108 P 1.005.4525...
Need help?
Do you have a question about the INTRA LUX head 66 LU and is the answer not in the manual?
Questions and answers