Table of Contents
Advertisement
Advertisement
Table of Contents

Related Manuals for KaVo DIAGNOdent 2190


Summary of Contents for KaVo DIAGNOdent 2190
- Page 1 Instructions for use DIAGNOdent pen 2190 Always be on the safe side.
- Page 2 Distributed by: Manufacturer: KaVo Dental GmbH Kaltenbach & Voigt GmbH Bismarckring 39 Bismarckring 39 D-88400 Biberach D-88400 Biberach Phone +49 (0) 7351 56-0 www.kavo.com Fax +49 (0) 7351 56-1488...
-
Page 3: Table Of Contents
Instructions for use DIAGNOdent pen 2190 Table of contents Table of contents 1 User instructions............................... 5 1.1 User guide..............................5 1.1.1 Abbreviations..........................5 1.1.2 Symbols............................5 1.1.3 Target group..........................6 1.2 Service..............................6 1.3 Warranty terms and conditions......................... 6 1.4 Transportation and storage........................6 1.4.1 Currently valid packaging regulations.................. - Page 4 Instructions for use DIAGNOdent pen 2190 Table of contents 5.5.2 Procedure..........................26 5.5.3 Individually adjust the DIAGNOdent pen 2190 to the patient............ 26 5.5.4 Scanning the tooth surface......................28 5.5.5 Detect concretions and calculus with the paro probe (optional accessory)....... 30 6 Maintenance..............................
-
Page 5: User Instructions
Instructions for use DIAGNOdent pen 2190 1 User instructions | 1.1 User guide 1 User instructions 1.1 User guide Requirement Read these instructions prior to first use to avoid misuse and prevent damage. 1.1.1 Abbreviations Abbre‐ Explanation viation Instructions for use Care instructions Assembly instructions Technician's instructions... -
Page 6: Target Group
12 months from the date of purchase as confirmed by the salesperson. In case of justified complaints, KaVo will honour its warranty with a free replacement or repair. -
Page 7: Damage In Transit
Dispose of and recycle the sales packaging appropriately in accordance with current packaging regulations, employing waste management or recycling companies. Com‐ ply with the comprehensive return system. KaVo has had its sales packaging licensed for this purpose. Please comply with the regional public waste-disposal system. -
Page 8: Information On The Packaging: Storage And Transportation
Instructions for use DIAGNOdent pen 2190 1 User instructions | 1.4 Transportation and storage Note If the recipient fails to comply with any of the above-mentioned obligations, the damage will be considered to have arisen after delivery (in accordance with CMR law, Chapter 5, Art. 30). 1.4.3 Information on the packaging: Storage and transportation Note Please keep the packaging in case you need to return the product for servicing or... -
Page 9: Safety
Instructions for use DIAGNOdent pen 2190 2 Safety | 2.1 Description of safety instructions 2 Safety 2.1 Description of safety instructions 2.1.1 Warning symbol Warning symbol 2.1.2 Structure DANGER The introduction describes the type and source of the hazard. This section describes potential consequences of non-compliance. ▶... -
Page 10: Protective Equipment
Instructions for use DIAGNOdent pen 2190 2 Safety | 2.2 Safety instructions CAUTION Danger of injury from electric current Electrical shock ▶ Do not use power supplies. ▶ Only supply the product with the specified voltage. CAUTION Hazard from improper use. Injury and damage. -
Page 11: Electromagnetic Compatibility
• Portable and mobile high-frequency communications devices can influence medi‐ cal electronics. Note KaVo cannot guarantee the compliance of accessories, cables, and other compo‐ nents not supplied by KaVo with the EMC requirements of IEC 60601-1-2 (DIN EN 60601-1-2). See also: 2 9 Information about electromagnetic compatibility, Page 39 2.4 Disposal... - Page 12 Instructions for use DIAGNOdent pen 2190 2 Safety | 2.5 Disposal of electronic and electrical devices 3. A unit that is not permanently installed will be picked up at the office. A permanently installed unit will be picked up at the curb at your address on the agreed date.
-
Page 13: Product Description
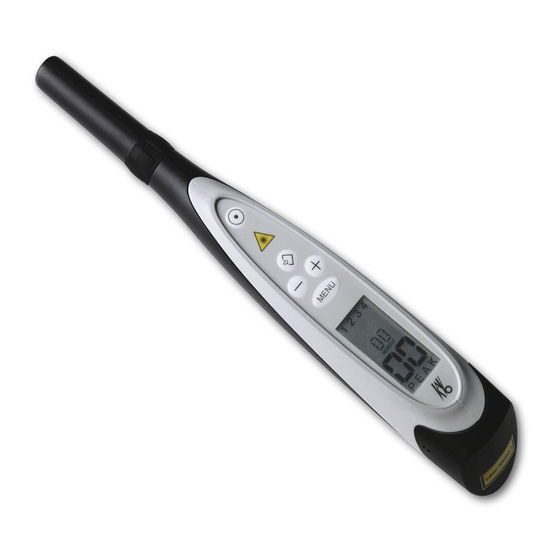
Instructions for use DIAGNOdent pen 2190 3 Product description | 3.1 DIAGNOdent pen 2190 3 Product description 3.1 DIAGNOdent pen 2190 4 5 6 7 ① Ring switch ② The start button ③ Warning sign: danger, laser ④ Save button ⑤... -
Page 14: Purpose - Proper Use
KaVo product for the intended pur‐ pose are to be applied and complied with. This KaVo product is intended only for use in the field of dentistry. The product may not be used for a purpose for which it was not intended. -
Page 15: Product-Specific
93/42/EEC and meets the requirements of 2004/108/EC, etc. in regard to electromag‐ netic compatibility. The following persons are authorised to repair and service the KaVo product: ▪ Technicians of KaVo branch offices after appropriate product training. ▪ Specifically KaVo-trained technicians of KaVo franchised dealers. -
Page 16: Rating Plate
Instructions for use DIAGNOdent pen 2190 3 Product description | 3.3 Rating plate 3.3 Rating plate CE mark CSA mark Classification (applied part type B) For disposal information, see Intended use Follow the instructions for use, icon is attached on the side of the unit Manufacturer Battery name Month manufactured... -
Page 17: Technical Specifications
Instructions for use DIAGNOdent pen 2190 3 Product description | 3.4 Technical Specifications 3.4 Technical Specifications Length approximately 220 mm Diameter approximately 32 mm Weight 110 g Voltage 1.5 V 1 cell, mignon LR6 alkaline Light output of the laser diode <1 mW Wavelength of the laser diode 655 nm... -
Page 18: First Use
Instructions for use DIAGNOdent pen 2190 4 First use | 4.1 Insert the battery 4 First use CAUTION Non-sterile gripping sleeve and probes. Health damage. ▶ Sterilise the probes and gripping sleeves before first startup since they are deliv‐ ered in non-sterile condition by the manufacturer! See also: 2 6.1 Reprocessing methods according to DIN EN ISO 17664, Page 33 4.1 Insert the battery... - Page 19 Instructions for use DIAGNOdent pen 2190 4 First use | 4.1 Insert the battery ▶ Insert conventional mignon (LR6) alkaline cell matching the polarity ③. ▶ Shove on the grip sleeve 19 / 44...
-
Page 20: Operation
Instructions for use DIAGNOdent pen 2190 5 Operation | 5.1 Mode of operation of the DIAGNOdent pen 2190 5 Operation 5.1 Mode of operation of the DIAGNOdent pen 2190 Changed tooth substance emits fluorescent radiation when exposed to light of a cer‐ tain wavelength. -
Page 21: Turning On/Off
Instructions for use DIAGNOdent pen 2190 5 Operation | 5.3 Turning on/off 5.3 Turning on/off 5.3.1 Start up ▶ Hold the start button ① for approximately 1 second until the signal sounds and the display appears. 5.3.2 Switch off Note After 90 seconds of non-use, the DIAGNOdent pen 2190 automatically turns off. -
Page 22: Checking/Setting The Reference Value
Instructions for use DIAGNOdent pen 2190 5 Operation | 5.4 Menus ð The product returns to display mode. If the save button is not pressed for 3 seconds, the set value is automatically saved. The DIAGNOdent pen 2190 returns to display mode. 5.4.2 Checking/setting the reference value The reference value is engraved on the surface of the supplied reference (such as C 58). - Page 23 Instructions for use DIAGNOdent pen 2190 5 Operation | 5.4 Menus Note The probes must be checked for damage before and after each use. They may only be used with the DIAGNOdent pen 2190 and only for the probe memory for which they were calibrated.
-
Page 24: Setting The Volume
Instructions for use DIAGNOdent pen 2190 5 Operation | 5.4 Menus 5.4.4 Setting the volume The volume can be set to three different levels (off, 1, 2). ▶ Press the menu key three times. ð A volume symbol appears. ▶ Set the desired value with the plus or minus button. Possible settings: off, 1, 2 ▶... -
Page 25: Determine Findings
In the table, we refer to the publication: Prof. Lussi et al., Quin‐ tessenz 10/2003. This publication can also be obtained as a special print from KaVo. These values are based on the fact that a zero value was first measured on at a healthy coronal location. -
Page 26: Procedure
Medium High 5.5.2 Procedure The patient's teeth must be clean before using the DIAGNOdent pen 2190. KaVo rec‐ ommends the following procedure: 1. When the patient's teeth are being cleaned by a dentist or dental assistant, Scan the teeth after cleaning but before fluoridation. - Page 27 Instructions for use DIAGNOdent pen 2190 5 Operation | 5.5 Determine findings ▶ Apply the prox probe to a healthy site of a tooth. The red dot on the probe must point toward the tooth. ▶ Turn on the ring switch ③ until you hear two beeps and the display ① appears. ð...
-
Page 28: Scanning The Tooth Surface
Instructions for use DIAGNOdent pen 2190 5 Operation | 5.5 Determine findings 5.5.4 Scanning the tooth surface Two different probes are available for detecting caries: Fissure probe F (blue) for scanning smooth surfaces and fissures. Prox probe A (black) for scanning the proximal area. Prox probe A can be rotated and deflects the laser beam through a prism. - Page 29 Instructions for use DIAGNOdent pen 2190 5 Operation | 5.5 Determine findings ð The product is switched on, and the display shows ±0. ▶ Calibrate if necessary. ▶ Individually adjust the DIAGNOdent pen 2190 to the patient. ▶ Guide the DIAGNOdent pen 2190 over the tooth surface without applying pres‐ sure and pivot it in all directions to more precisely identify the max.
-
Page 30: Detect Concretions And Calculus With The Paro Probe (Optional Accessory)
If the patient makes sudden moves, the applied probe may be stressed and break. KaVo recommends scanning by quadrant first mesial and then distal, or vice versa. Interpretation of the obtained values in the proximal area Not all of the proximal area can be reached, even when the prox probe is optimised. - Page 31 Instructions for use DIAGNOdent pen 2190 5 Operation | 5.5 Determine findings Before using the Period probe, the dentist should: 1. read the instructions for use. 2. properly store the probes. 3. follow the proper setup for the DIAGNOdent pen 2190. 4.
- Page 32 Instructions for use DIAGNOdent pen 2190 5 Operation | 5.5 Determine findings Note Adhesive or fluorescent substances (including plaque or calculus) can adhere to the probe and influence the MOMENT values. The MOMENT values do not change even though the probe is moved in and out of the pocket. In this case, the probe should be cleaned.
-
Page 33: Maintenance
6 Maintenance | 6.1 Setup methods according to DIN EN ISO 17664 6 Maintenance The following persons are authorised to repair and service the KaVo product: ▪ Technicians of KaVo branch offices after appropriate product training. ▪ Specifically KaVo-trained technicians of KaVo franchised dealers. -
Page 34: Preparations For Cleaning
Not applicable. 6.1.3 Disinfection Manual disinfection KaVo recommends the following products based on material compatibility. The micro‐ biological efficacy must be ensured by the disinfectant manufacturer: ▪ Mikrozid AF made by Schülke & Mayr (liquid or cloths) 34 / 44... -
Page 35: Sterilization In A Steam Sterilizer In Compliance With Din En 13060
Instructions for use DIAGNOdent pen 2190 6 Maintenance | 6.1 Setup methods according to DIN EN ISO 17664 ▪ FD 322 made by Dürr • For range of applications, please refer to the manufacturer's Instructions for Use. ▶ Wipe the surface, handpiece and probes with a soft cloth and permitted disinfec‐ tants. -
Page 36: Packaging And Storage
Instructions for use DIAGNOdent pen 2190 6 Maintenance | 6.1 Setup methods according to DIN EN ISO 17664 ð When the surface is scratched on the light exit side, exchange the probe. ① Prox probe ② Fissure probe ③ Paro probe (optional accessory) ▶... -
Page 37: Troubleshooting
▶ Do not turn the instru‐ Display shows: ERR 4 Laser power consumption ment on again. Send the too high. instrument to KaVo for repair. ▶ Send the instrument to Double audio signal after No acknowledgement sig‐ KaVo for repair. -
Page 38: Accessories
Instructions for use DIAGNOdent pen 2190 8 Accessories | 6.1 Setup methods according to DIN EN ISO 17664 8 Accessories The following additional accessories are approved by KaVo: Presentation Material summary Mat. No. Light probe, prox saphir 1.002.6970 mont. Light probe, fissure saphir 1.002.6967... -
Page 39: Information On Electromagnetic Compatibility
Instructions for use DIAGNOdent pen 2190 9 Information on electromagnetic compatibility | 6.1 Setup methods according to DIN EN ISO 17664 9 Information on electromagnetic compatibility Electromagnetic Transmissions The DIAGNODENT pen type 2190 is for use in an environment like the one cited be‐ low. - Page 40 Instructions for use DIAGNOdent pen 2190 9 Information on electromagnetic compatibility | 6.1 Setup methods according to DIN EN ISO 17664 Immunity tests IEC 60601 test level Conformance level Electromagnetic environ‐ ment - guidelines Radiated HF disturbances 3 V/m 3 V/m Portable and mobile radio according to IEC 80 MHz to 2.5 GHz...
- Page 41 Instructions for use DIAGNOdent pen 2190 9 Information on electromagnetic compatibility | 6.1 Setup methods according to DIN EN ISO 17664 2190 should be monitored to demonstrate proper function. When unusual perform‐ ance features are observed, additional measures may be necessary such as realign‐ ing or moving the DIAGNOdent pen type 2190.
- Page 42 Instructions for use DIAGNOdent pen 2190 9 Information on electromagnetic compatibility | 6.1 Setup methods according to DIN EN ISO 17664 42 / 44...
Need help?
Do you have a question about the DIAGNOdent 2190 and is the answer not in the manual?
Questions and answers