Table of Contents
Advertisement
Advertisement
Table of Contents

Related Manuals for Avid Technology Pro Tools Carbon


Summary of Contents for Avid Technology Pro Tools Carbon
- Page 1 PRO TOOLS | CARBON Guide...
- Page 2 Legal Notices © 2020 Avid Technology, Inc., (“Avid”), all rights reserved. This guide may not be duplicated in whole or in part without the written consent of Avid. For a current and complete list of Avid trademarks visit: www.avid.com/legal/trademarks-and-other-notices. Bonjour, the Bonjour logo, and the Bonjour symbol are trademarks of Apple Computer, Inc.
- Page 3 Safety Instructions Read and Keep these Instructions Product Safety Warning Important Safety Instructions Read these instructions. Keep these instructions. Heed all warnings. Follow all instructions. Do not use this equipment near water. Clean only with dry cloth. Do not block any ventilation openings. Install in accordance with the manufacturer's instructions. Do not install near any heat sources such as radiators, heat registers, stoves, or other equipment (including amplifiers) that pro- duce heat.
- Page 4 For products containing a lithium battery: Danger of explosion if battery is incorrectly replaced. Replace only with the same or equivalent type. CAUTION! For products with a power switch: It should remain accessible after installation. The equipment shall be used at a maximum ambient temperature of 40' C. This unit is provided with a power supply cord set suitable for 120V AC input only (for U.S.A.
-
Page 5: Environmental Compliance
Environmental Compliance Proposition 65 Warning Warning This product can expose you to chemicals including Pb and Pb compounds, which is known to the State of California to cause cancer and birth defects or other reproductive harm. For more information go to www.P65Warnings.ca.gov. Perchlorate Notice This product may contain a lithium coin battery. - Page 6 CAN/CSA C22.2 No. 60065:16, IEC/EN 60065:2014 (8th Edition), UL 62368-1:2014, CAN/CSA 62368-1-14 and IEC/EN 62368-1:2014 (2nd Edition) Avid Technology Inc., has been authorized to apply the appropriate NRTL mark on its compliant equipment. Power Safety Input Rating Regulatory Model Number (RMN) 9100-74077: AC~100-240V, 50-60Hz, 1.0A...
-
Page 7: Table Of Contents
Contents Appendix A. Safety Instructions............... iii Appendix B. - Page 8 DSP Mode for Low-Latency Monitoring ............25 Enabling DSP Mode .
-
Page 9: Introduction
Introduction Pro Tools | Carbon ™ ® ® Welcome to Pro Tools | Carbon by Avid . Pro Tools | Carbon is a versatile multi-channel audio interface for use with Pro Tools ™ and Pro Tools | Ultimate software or other Core Audio–compatible software. It provides exceptional AD/DA audio conversion with 8 mic/line inputs (combo XLR/TRS or DB25), 2 instrument inputs (TS), 8 line outputs (DB25), 2 dedicated outputs for stereo monitor- ™... -
Page 10: System Requirements And Compatibility Information
Included Software, Plug-ins, and Sound Libraries With your purchase and registration of Pro Tools | Carbon, you are entitled to the following: • Pro Tools software, with: • 1-year subscription with a “perpetual parachute” (an off-plan perpetual license) • Standard Avid support contract •... -
Page 11: Resources
Resources The Avid website (www.avid.com) is your best online source for information to help you get the most out of your Avid system. Account Activation and Product Registration Activate your product to access downloads in your Avid account (or quickly create an account if you do not have one). Register your purchase online, download software, updates, documentation, and other resources. -
Page 12: Installation And Setup
Installation and Setup Installing and setting up Pro Tools | Carbon involves the following: Unpacking Pro Tools | Carbon from the box. Rack mounting Pro Tools | Carbon (optional). Connecting cables. Registering Pro Tools | Carbon. Downloading and installing Pro Tools and bundled software. Authorizing your software with iLok License Manager. -
Page 13: Connecting Cables
Connecting Cables Once you have installed Pro Tools | Carbon in a rack (optional), you are ready to start connecting cables. In order to meet EMC requirements and in order to obtain the highest performance of Pro Tools | Carbon, use high-quality, properly shielded cables for all external connections. -
Page 14: Register Pro Tools | Carbon And Activate Your Avid Master Account
Register Pro Tools | Carbon and Activate your Avid Master Account Pro Tools | Carbon includes a Welcome card with a redemption code and a QR code that lets you register the unit. Registering lets you access software and PDF documentation through your online Avid Master Account. To register your Pro Tools | Carbon unit and access Pro Tools | Carbon-related downloads through your Avid Master Account: Locate the Welcome card. -
Page 15: Avb Connections And Settings
AVB Connections and Settings Pro Tools | Carbon requires a direct connection to your computer using AVB Ethernet. The AVB Ethernet connection provides up to 56 input channels and 84 output channels of AVB audio between Pro Tools | Carbon and Pro Tools, and up to 28 input channels and 28 out- put channels of AVB audio between Pro Tools | Carbon and third-party Core Audio–compatible software. - Page 16 Setting Up Pro Tools | Carbon for macOS System Sound Input and Output You can use Pro Tools | Carbon for macOS System Sound Input and Output. Select Pro Tools | Carbon: I/O as the Sound Input device for recording audio with third-party Core Audio audio applications. Select Pro Tools | Carbon: I/O as the Sound Output device to play back third-party Core Audio audio applications and websites through the Main Monitor (MON L–R) outputs on the back of Pro Tools | Carbon as well as headphones that are assigned to the Main Monitor output path (configured in the Pro Tools Hardware Setup).
-
Page 17: Launch Pro Tools
Launch Pro Tools After you have installed Pro Tools software, bundled plug-ins, and sound libraries, and have enabled AVB for Pro Tools | Carbon, launch Pro Tools. When launching Pro Tools for the first time, you are prompted to Activate your Pro Tools software license and licenses for any newly installed plug-ins. -
Page 18: Starting Up Or Shutting Down Your System
Starting Up or Shutting Down Your System To ensure that the components of your Pro Tools system communicate properly with each other, it is advised that you power them on in the following order. Start up your Pro Tools system in this order: Make sure all your equipment (including your computer) is off. -
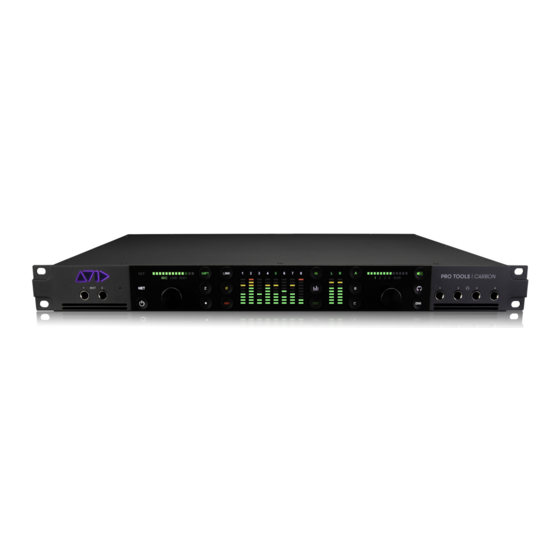
Page 19: Pro Tools | Carbon Front Panel Operation
Pro Tools | Carbon Front Panel Operation The front panel of Pro Tools | Carbon provides indicators and controls for input settings and monitoring functions. Pro Tools | Carbon Front Panel The front panel of Pro Tools | Carbon provides various jacks, controls, and indicators. To the left of the segmented I/O Meters are con- trols and indicators for inputs, as well as 2 instrument input jacks. - Page 20 Talkback button — A single press latches Talkback on (unmute the Talkback mic input). Press the button again to unlatch and turn Talkback off (mute the Talkback mic input). Press and hold the Talkback button to engage Talkback temporarily and release to dis- engage.
- Page 21 I/O Meters — 9-segment LED meters display peak metering with peak hold (3 seconds) for input or output channels. Above each me- ter are Channel Number indicators for each I/O channel. Channel Number indicators for the selected channel (or channel pairs when stereo linked) light green.
-
Page 22: Configuring Inputs
DIM button — Press to dim (attenuate) the signal level of the selected monitor set by the amount (in dB) configured in the Pro Tools Hardware Setup (see Main Page). The default Dim value is –15 dB. When enabled, the button lights amber. When disabled, the button lights white. -
Page 23: Device Reset
Device Reset If you encounter a problem with Pro Tools | Carbon and Avid customer support advises that you reset the device, you can reset to the default device settings or revert to the default firmware image. Default Device Settings If necessary, you can restore the default system settings (such as preamp gain, monitor gain, and so on). -
Page 24: Pro Tools | Carbon Back Panel Connections
Pro Tools | Carbon Back Panel Connections Pro Tools | Carbon Back Panel Pro Tools | Carbon back panel IEC power connector. ADAT Out 1 and 2. ADAT In 1 and 2. Word Clock In and Out (BNC). Footswitch — the footswitch can be used for toggling talkback on and off (see Footswitch). Ethernet 1 and 2 (AVB) —... -
Page 25: Analog I/O Connections
Analog I/O Connections Monitor L–R Outputs The Monitor L–R outputs on the back panel are independent of Line Out 1–8 (DB25). Use 1/4-inch TRS (balanced) or 1/4-inch TS (unbalanced) cables to connect these line level outputs to loudspeakers for stereo monitoring. These outputs can be configured to operate at +4 dBu or –10 dBV, and have a maximum operating level of +24 dBu. -
Page 26: Configuring Pro Tools
Configuring Pro Tools Once you have made the necessary cable connections for your studio and have enabled Pro Tools | Carbon for AVB in AMS, launch and configure Pro Tools: Launch Pro Tools. If the Dashboard appears, click Cancel to proceed without opening or creating a session. Select Pro Tools | Carbon as the Playback Engine ( Setup >... -
Page 27: Hardware Setup
Hardware Setup When Pro Tools | Carbon is connected to your Pro Tools system, the Hardware Setup provides two pages specifically for setting up Pro Tools | Carbon. To configure Pro Tools | Carbon in the Hardware Setup dialog: Launch Pro Tools if it is not already running. Choose Setup >... - Page 28 Main Page Click the Main tab in the Hardware Setup to view the Main page. Hardware Setup, Pro Tools | Carbon Main page Monitors The Monitors section lets you enable or disable the following Monitor options: When enabled, the Main monitor set can be selected for monitoring on the front panel of Pro Tools | Carbon. The Main (MON L–R) Main monitor uses the Monitor L–R outputs on the back panel.
- Page 29 Function Switch Assignments The Function Switch Assignments section shows whether or not the control assignments for the front panel buttons are enabled. If a control assignment is not available, such as if Alt 2 (3–4) is disabled, the button on the front panel is unlit and the corresponding icon in the Hardware Setup is grayed out.
- Page 30 Clock Source You can set the Clock Source for Pro Tools | Carbon in the Audio window of AMS, which can be accessed from the Hardware Setup dialog. The Clock Source defaults to the internal clock. If other digital devices are connected to Pro Tools | Carbon that can be set to follow the internal clock of Pro Tools | Carbon, you can leave Pro Tools | Carbon set to the default Internal option.
-
Page 31: I/O Setup
I/O Setup Configure the Pro Tools I/O Setup for input and output routing for Pro Tools | Carbon. At higher sample rates, the number of available ADAT Inputs and Outputs are reduced for each port. At 88.2/96 kHz, only ADAT channels 1–4 are available, and at 176.4/192 kHz, only ADAT channels 1–2 are available. Unavailable ADAT chan- nels are indicated in italic text in the Input, Output, Bus, and Insert pages of the I/O Setup. - Page 32 Pro Tools | Carbon Output Setup In addition to line and ADAT outputs, Pro Tools | Carbon has a dedicated Main stereo monitor output, two additional Alternate ste- reo monitor output paths, and four dedicated Headphone outputs. I/O Setup, Output page Main and Alt Monitor Paths The Main monitor output path and the two Alt monitor paths can be enabled or disabled in the Hardware Setup.
-
Page 33: Dsp Mode For Low-Latency Monitoring
DSP Mode for Low-Latency Monitoring DSP Mode ensures that low-latency monitoring is maintained during recording with Pro Tools | Carbon. You can enable or disable DSP Mode on a track-by-track basis. DSP Mode can be enabled for Audio, Auxiliary Input, Instrument, Routing Folder, and Master Fader tracks. -
Page 34: Enabling Dsp Mode
Enabling DSP Mode Enable DSP Mode on tracks for low-latency monitoring during recording or input monitoring. With DSP Mode enabled: Protecting low latency is the highest priority. The track and its entire signal chain run on the HDX DSP in Pro Tools | Carbon. ... -
Page 35: Enabling Dsp Mode Safe
Enabling DSP Mode Safe Use DSP Mode Safe to prevent DSP Mode from being automatically enabled on a track. This is useful if you want to route any audio from a DSP Mode–enabled track with any plug-ins that are only available in Native format. For example, you might want to send audio from a DSP Mode–enabled audio track to a DSP Mode Safe–enabled Auxiliary Input track for processing with a reverb plug-in that is only available as a Native plug-in. - Page 36 DSP Mode Insert Indicator Plug-in Insert selectors change color to indicate whether DSP plug-ins are inserted on a track that is DSP Mode enabled or DSP Mode auto-enabled, or if a plug-in has been made inactive due to insufficient DSP resources. DSP Mode Insert indicator color coding DSP Mode Color...
- Page 37 DSP Mode, DSP plug-in inactive due to insufficient DSP resources DSP Mode, Key Input inactive due to insufficient DSP resources Send Selector DSP Mode Indicator When a Send is made inactive due to insufficient DSP resources, the Send selector appears dark orange and any text is italicized. DSP Mode-enabled, send inactive due to insufficient resources Output View Selector DSP Mode Indicator When a track output is made inactive due to insufficient DSP resources, the Output View selector appears dark orange and any text...
-
Page 38: System Usage
System Usage The System Usage window in Pro Tools provides a Pro Tools | Carbon pane that lets you monitor the number of available AVB In- put and Output channels in use, and how much DSP is being used by plug-ins and the mixer. System Usage window, Pro Tools | Carbon pane Shows the number of AVB channels dedicated to audio streams from Pro Tools | Carbon to Pro Tools. -
Page 39: Workflow Example: Recording In Dsp Mode For Low-Latency Monitoring
Workflow Example: Recording in DSP Mode for Low-Latency Monitoring The following workflow example uses DSP Mode for recording a singer with DSP plug-in processing and low-latency monitoring. This example session is made up of the following tracks (see the graphic on the next page): •... - Page 40 Adjust the Mix for Recording Start playback to set the levels and panning of the instruments to get the mix you want in the control room monitors. Set the send levels from each track to balance the headphone mix. Input-enable the vocal track and use the talkback mic to communicate with the singer and adjust the headphone mix to the singer’s liking.
- Page 41 Record with Low-Latency Monitoring Enable DSP Mode on the vocal track. Notice that all tracks that are part of the signal chain for the vocal track have DSP Mode en- abled automatically: the reverb Auxiliary Input track and both Master Fader tracks. All plug-ins on these tracks switch from Native to DSP format (any Native only plug-ins on any of these tracks are automatically bypassed).
- Page 42 Use DSP Mode Safe to Record with Native Reverb Let’s assume that you have a Native-only reverb plug-in that you really like. You can still record vocals with virtually no latency in their monitor mix while still using your favorite Native-only reverb plug-in to process all of the audio tracks. Enable DSP Mode Safe on the reverb track and set the wet/dry mix on the reverb plug-in to 100% wet.
-
Page 43: Tips For Using Dsp Mode
Tips for Using DSP Mode To ensure optimal workflows in DSP Mode: Use input and output gain controls on Native-only plug-in inserts to make up for any undesirable changes in signal level when switching between Native Mode and DSP Mode. Since DSP Mode does not reduce latency for tracks that are not part of a live signal path, avoid enabling DSP Mode on tracks ... -
Page 44: Appendix C. Specifications
Appendix A: Specifications Audio Specifications Microphone Preamp Inputs Back panel: XLR inputs 1–8 Frequency Response 20 Hz to 20 kHz, ±0.1 dB Gain Range 3–60 dB in 1 dB steps Equivalent Input Noise (EIN) –129 dBu (A-weighted) Signal to Noise Ratio (SNR) –123.5 dB, –126 dB (A-weighted) Dynamic Range 126 dB (A-weighted) - Page 45 Line Inputs (True Bypass) Back panel: DB25 inputs 1–8 and 1/4-inch TRS inputs 1–8 Frequency Response 20 Hz to 20 kHz, ±0.1 dB Gain Range 0 dB fixed –123 dB, –126 dB (A-weighted) Dynamic Range 123 dB, 126 dB (A-weighted) THD 1 kHz @ –1 dBFS –113 dB (0.00022%) Maximum Input Level...
- Page 46 Monitor Outputs Back panel 1⁄4-inch TRS outputs L–R Frequency Response 20 Hz to 20 kHz, ±0.1 dB –120 dB (A-weighted) Dynamic Range 120 dB (A-weighted) THD 1 kHz @ –1 dBFS –110 dB (0.0003%) Maximum Output Level +24 dBu Crosstalk –135 dB @ 1 kHz Connector Type 1⁄4-inch TRS Balanced...
-
Page 47: Mechanical Specifications
Network Interface Interface 1000BASE-T, RJ45 connector, 4-pair connection Mechanical Specifications Chassis standard 19”, 1 RU Chassis depth, without connectors mounted 34.8 cm / 13.5” Chassis body width 44.2 cm / 17.4” Weight 5.44 kg / 12 lbs. Environmental Specifications Operating Temperature 4–40º... -
Page 48: Appendix D. Pro Tools | Carbon Core Audio Devices
Pro Tools | Carbon: Reserved for Pro Tools . Note that when setting the Clock Source , default Sample Rate , or AVB Configuration for Pro Tools Carbon, any changes you make to one device affects the other. Pro Tools | Carbon: I/O When using Pro Tools | Carbon with third-party Core Audio applications or for macOS system audio, the Pro Tools | Carbon: I/O device must be used. -
Page 49: Pro Tools | Carbon: Reserved For Pro Tools
Pro Tools | Carbon: Reserved for Pro Tools The Pro Tools | Carbon: Reserved for Pro Tools device is dedicated to Pro Tools. The available AVB input and output channels are determined by the selected AVB Device Configuration (see AVB Device Configuration in AMS). - Page 50 To set the device configuration: Launch Audio MIDI Setup (AMS). In the Audio Devices window, select Pro Tools | Carbon: Reserved for Pro Tools in the Audio Devices list. Do one of the following: • From the Configure Selected Device menu, choose Configure Device . •...
- Page 51 In the resulting AVB Audio Entity Configuration window, select Pro Tools | Carbon . If the AVB Audio Entity Configuration window does not appear automatically, choose Window > Audio Entity Configuration (or press Command+1). AVB Audio Entity Configuration window From the Current Configuration selector, select the configuration that best suits your workflow: •...
-
Page 52: Avb Channel To Physical I/O Mappings For The Pro Tools | Carbon: I/O Device
AVB Channel to Physical I/O Mappings for the Pro Tools | Carbon: I/O Device The following table is for the Pro Tools | Carbon: I/O device with these AVB configurations: • 28x56 (44.1–96 kHz) • 56x56 (44.1–96 kHz) • 56x84 (44.1–96 kHz) 44.1–48 kHz 88.2–96 kHz AVB Channels... - Page 53 The following table is for the Pro Tools | Carbon: I/O device with this AVB configuration: • 28x42 (44.1–192 kHz) 44.1–48 kHz 88.2–96 kHz 176.4–192 kHz Channels AVB In 1–28 AVB Out 1–28 AVB In 1–28 AVB Out 1–28 AVB In 1–28 AVB Out 1–28 Pro Tools | Carbon I/O Pro Tools | Carbon I/O...
-
Page 54: Appendix E. Pro Tools | Carbon Pin Out Diagrams
Appendix C: Pro Tools | Carbon Pin Out Diagrams Ethernet, RJ45 Connector, Gigabit Pro Tools | Carbon connects to your Pro Tools system using Ethernet. Pro Tools both controls the unit over Ethernet and streams audio over Ethernet using AVB (see Connect Ethernet). -
Page 55: Appendix F. Network Port Usage
Appendix D: Network Port Usage Required Access for Normal Operation The following services are required for normal operation of Pro Tools | Carbon. The actual ports that are used in the reserved range may vary depending on the firmware version that is running on the device. Port Protocol Purpose... - Page 56 For Technical Support, visit www.avid.com/support...
Need help?
Do you have a question about the Pro Tools Carbon and is the answer not in the manual?
Questions and answers