Table of Contents
Advertisement
Quick Links
Advertisement
Table of Contents

Related Manuals for Avid Technology AvidDock


Summary of Contents for Avid Technology AvidDock
- Page 1 AvidDock Guide Installation and Overview...
- Page 2 Legal Notices © 2020 Avid Technology, Inc., (“Avid”), all rights reserved. This guide may not be duplicated in whole or in part without the written consent of Avid. For a current and complete list of Avid trademarks visit: http://www.avid.com/legal/trademarks-and-other-notices Bonjour, the Bonjour logo, and the Bonjour symbol are trademarks of Apple Computer, Inc.
- Page 3 This equipment has been tested to comply with USA, Canadian, EU and International safety certification standards: UL 60950-1 2nd edition, CAN/CSA C22.2 No. 60950-1-07; 2nd edition, EN 60950-1:2006 /A11, /A1, /A12, /A2 and IEC 60950-1:2005/A1, /A2. Avid Technology Inc., has been authorized to apply the appropriate NRTL mark on its compliant equipment. Power Safety Input Rating Pro Tools | Dock: 12Vdc, 2.5A...
- Page 4 13) For products containing a lithium battery: Warning! Danger of explosion if battery is incorrectly replaced. Replace only with the same or equivalent type. 14) For products with a power switch: It should remain accessible after installation. 15) The equipment shall be used at a maximum ambient temperature of 40° C and maximum altitude of 2000m. 16) For products with an operator-accessible fuse: CAUTION: For continued protection against risk of fire, replace only with same type and rating of fuse.
-
Page 5: Table Of Contents
Contents Introduction ..................1 What’s Included . - Page 6 Appendix A. Specifications................24 Mechanical .
-
Page 7: Introduction
Introduction Welcome to the Avid Dock studio controller and tablet dock from Avid . The Dock uses Avid’s high-speed EUCON ® (Extended User Control) control protocol to enable fully integrated control of Pro Tools and other EUCON-compatible audio and ® video applications via an Ethernet connection. -
Page 8: What's Included
What’s Included • Avid Dock control surface • Power cable and power adapter • Cat5e (350 MHz) Ethernet crossover cable • Documentation pack, which includes the EuControl software Activation Card, Dock Welcome Card, Pro Tools | Dock Safety & Regulatory Guide, Health and Safety Guide, and a warranty card Additional Required Equipment •... -
Page 9: Conventions Used In This Guide
Conventions Used in This Guide All of our guides use the following conventions to indicate menu choices and key commands: Convention Action File > Save Choose Save from the File menu Control+N Hold down the Control key and press the N key Control-click Hold down the Control key and click the mouse button Right-click... -
Page 10: How To Use This Pdf Guide
How to Use this PDF Guide These are some useful features of this PDF: • The Bookmarks on the left serve as a continuously visible table of contents. Click a + symbol to expand that heading to show subheadings. Click the – symbol to collapse a subheading. Click on a subject heading to jump to that page. •... -
Page 11: Installation And Setup
Installation and Setup This section shows how to get your Dock set up as a studio controller, and consists of the following steps: • Connecting the Dock • Installing EuControl Software • AutoLaunch Settings • Updating Dock Firmware • Installing and Connecting Avid Control •... - Page 12 Connecting Ethernet Depending on your configuration requirements, you can connect the Dock directly to your workstation computer (the computer running Pro Tools or other DAW), to a router or switch that is then connected to your workstation computer, or to an S3 that is con- nected to your workstation computer.
-
Page 13: Installing Eucontrol Software
Installing EuControl Software Next, install EuControl software on your workstation computer. The computer running media applications is referred to in this guide as a workstation. An Internet connection is required to download EuControl. To install EuControl software: Visit and log into your Avid account. www.avid.com/account To create an account if you don’t already have one, follow the instructions on the included EuControl Activation card (visit , click to select EuControl , then follow the on-screen instructions to create an account. - Page 14 If the lit EuControl icon does not appear, do any of the following: • See to add the Dock manually. 3 – Add • Click the unlit EuControl icon and choose Restart EUCON Applications . • Shut down the Dock and your computer, then turn them on (Dock first, then the workstation computer). •...
-
Page 15: Updating Dock Firmware
Updating Dock Firmware After installing EuControl, make sure your Dock and other Avid media controllers are running the latest firmware. The firmware is provided within EuControl, so an Internet connection is not required. To update firmware: Click (Mac) or double-click (Windows) the EuControl icon and select EuControl Settings . If necessary, click Surfaces to display the Surfaces tab. - Page 16 Overview of the Surfaces Tab The Surfaces tab in EuControl Settings shows all EUCON controllers on your network and those connected to your instance of Eu- Control. Use the Surfaces tab to add and connect surfaces, arrange them in the desired order, pair S1s with Control app tablets and manage Control app Master/Meters/Hybrid designation.
- Page 17 The firmware is embedded in EuControl so an Internet connection is not required. Follow the instructions in the EuControl dialog box. • The media controllers must be plugged into a working power source. • Do not power off any media controllers during the update or attempt to interrupt the update. •...
-
Page 18: Installing And Connecting Avid Control
Installing and Connecting Avid Control Before proceeding, make sure your tablet is running the most recent version of the Avid Control app (previously known as Pro Tools | Control), and that it appears in the My Surfaces list in EuControl. See the Avid Control Guide.pdf for instructions on installing and connecting the app onto supported iOS and Android tablets. -
Page 19: Enabling Eucon In Pro Tools
Enabling EUCON in Pro Tools When you first connect your Dock, you must enable EUCON in Pro Tools, EUCON subsequently remains enabled in Pro Tools un- less you disable it. To enable EUCON in other DAWs, see the documentation provided by the manufacturer. To enable EuControl in Pro Tools: Launch Pro Tools. -
Page 20: Confirming Eucon
Confirming EUCON To confirm installation and communication: Make sure you have enabled EUCON. Open a session if one is not already open. Verify that the Tracks or Mixer view in the Control app shows the track names from the Pro Tools session. Avid Control app Tracks view showing the first 16 tracks in a session •... -
Page 21: Connecting A Second Workstation
Connecting a Second Workstation The Dock can control applications running on a second computer connected to the same network as the primary computer, referred to in this guide as a workstation. If EuControl is running on the same workstation as all your audio/video applications you can skip these instructions. -
Page 22: Connecting A Footswitch
You can now switch between workstations by doing either of the following: • On the Dock, S3, or other Artist Series media controller, press the Workstation switch. For example, on the Dock press SHIFT+App/Workstation . • In the Workstations tab of EuControl Settings, select the desired workstation in the My Workstations list and click Attach . If you are using the Control app without any other Artist Series controllers, you must use this method to switch workstations. -
Page 23: Troubleshooting Eucontrol Connections
Troubleshooting EuControl Connections This section provides troubleshooting for EuControl connection issues. Tablets or Surfaces Disconnecting from EuControl If your tablets or surfaces are losing connection to EuControl, try the following: • Make sure the computer is not going to sleep. •... -
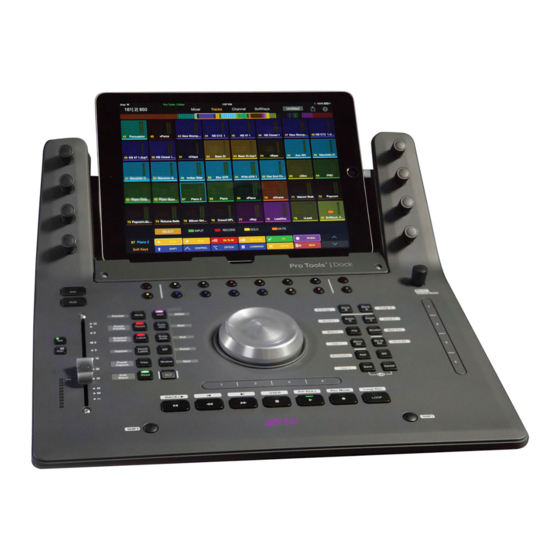
Page 24: Dock Surface Controls Overview
Dock Surface Controls Overview This section provides an overview of the surface controls on the Dock when using it with the Control app and EUCON-compatible applications. For audio workflows, see the Using EuControl Surfaces.pdf. Solo Monitor Mute Control Room Write to Bank Preview All/Sel... -
Page 25: Tablet Stand
Tablet Stand Provides a stand for securely mounting a compatible iOS or Android tablet (not included) running the Avid Control app. The Con- trol app can be used in landscape (wide) or portrait (tall) mode. The included Mini-Riser increases the viewing angle for smaller tablets such as the iPad Mini, or it can be removed to fit larger tablets in the stand. -
Page 26: Soft Keys
Soft Keys These sixteen switches engage the corresponding Soft Key assignment in the Control app. Default (factory) Soft Key assignments are available automatically, and you can customize assignments using the Soft Key Editor in EuControl Settings. Soft Keys shown in Mixer view In the default Pro Tools appset, the two Soft Keys at the far left are assigned to the Fader and Soft Keys buttons. -
Page 27: Right Control And Vertical Touchstrip
Right Control and Vertical Touchstrip These twelve switches include controls for navigation (such as Bank and Nudge ), Wheel modes (such as Jog , Shuttle , Zoom , and Scroll ), and utility controls (such as OK , Cancel and the App/Workstation switch). The EUCON Show Me icon is shown between the Save and Cancel switches. -
Page 28: Transport
Transport These seven switches provide basic Transport commands RTZ (Return to Zero), Rewind, Fast Forward, Stop, Play, Record, and Loop on/off in their primary layer, and extended Transport commands in the SHIFT layer. BACK+ USER P P ROLL Rec Mode Loop Rec The following table lists all the primary and secondary functions of the Transport switches. -
Page 29: Control Room/Monitor
Channel Sel and Rec/A Switches The channel strip features channel Sel and Rec / A switches that operate as follows: Sel Selects that track in the application, and attentions it. In Pro Tools and other applications, multiple tracks can be selected, but only one can be attentioned. In this case, the attentioned track is the last one selected. -
Page 30: Appendix A. Specifications
Appendix A: Specifications All specifications subject to change. Avid Dock Module: Mechanical Avid Dock Mechanical Specifications Parameter Specification Dimensions (L x W x D) 14.1 x 13.87 x 5.4 inches (height at back) 359 x 352 x 138 mm Weight 4.17 lbs 1.89 kg Power Requirements... -
Page 31: Dimensions
Dimensions Test Mode The Dock has a self-test mode that lets you test the fader, LEDs and knob touch-sensitivity. This self-test mode is similar to “Vegas Mode” on other control surfaces. To enable Test Mode on the Dock: Power the Dock off. Press and hold down both Bank switches ( <... -
Page 32: Appendix B. Avid S3 Dock Link Kit
Appendix B: Avid S3 Dock Link Kit If you are using the Dock along with an S3, you can use the Avid S3 Dock Link kit (not included) to attach them to each other. The Link kit lets you attach the Dock to the left or right of S3 to keep them stable and aligned. You can install the Link Kit at any time. If you are using one or more S1s with the Dock you can use the S1 Link plate included with each S1. - Page 33 Contents of the S3 Dock Link Kit Number Item Link Plate Spacer Plates (2x) with adhesive backing Foot Bracket not shown Fasteners (2x Phillips, M3 x 12mm, flat head) Turn the S3 over and slowly set it face down on a padded surface, being careful not to let the unit drop (this could damage the encoders and faders).
- Page 34 Attaching the Foot Bracket Next, attach the Foot Bracket to the front corner of the underside of the S3. The figures below show the Foot Bracket being installed to have the Dock to the right of the S3 (when turned right-side up for use). If you want the Dock to the left of the S3, the basic steps are the same.
- Page 35 Installing the Link Plate The Link Plate is held magnetically to the underside of the S3. To install the Link Bracket: Orient the Link Plate and align its pins with the holes in S3 as shown below ( 1 in Figure 6), then place it against the underside ...
-
Page 36: Appendix C. Compliance Information
Appendix C: Compliance Information Model Name: Avid Dock Model #: 9100-65779 Environmental Compliance Disposal of Waste Equipment by Users in the European Union This symbol on the product or its packaging indicates that this product must not be disposed of with other waste. Instead, it is your responsibility to dispose of your waste equipment by handing it over to a designated collection point for the recycling of waste elec- trical and electronic equipment. -
Page 37: Emc (Electromagnetic Compliance)
EMC (Electromagnetic Compliance) Avid declares that this product complies with the following standards regulating emissions and immunity: • FCC Part 15 Class B • EN 55022 Class B • EN 55024 • AS/NZS CISPR 22 Class B • CISPR 22 Class B FCC Compliance for United States Radio and Television Interference Communication Statement... - Page 38 Appendix C: Compliance Information...
- Page 39 Technical Support (USA) Product Information Visit the Online Support Center For company and product information, www.avid.com/support www.avid.com visit us on the web at...
Need help?
Do you have a question about the AvidDock and is the answer not in the manual?
Questions and answers