Table of Contents
Advertisement
Quick Links
Advertisement
Chapters
Table of Contents

Related Manuals for Analytik Jena aj CYBERTRON InnuPure C12


Summary of Contents for Analytik Jena aj CYBERTRON InnuPure C12
- Page 1 InnuPure C12 Extraction system...
- Page 2 + 49 (0) 3641 / 77 76 77 76 E-Mail: service@analytik-jena.de bio.application@analytik-jena.de General information about Analytik Jena AG on the internet: http://www.bio.analytik-jena.de Copyrights and Trademarks Microsoft, Windows 2000 / XP / Vista, MS Excel are registered trademarks of Microsoft Corp.
-
Page 3: Table Of Contents
Contents Contents Introduction ..............3 Use of the InnuPure C12 ............... 3 Notes on the use of this manual ............3 Safety Instructions ............5 Warning and safety symbols on the InnuPure C12 ......5 General warning information ..............5 Device description and functional principle .... - Page 4 Contents The UpDateIP work place ..............30 8.5.1 Menu bar .....................32 8.5.2 Toolbar and function buttons ..............32 Loading of isolation protocols from PC ..........33 Download of isolation protocols from InnuPure C12 ......33 Transfer of isolation protocols .............33 8.8.1 Copy isolation protocols ..............34 8.8.2 Move isolation protocols ..............34 Up-load of isolation protocols to InnuPure C12 ........34...
-
Page 5: Introduction
Introduction Use of the InnuPure C12 Introduction Use of the InnuPure C12 The InnuPure C12 is a flexible and efficient extraction system for the completely automated isolation and purification of nucleic acids. The system, which was developed and produced in Germany, is designed for small and medium sample throughput. - Page 6 Introduction Notes on the use of this manual Formatted In the description of the operating steps, menu commands, dialog boxes, text buttons and options, etc. are formatted in bold characters. Menu commands of a command sequence are separated by a slash ( / ), e.g. File / Open.
-
Page 7: Safety Instructions
Safety Instructions Warning and safety symbols on the InnuPure C12 Safety Instructions Read through this chapter carefully prior to commissioning the InnuPure C12 for your own safety and for trouble-free operation. Follow all the safety instructions explained in the manual, as well as all messages and information displayed on the screen by the control firmware. - Page 8 Disconnect the mains plug before opening the device! The device hood may only be opened by the Technical Customer Service department of Analytik Jena AG or by trained personnel! Before connecting the InnuPure C12 to the mains supply, check that the operating voltage on the rating plate on the left side of the device agrees with the mains voltage at the intended socket.
- Page 9 Safety Instructions General warning information Before another cleaning or decontamination procedure is used as that prescribed by the manufacturer, the user shall check with the manufacturer that the intended procedure will not damage the device. Transportation! In case of transportation only use the provided packaging and follow the packaging instruction strictly.
-
Page 10: Device Description And Functional Principle
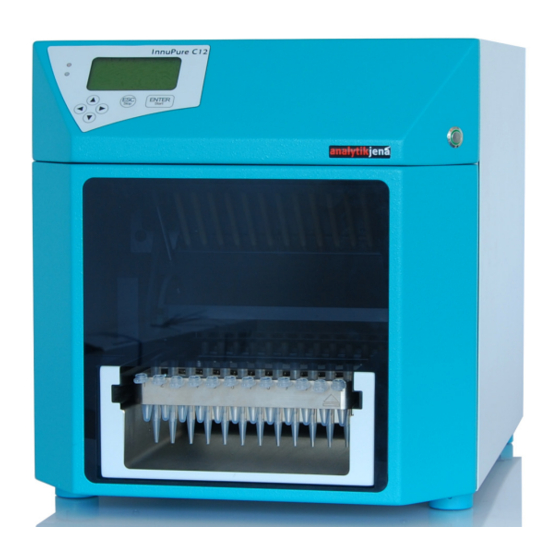
Device description and functional principle Construction and connections Device description and functional principle Construction and connections Front view Status LED's Display Switch for sample compartment light Front door Sample tray Admission of sample Tray Fig. 3-1 Front view of the InnuPure C12 Ceramic pistons Removing tips Tip adapter... -
Page 11: Keypad Functions
Device description and functional principle Keypad functions The InnuPure C12 is a stand alone device without the necessity of a PC with control software. New isolation programs can be installed on the device by a simple update tool as described in section "Up-date of the InnuPure C12" on page 29. -
Page 12: Functional Principle
Device description and functional principle Functional principle The keys are configured with the following functions: LED (red and Displays status of the device green) Move the cursors to a certain position on the display. ENTER / Start Confirm an entry. Start a chosen isolation protocol or an option of the tool list. -
Page 13: Fig. 3-6 Sample Processing
Device description and functional principle Functional principle Due to the Binding Buffer, the nucleic acids are bound to the magnetic particles. During the next step a bar magnet enters the plastic insert within the MFR – Tips, by what the magnetic particles with the bound nucleic acid will be fixed on the insert in consequence of the magnetic field. -
Page 14: Fig. 3-9 Elution Of Dna/Rna
Device description and functional principle Functional principle Elution The last tube contains the Elution Buffer. The magnetic particles are left inside the tube, the nucleic acid is eluted in a defined volume and the magnetic particles are removed again from the sample. The nucleic acid is now purified, pipetted to the final Elution Tube and ready for other down-stream applications. -
Page 15: Installation, Transport, Storage Conditions
Installation, transport, storage conditions Installation, transport, storage conditions Installation conditions Attention! Observe the following installation conditions under all circumstances! Keep the ventilation slits on the back side of device free! Do not place any objects on the device! No operation in areas subject to a risk of explosion! No aggressive vapours, e.g. - Page 16 Installation, transport, storage conditions Conditions for storage and transport The following environment conditions must be observed for transport and storage: • Temperature range: -40...+70 °C • Humidity: up to 80 % Note Before transportation and storage of the device, the sample tray has to be emptied from all consumables to prevent any device damages.
-
Page 17: Commissioning And Powering Up
Commissioning and powering up Connecting and powering up / powering down Commissioning and powering up Connecting and powering up / powering down Electric shock! Before connecting the InnuPure C12 to the mains supply, check that the operating voltage on the power sign on the device agrees with the mains voltage at the intended socket. -
Page 18: Assembly Instruction Priming Station
Commissioning and powering up Assembly instruction Priming Station Assembly instruction Priming Station Position Description Quantity Screws Side panel Cross brace Baseplate Allen key Fig. 5-2 Assembly instruction Priming Station Preparation of buffers and solutions All buffers and solutions are provided in pre-filled and sealed strips regarding to the isolation routine and starting material. -
Page 19: Preparation Of The Sample Tray
Commissioning and powering up Preparation of the sample tray Preparation of the sample tray Nickel allergy! The sample tray is coated by nickel. 1, 3 Reagent Strip holder Waste Box for MFR filter tips Pre-filled Reagent Strips MFR filter tips 4, 6 Clamp of the lock Elution Tubes Fig. -
Page 20: Position Of The Sample Tray
Commissioning and powering up Position of the sample tray 3. Press the clamps of the Strip Holder together, flap it down so that the ends of the Reagent Strips are covered and release the clamps. The Strip Holders are locked correctly if the pins at the ends of the Strip Holders are latched in the holes of the Sample Tray and the red dot next to the clamps are covered again. -
Page 21: Packaging Instruction
Packaging instruction Packaging instruction Attention! For packaging two persons are required! The InnuPure C12 is weighing approx. 28.5 kg. Thus it has to be lifted with at least 2 persons! Attention! Device damages due to improper packaging! It is important to follow this packaging instruction strictly, to avoid any damages at the device during the transportation! Attention! Before packaging all samples, reagents and the sample tray have to be removed from the device! - Page 22 Packaging instruction Place the InnuPure with the bag into the Affix the second foamed plastic, which is foamed plastic. presented as a negative of the device top on the InnuPure C12. Impose the covering box (without lid Put the foamed plastic insert onto the and bottom) on the InnuPure C12.
- Page 23 Packaging instruction Place the power cord and the RS 232 cable Cover the parts with burling foam sheets. onto the top of the priming station and the sample tray on the top of the waste box. Place the foamed plastic lid with the user manual and CD onto the foamed plastic insert.
-
Page 24: Operation
Operation Preparing and starting an isolation routine Operation Preparing and starting an isolation routine Attention! After switching on the InnuPure C12 is initialized automatically. Wait until a beep is audible, before starting any isolation protocol! 1. In case of an external lysis step, start the nucleic acid isolation with the sample preparation as mentioned inside the used InnuPure C12 purification kit. -
Page 25: Innupure C12 Tools
Operation InnuPure C12 tools InnuPure C12 tools The following options are available in the InnuPure C12 tools: Init Initialization of the device, whereby the axes and sample tray are moved to the starting position. Waste tips Moving of tip on the tips admission to the waste box. -
Page 26: Waste Tips
Operation InnuPure C12 tools 3. Press [ENTER/Start] to open the Main menu ENTER/Start 4. Use cursor down [] to select 'Tools' and confirm with pressing [ENTER/Start] 5. The 'Tools' screen appears 6. Confirm 'Init' with the [ENTER/Start] button. 7. During the progress the shown screen appears. 8. -
Page 27: Remove Sample Tray
Operation InnuPure C12 tools 7.3.3 Remove sample tray Note After an isolation routine is finished, the sample tray is moved out automatically. 1. Use cursor down [] to select 'Tools' inside the ENTER/Start main menu and confirm with pressing [ENTER/Start]. The 'Tools' screen appears 2. -
Page 28: Performance Of An Isolation Routine
Operation Performance of an isolation routine 3. During the progress the shown screen appears; the magnets are moved out. 4. After the magnets were moved out the 'Tools' are displayed again. Note! The option 'Magnet out' is a tool of the InnuPure C12, which is needed for necessary cleaning purposes (→... -
Page 29: Cancel Or Continue A Running Program
Operation Cancel or continue a running program 4. During the isolation protocol is running, the following comments are displayed on the screen: [DNA_01] Name of the chosen isolation protocol [Total time] Time of the whole protocol until finish [Remaining]Remaining time until finish [Bind] Current running step is shown [00:29]... - Page 30 Operation Cancel or continue a running program 4. The tips are wasted into the waste box, the sample tray is moved out automatically and the shown screen appears. ENTER/Start 5. Confirm with [ENTER/Start] and the 'Protocol list' is displayed again. Issue 01/2011 InnuPure C12...
-
Page 31: Up-Date Of The Innupure C12
Up-date of the InnuPure C12 Installation of UpDateIP Up-date of the InnuPure C12 Note Enter the start screen of the InnuPure C12, before starting and working with the up-date software UpDateIP! Installation of UpDateIP 8.1.1 System requirements UpDateIP requires your PC to meet the following minimum requirements: Operating system: Windows 95 or higher Processor... -
Page 32: Language Versions
Up-date of the InnuPure C12 Language versions Finishing up-date program UpDateIP To exit the UpDateIP application, activate menu command File/Exit. Language versions For InnuPure C12 up-date software operation, German-language or English- XTRAS ANGUAGE language version can be selected. A desired language can easily be set in the NGLISH ERMAN software user screen. -
Page 33: Fig. 8-1 Updateip Workplace
Up-date of the InnuPure C12 The UpDateIP work place Menu bar Tool bar Device protocols Operation buttons Interface PC protocols Fig. 8-1 UpDateIP workplace The workplace contains the typical elements of Windows applications, such as: • Title bar with the standard buttons for resizing the window and closing the application •... -
Page 34: Menu Bar
Up-date of the InnuPure C12 The UpDateIP work place 8.5.1 Menu bar The menu bar is located at the top margin of the main window. Their functions are arranged in the following structure: Menu Command Function File Exit Finishing of the up-date software UpDateIP Extras Interface Choose the right COM port of the device connection to the... -
Page 35: Loading Of Isolation Protocols From Pc
Up-date of the InnuPure C12 Loading of isolation protocols from PC Loading of isolation protocols from PC 1. Start the InnuPure C12 up-date tool UpDateIP as mentioned in section → "Starting and finishing UpDateIP" on page 29. 2. Press the [Load] button to load a new isolation protocol (e.g. from CD or another directory) into the main window list 'PC protocols. -
Page 36: Copy Isolation Protocols
Up-date of the InnuPure C12 Up-load of isolation protocols to InnuPure C12 8.8.1 Copy isolation protocols 1. Press/activate the shown button [Copy]. 2. Choose the isolation protocol, which has to be transferred inside the list 'PC protocols' or inside the list 'Device protocols' and press accordant button: [Arrow left] Copy isolation protocol to main window list 'PC protocols'. -
Page 37: Delete Isolation Protocols
Up-date of the InnuPure C12 Delete isolation protocols 1. Press the shown button [Upload] to save the isolation protocols, which are shown in the list 'Device protocols' on the internal device memory. 2. All buttons inside the main window becomes inactive and a progress bar above the list 'Device protocols' is shown during the up-load progress is running. - Page 38 Up-date of the InnuPure C12 Delete isolation protocols Issue 01/2011 InnuPure C12...
-
Page 39: Care, Maintenance
Incidin Plus solution • If the InnuPure C12, with which infectious material has been processed, is returned to Analytik Jena AG for servicing, decontamination is to be carried out beforehand and is to be documented. • The magnets of the InnuPure C12 can be cleaned separately. -
Page 40: Changing Fuses
Care, maintenance Changing fuses After finishing the cleaning of the magnets and if they are completely try again, initialize the device (→ "Initialization" p. 23). Changing fuses Electric shock! Disconnect the mains plug before changing the fuses! If the fuses in the InnuPure C12 are defective they can be replaced. 1. -
Page 41: Waste Disposal
Waste disposal Waste disposal The InnuPure C12 operator must dispose of the waste materials arising from measurement (sample materials) in accordance with the legal and local regulations. The InnuPure C12 with its electronic components is to be disposed of as electronic waste at the end of its service life in accordance with the applicable provisions. - Page 42 Waste disposal Issue 01/2011 InnuPure C12...
-
Page 43: Technical Data
Technical data Technical data Extraction time 20 - 40 min (depending on starting material) Engine 5 low-noise long-live servo motors Device handling Stand alone; up-date compliant via PC Consumables Contained completely in the necessary kit Extraction routine Pre-installed protocols (optimized for different kinds of starting materials) Sample capacity Up to 12 samples in parallel... - Page 44 Technical data Issue 01/2011 InnuPure C12...
-
Page 45: Table Of Figures
Table of figures Table of figures Fig. 3-1 Front view of the InnuPure C12 ............8 Fig. 3-2 View inside of InnuPure C12 .............. 8 Fig. 3-3 Connections on the back side of the InnuPure C12 ......9 Fig. 3-4 Keypad functions ................ - Page 46 Table of figures Issue 01/2011 InnuPure C12...
Need help?
Do you have a question about the aj CYBERTRON InnuPure C12 and is the answer not in the manual?
Questions and answers