Table of Contents
Advertisement
Quick Links
Advertisement
Table of Contents

Related Manuals for Delta WASP 40100 Clay

Summary of Contents for Delta WASP 40100 Clay
- Page 1 MANUAL OF USE AND MAINTANANCE ORIGINAL INSTRUCTIONS...
- Page 2 The missing acknowledgment of the manual can be cause of personal injury, worst quality results or damages to the printer Delta WASP 40100 Clay. Always make sure that the personal using the 3D printer knows and understands the content of the manual in order to the best results from tDelta WASP 40100 Clay.
-
Page 3: Table Of Contents
Summary 0 Premises ................5 7 Ordinary and extraordinary maintanance ..34 0.1. Aim of the instruction manual ..........5 7.1. General warnings ..............34 0.2. How the read the manual of instructions ...... 6 7.2. Ordinary maintenance............35 0.3. Storage of the manual of instructions ......6 7.2.1. - Page 4 INTRODUCTION Delta WASP Clay line features all the latest technological innovations in the world of digital ceramics developed by WASP. The Manufacturer declines any responsibility for accidental damages caused by products when non-correctly used. WASP certifies the use LDM WASP Extruder and LDM WASP Extruder XL with ceramic materials, in case of use of the system with different kind of materials, warranty and support may not be valid anymore.
-
Page 5: Premises
Premises 0 PREMISES 0.1. Aim of the instruction manual IMPORTANT: Before proceding with the installing and starting of the printer, the technician, the user, the maintainer and the safety responsible must read and understand the actual manual. The manual must be considered as a fundamental part of the printer. The correct use and maintanence of the machine depends on the informations contained here. -
Page 6: How The Read The Manual Of Instructions
Premises 0.2. How the read the manual of instructions This manual is composed by: COVER WITH PRINTER IDENTIFICATION By consulting the cover you trace to the printer model covered in the manual and to the printer serial number in your possession. ANALYTICAL INDEX By consulting the index it is possible to indentify to the chapter and to the paragraph on which all the notes relating to a given topic are reported. -
Page 7: General Information
The marking can be identified by means of an identification plate of the Manufacturer as required by the Machinery Directive. In case of damage, the Recipient must commission a copy. Stampante 3D Modello: Delta WASP 40100 CLAY IT16060000009355 Volts: 230V 50/60Hz Advanced settings... -
Page 8: Position Of The Label On The Printer
1.2.1. Position of the label on the printer IMPORTANT: The label of identification of the printer is placed on the back column of the printer near the socket for the supply of the machine 1.3. Testing The printer is tested directly by the Manufacturer during the phase of mounting and post mounting. 1.4. -
Page 9: Declaration Of Conformity
1.5. Declaration of conformity Below is the declaration of conformity (FAC-SIMILE) of which the original copy is supplied together with the printer documentation. © CSP S.r.l. © CSP S.r.l. -
Page 10: General Safety Warnings
1.6. General safety warnings CAUTION: Any intervention must be performed on the printer requires particular caution on the part of the operator. NOTE: Any intervention on the printer must be carried out in strict compliance with the operational skills (see paragraph 1.7.1 “Identification of Operational Staff”). CSP S.r.l. declines any responsibility in case of non-compliance with these skills. -
Page 11: Operators For Whom The Manual Is Intended
1.6.2. Operators for whom the manual is intended The manual is written for: • The operators involved in using the printer (in the continuation of the manual will be briefly called “users”); • Mechanical maintenance workers: trained and authorized operators for the maintenance of mechanical parts, pneumatic and oil-hydraulic systems;... -
Page 12: Safety Stickers
1.6.4. Safety stickers The safety stickers shown below are applied to the printer. Before using the printer, check the integrity of these adhesives and assimilate the instructions. Refer to paragraph 1.7 “Glossary and pictograms”. If the meaning is not clearly understood, contact the Manufacturer. ATTENTION: The labels and stickers applied to the printer must be replaced before they become illegible. -
Page 13: Glossary And Pictograms
1.7. Glossary and pictograms 1.7.1. Identification of operating personnel The operator responsible for the operation or maintenance of the printer must possess the specific professional requirements for each intended operation. The operator must be instructed and therefore be aware of the tasks entrusted to him who has responsibility for the job. -
Page 14: Editorial Pictograms
1.7.2. Editorial pictograms To ensure a deeper knowledge of the printer, the text of this manual is accompanied by indications that complete it, providing additional information, indispensable attention or particularly significant hazards to consider; in this regard, the following notation is used: DANGER: Indica situazioni o operazioni che devono obbligatoriamente essere eseguite o le informazioni alle quali occorre prestare particolare attenzione per evitare danni alle persone. -
Page 15: Description Of The Printer
The device described in this manual is a printer intended for 3D printing using fluid-dense material. The printer consists of an extruder with a screw mounted on a delta robot type structure and a work bed. The material is put under pressure and pushed towards the extruder where it is dosed in a controlled manner by a screw and poured through a nozzle that deposits very small quantities of material on the work bed. -
Page 16: Control Panel
2.1. Control panel Fig. 2.1 - Control panel Legend: 1. Turn ON/OFF button 2. USB door type A 3. SD Card door 4. LCD display 5. Control handle (rotating left/right and it’s clickable) 6. Pressure regulation 7. Pause button © CSP S.r.l. ©... -
Page 17: Work Area
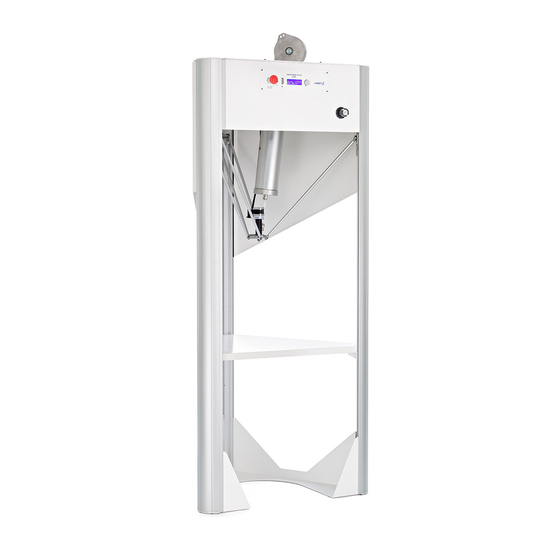
2.2. Work area Fig. 2.2 - Work area Legend: 1. Tank 2. Tank support 3. Double support arm 4. Extruder 5. Material pipe 6. Middle-height plate © CSP S.r.l. © CSP S.r.l. -
Page 18: Technical Data
2.3. Technical data All WASP 3D printers are characterized by considerable strength and working precision. Their mechanics allows for greater precision and stability, guaranteeing greater production speeds. A further advantage is the possibility of restarting the production of the piece from the point where it should be interrupted for any reason. -
Page 19: Noisiness
2.4. Noisiness The noise emitted by the printer only is inferior than 70 dB(A). The presence of more machines in the same area increases ATTENTION: It is the responsibility of the customer to carry out an assessment of the noise risk of his activity as prescribed by the legislation in force in the place where the printer is installed, and to equip the operators with adequate Personal Protective Equipment (such as headphones for hearing protection). -
Page 20: Transport And Handling
Transport and handling 3 TRANSPORT AND HANDLING 3.1. General warnings The reading of this chapter assumes, in order to use the printer safely, the knowledge of the contents of paragraph 1.6 “General safety warnings”. Furthermore, the specific requirements for safe interaction with the printer, related to this chapter, are detailed in the following paragraphs. -
Page 21: Unpackaging
Transport and handling 3.2. Unpackaging ENVIRONMENTAL NOTE: Once the packaging has been removed from the printer it is recommended to keep it for any requests for assistance from the Manufacturer. The printer will be delivered in a horizontally oriented wooden box. After removing the printer from the case, you must place the printer upright. -
Page 22: Installation
Installation 4 INSTALLATION 4.1. General warnings The reading of this chapter assumes, in order to use the printer safely, the knowledge of the contents of paragraph 1.6 “General safety warnings”. Furthermore, the specific requirements for safe interaction with the printer, related to this chapter, are detailed in the following paragraphs. -
Page 23: Electrical Connection
Installation 4.2. Electrical connection ATTENTION: The operations related to these activities must be performed by authorized and professionally qualified personnel. ATTENTION: It is up to the user to protect the cable mechanically against any crushing or sources of wear according to the type of installation made. ATTENTION: The printer must be powered by a 10A socket protected by a magnetothermic set at 30 mA. -
Page 24: Preparing To Use The Printer
Preparing to use the printer 5 PREPARING TO USE THE PRINTER 5.1. General warnings The reading of this chapter assumes, in order to use the printer safely, the knowledge of the contents of paragraph 1.6 “General safety warnings”. Furthermore, the specific requirements for safe interaction with the printer, related to this chapter, are detailed in the following paragraphs. -
Page 25: User Interface
Preparing to use the printer 5.2. User interface 5.2.1. Main board LDM mode Z1000.00 100% SD---% --:-- WASP 2040 Clay ready Fig. 5.2.1 - Main board The main board appears when turning on the printer and when launching the print. It is intended to be the principal tool for the monitoring and control of the printer Legend: 1. - Page 26 Preparing to use the printer 1. Main menu Machine not printing • Main menu: go back to main screen • Prepare: allows managing various settings of the printer • Advanced: allows managing advanced settings on the printer • SD Card menu: access files inside inside the SD Card for printing (only with SD card) •...
-
Page 27: Tune Menu
Preparing to use the printer 5.2.2. Tune menu • Main menu: go back to main screen • Speed: allows setting the speed during the print • Flow: allows setting the flow during the print 5.2.3. Advanced menu (machine not printing) “Advanced”... -
Page 28: First Start
Preparing to use the printer 5.4. First start After having correctly connected the printer to the socket it is necessary to perform some operations in order to allow the printer to work. Belt-stop clamps Inside the printer there are three belts necessary for moving the extruder during printing. To avoid movements of the extruder during transport, clamps are applied on the straps, to be removed before starting the printer. - Page 29 Preparing to use the printer © CSP S.r.l. © CSP S.r.l.
-
Page 30: First Use Of The Printer
First use of the printer 6 FIRST USE OF THE PRINTER 6.1. General warnings The reading of this chapter assumes, in order to use the printer safely, the knowledge of the contents of paragraph 1.6 “General safety warnings”. Furthermore, the specific requirements for safe interaction with the printer, related to this chapter, are detailed in the following paragraphs. -
Page 31: Printing Bed
First use of the printer 6.2. Printing bed NOTE: The printer has been designed to print directly on the working surface so that the machine can be moved to proceed with new prints. NOTE: Another option is printing directly on the bed of the printer. This bed needs to be calibrated on the first use. -
Page 32: Loading Of Material
First use of the printer 6.4. Loading of material NOTE: WASP provides a mixture to be fixed with water. The amount of water depends on the kind of extruder, nozzle and environmental conditions. Normally it is possible to use the following recipe: porcelaine 95%, water 5%. -
Page 33: First Print
First use of the printer ATTENTION: During operations, the operator must wear all the necessary Personal Protective Equipment (PPE). 6.5. First print To perform the print proceed as described: • Turn on the compressor to the 8 bars. • Screw the manometer in clockwise sense until around 5/6 bars (the necessary pressure varies depending on the consistency of the mixture ). -
Page 34: Ordinary And Extraordinary Maintanance
Ordinary and extraordinary maintanance 7 ORDINARY AND EXTRAORDINARY MAINTANANCE 7.1. General warnings The reading of this chapter assumes, for a safe use of the printer, the knowloedge of what contained in chapter1.6 “General safety warnings”. Moreover, the specific prescriptions for interacting in a safe way with the printer, relative to this chapter, are detailed in the next paragraphs. -
Page 35: Ordinary Maintenance
Ordinary and extraordinary maintanance 7.2. Ordinary maintenance TANK CLEANING The periodic maintenance and the correct use are fundamental factors to guarantee the functioning, safety and reliability of the machine The interventions of maintenance are carried out by the mechanical technician that must operate in total accomplishment of the safety warnings contained in this manual. -
Page 36: Ball Joints
Ordinary and extraordinary maintanance 7.2.1. Ball joints Lubrication Verify that all the mechanics are moving correctly, especially the ball joints. If they are not working properly lubricate with grease by using a brush. 7.2.2. Stepper fan Check that the fan on the extruder is working when the machine is turned on 7.2.3. - Page 37 Ordinary and extraordinary maintanance © CSP S.r.l. © CSP S.r.l.
-
Page 38: Additional Instructions
ADDITIONAL INSTRUCTIONS 9 ADDITIONAL INSTRUCTIONS 9.1. General warnings The reading of this chapter assumes, in order to use the printer safely, the knowledge of the contents of paragraph 1.6 “General safety warnings”. Furthermore, the specific requirements for safe interaction with the printer, related to this chapter, are detailed in the following paragraphs. -
Page 39: Instructions For Emergency Situations
ADDITIONAL INSTRUCTIONS NOTE: It is absolutely necessary to apply the regulations in force in the country of destination, concerning the disposal of waste, so it is forbidden to disperse in the environment any type of processing residue, oils, etc .. subdividing the dismantled parts by type for a correct separate collection of materials. - Page 40 ADDITIONAL INSTRUCTIONS NOTE __________________________________________________________________________________ __________________________________________________________________________________ __________________________________________________________________________________ __________________________________________________________________________________ __________________________________________________________________________________ __________________________________________________________________________________ __________________________________________________________________________________ __________________________________________________________________________________ __________________________________________________________________________________ __________________________________________________________________________________ __________________________________________________________________________________ __________________________________________________________________________________ __________________________________________________________________________________ __________________________________________________________________________________ __________________________________________________________________________________ __________________________________________________________________________________ __________________________________________________________________________________ __________________________________________________________________________________ __________________________________________________________________________________ __________________________________________________________________________________ __________________________________________________________________________________ __________________________________________________________________________________ __________________________________________________________________________________ __________________________________________________________________________________ __________________________________________________________________________________ __________________________________________________________________________________ © CSP S.r.l. © CSP S.r.l.
- Page 41 CSP S.R.L. Viale Zaganelli, 26 - 48024 Massa Lombarda (RA) Italia Tel. +39 0545 82966 www.wasproject.it - info@wasproject.it...
Need help?
Do you have a question about the WASP 40100 Clay and is the answer not in the manual?
Questions and answers