
Subscribe to Our Youtube Channel
Related Manuals for ADDAC System ADDAC812V


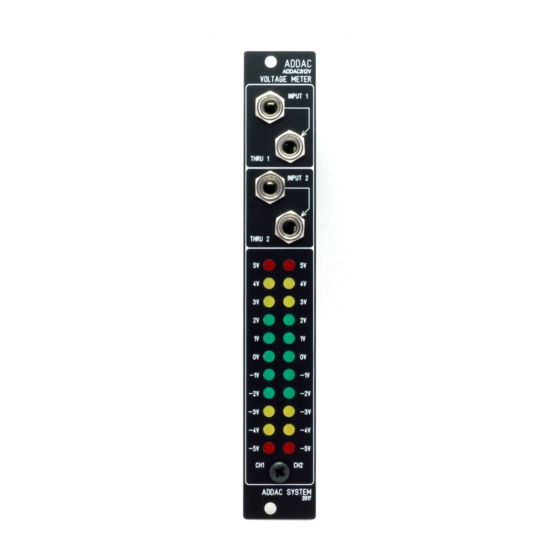
Summary of Contents for ADDAC System ADDAC812V
- Page 2 ADDAC812V Assembly Guide July.2017 Parts included in the kit: 1x Front Panel 2x Pcbs (front and back) 1x 12mm male/female spacer 1x 12mm female/female spacer 1x 10mm female/female spacer 3x M3 fiber washer 6x M3 screws 4x 4 pin male pinheaders...
- Page 3 ADDAC812V Assembly Guide STEP 2: Locate bboth Trimmers and cut the led further away from the metal pot shaft. Also cut the plastic corners of one of the trimmers (shown on the left). STEP 3: Place all leds as show in the picture below.
- Page 4 ADDAC812V Assembly Guide STEP 5: Place the four jacks in the pcb and attach the front panel. Hold the front panel in place by tightening the bottom screw. Also tighten the jack nuts and solder one leg of the top jack, this will keep the front panel secure to the pcb.
- Page 5 ADDAC812V Assembly Guide STEP 8: Force the pcb against the cards and solder one leg of each led. STEP 9: After one leg of each led is soldered check the front of the module to verify if all leds are aligned.
- Page 6 ADDAC812V Assembly Guide STEP 10: Next cut the soldered leg of all leds, this will help soldering the second leg. STEP 11: Solder the remaining leds and trim their legs. STEP 12: Solder the remaining jack legs. ADDAC SYSTEM page 6...
- Page 7 ADDAC812V Assembly Guide STEP 13: Place the top spacer and hold it with a screw. STEP 14: Cut the marked jack leg. ADDAC SYSTEM page 7...
- Page 8 ADDAC812V Assembly Guide STEP 15: Place but DO NOT solder the trimmer next to the spacer! STEP 16: Grab the Top pcb, locate the 79L05 ic, place it in place and solder it. STEP 17: Flip the pcb and place the power connector and 78L05 like shown in the picture below.
- Page 9 ADDAC812V Assembly Guide STEP 18: Flip the pcb and solder the power connector and 78L05. Also place the remaining spacer and attach it with a screw (marked below). STEP 19: Locate and connect all pinheaders like shown below. STEP 20: Place the pinheaders on the front pcb, attach the back pcb on top and hold the two pcbs by screwing the two spacers with two screws.
- Page 10 ADDAC812V Assembly Guide STEP 21: Push the trimmer against the bottom pcb making sure there’s a small gap between the trimmer and the top pcb. This will avoid shorting the cutted leg of the trimmer to touch the jack leg below.
- Page 11 ADDAC812V Assembly Guide CALIBRATION: The side trimmers are attenuator/amplifiers for the led voltage references.This allows the user to calibrate the led reaction to more specific needs. INPUT 1 By default the process described will calibrate the module TRIMMER for the ±5v range.
-
Page 12: Assembly Guide
For feedback, comments or problems please contact us at: For feedback, comments or problems please contact us at: addac@addacsystem.com addac@addacsystem.com ADDAC812V ASSEMBLY GUIDE Revision.01 July.2017...
Need help?
Do you have a question about the ADDAC812V and is the answer not in the manual?
Questions and answers