
Related Manuals for Slamtec ATHENA N4M11


Summary of Contents for Slamtec ATHENA N4M11
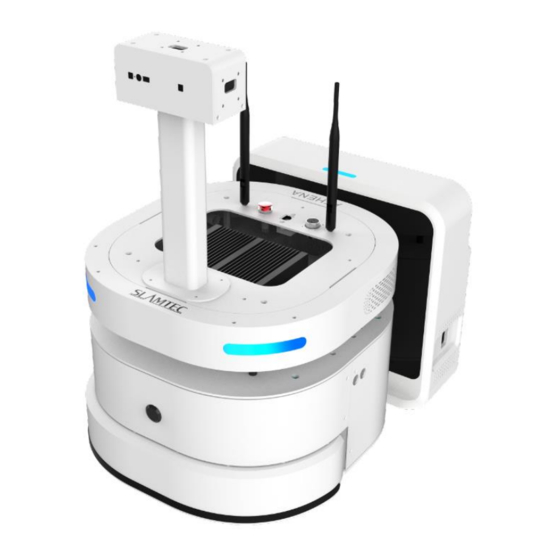
- Page 1 ATHENA General Purpose Robot Platform Professional Version User manual Model: N4M11 Shanghai Slamtec.Co.,Ltd 1 / 31 Copyright (c) 2016-2017 Shanghai Slamtec Co., Ltd.
-
Page 2: Table Of Contents
MECHANICAL DIMENSIONS ......................... 24 QUICK START——UNPACK ........................25 QUICK START——MOUNT THE DEPTH CAMERA ................27 QUICK START——PUT BATTERY IN(OPTIONAL) ................28 APPENDIX ..............................31 MAGE AND TABLE INDEX ..........................31 2 / 31 Copyright (c) 2016-2017 Shanghai Slamtec Co., Ltd. -
Page 3: Overview
Introduction Athena is a low cost small-sized general purpose robot development platform developed by SLAMTEC to meet the requirement of small-size robot application like patrol robot, delivery robot and etc. Its build-in SLAMWARE Cube autonomous localization and navigation module is designed to realize path finding and navigation. -
Page 4: Sensors
Emergency charging port Wi-Fi Figure 1-1 Connection between Athena and External System Sensors Depth Camera RPlidar (layer) Ultrasonic sensor Bumpers Cliff sensor Magnetic sensor Figure 2-1 Athena Sensor Configuration 4 / 31 Copyright (c) 2016-2017 Shanghai Slamtec Co., Ltd. -
Page 5: Interfaces
Right Status Description None Power off Blink Blink Low battery(lower than 15%) There is health information (Emergency stop or sensor errors). Energency charging Blink Blink autonomous recharging Green Fully charged 5 / 31 Copyright (c) 2016-2017 Shanghai Slamtec Co., Ltd. - Page 6 Energency charging or autonomous Blink Blink recharging Blink Blink Turn left Blink Blink Turn right Blink Blink Walk straight Figure 2-4 Athena Indicator Status Under Low Battery 6 / 31 Copyright (c) 2016-2017 Shanghai Slamtec Co., Ltd.
-
Page 7: Charging Station
220V power with the charging station power cable. Emergencing charging Come with charging station as accessories. Please cable of charging connect the charging station and Athena with the station charging cable. 7 / 31 Copyright (c) 2016-2017 Shanghai Slamtec Co., Ltd. -
Page 8: Extended Platform
Athena. Please refer to the following figure for the specific position of threaded holes and the port dimensions. Power port Ethernet port Emergency stop Reserved Threaded Holes 5-M5 Figure 3-1 Athena Extended Platform 8 / 31 Copyright (c) 2016-2017 Shanghai Slamtec Co., Ltd. -
Page 9: Port Definition
Athena under Standard charging: 6A Emergency 25.2V 6A unexpected situations charging port Quick charging supported:10A such as the charger electrode not working. Supported Switch Type and Description of Control Port 9 / 31 Copyright (c) 2016-2017 Shanghai Slamtec Co., Ltd. - Page 10 This switch is used to reset the press the network resetting switch wireless network. button for 3 seconds to reset Wi-Fi. Figure 3-3 Supported Switch Type of Athena Extended Platform Control Port 10 / 31 Copyright (c) 2016-2017 Shanghai Slamtec Co., Ltd.
-
Page 11: Athena Reference Design
Keep enough space for user control port Keep enough space for WIFI antennas Reserved Threaded Holes 5-M5 Figure 3-4 Athena Reference Design 11 / 31 Copyright (c) 2016-2017 Shanghai Slamtec Co., Ltd. - Page 12 190*40 area. Try to put the center of gravity in the middle of the robot (left and right). Figure 3-5 Athena Reference Design for Center of Gravity 12 / 31 Copyright (c) 2016-2017 Shanghai Slamtec Co., Ltd.
- Page 13 800-1000mm. The higher the robot is, the weaker the ability to pass the threshold and slope. Figure 3-6 Athena Reference Design for Center of Gravity 13 / 31 Copyright (c) 2016-2017 Shanghai Slamtec Co., Ltd.
-
Page 14: Deployment And Usage
Once succeeded, the system indicator turns on and the buzzer beeps several times. It takes one minute to start the system. 14 / 31 Copyright (c) 2016-2017 Shanghai Slamtec Co., Ltd. - Page 15 File->Robots in the menu, user can find a docked window opened in the left side of the pane as in Figure 4-2. In this window, user can connect to or disconnect from robots. 15 / 31 Copyright (c) 2016-2017 Shanghai Slamtec Co., Ltd.
- Page 16 Once connected successfully, the major work area will show the robot, map information and its status. The robot name will turn to green and the robot status will turn to Connected as below. 16 / 31 Copyright (c) 2016-2017 Shanghai Slamtec Co., Ltd.
- Page 17 Click File->MapEditor and choose saving the map file to local or uploading it to the firmware. Figure 4-5 RoboStudio Robot Map Editing Window 4. Launch Host Computer and Load the Map 17 / 31 Copyright (c) 2016-2017 Shanghai Slamtec Co., Ltd.
- Page 18 "connect failed on " << e.what() << endl; catch (rpos::system::detail::ExceptionBase &e) cout << "failed on " << e.what() << endl; return Please refer to our SDK reference for more movement deployment. 18 / 31 Copyright (c) 2016-2017 Shanghai Slamtec Co., Ltd.
-
Page 19: Connect To Computer
In the same page, we also provide a document to introduce the usage of this tool. Web Portal Tool During developing, testing and controlling the SLAMTEC robtots like Athena, our users can do many things to our robot via the Web Portal tool, such as checking basic information,upgrading firmware and configuring WiFi. -
Page 20: Charging And Battery
Athena is shown in the following figure. Please use the emergency charging cable to connect the emergency charging port on the charger and the charging port on Athena 20 / 31 Copyright (c) 2016-2017 Shanghai Slamtec Co., Ltd. - Page 21 3.6V-3.9V. Attentional Notes Since the battery is softly packaged with aluminum foil, it is vulnerable to sharp objects. Please do not place the battery with sharp objects. 21 / 31 Copyright (c) 2016-2017 Shanghai Slamtec Co., Ltd.
- Page 22 Avoid violent vibration, shock and pressing during the transportation of the battery and handle it gently when carrying it. The battery should be packaged and protected with soft packing material. 22 / 31 Copyright (c) 2016-2017 Shanghai Slamtec Co., Ltd.
-
Page 23: Attention
Ensure that the load of Athena meets the requirement of the specification. Do not use Athena on slope. Do not use Athena under environment with too many highly transparent materials. 23 / 31 Copyright (c) 2016-2017 Shanghai Slamtec Co., Ltd. -
Page 24: Mechanical Dimensions
Mechanical Dimensions Reserved Threaded Holes 5-M5 Figure 6-1 Athena Mechanical Dimensions 24 / 31 Copyright (c) 2016-2017 Shanghai Slamtec Co., Ltd. -
Page 25: Quick Start--Unpack
3. As shown in Figure 5, please carefully take out the EPE for fixing the depth camera from the box and then take out the depth camera module from the EPE. 25 / 31 Copyright (c) 2016-2017 Shanghai Slamtec Co., Ltd. - Page 26 4. After removing the top EPE, please take out the Athena carefully with the help from at least one of your colleagues. Next, you need to install the depth camera on the top of the robot. 26 / 31 Copyright (c) 2016-2017 Shanghai Slamtec Co., Ltd.
-
Page 27: Quick Start--Mount The Depth Camera
Athena with four M3*5 screws (in the blue circled screw holes of Figure 9). And then connect the USB cable of the depth camera module with the IPC(the blue USB interface of the IPC) on the tope of Athena. Figure 9 Figure 10 27 / 31 Copyright (c) 2016-2017 Shanghai Slamtec Co., Ltd. -
Page 28: Quick Start--Put Battery In(Optional)
M3*8 screws in Figure 12, there are four M3*8 screws in total. And then you can remove the whole Athena back cover from Athena as shown in Figure 13. Figure 13 Figure 12 28 / 31 Copyright (c) 2016-2017 Shanghai Slamtec Co., Ltd. - Page 29 BATIN interface of the power management module), as shown in figure 17. Figure 17 Figure 16 4. As shown in Figure 18, please tidy the cables. 29 / 31 Copyright (c) 2016-2017 Shanghai Slamtec Co., Ltd.
- Page 30 Figure 18 5. Please install the Athena back cover back to the Athena to finish the whole installation. 30 / 31 Copyright (c) 2016-2017 Shanghai Slamtec Co., Ltd.
-
Page 31: Appendix
TUDIO OBOT ONNECTION ....................17 4-5 R IGURE TUDIO OBOT DITING INDOW ................17 4-6 M IGURE ANUAL HARGING ONNECTION ....................21 6-1 A IGURE THENA ECHANICAL IMENSIONS ....................24 31 / 31 Copyright (c) 2016-2017 Shanghai Slamtec Co., Ltd.
Need help?
Do you have a question about the ATHENA N4M11 and is the answer not in the manual?
Questions and answers