Advertisement
Quick Links
Advertisement

Related Manuals for Kogan KACKR4LMLTB


Summary of Contents for Kogan KACKR4LMLTB
- Page 1 12-IN-1 MULTI COOKER KACKR4LMLTB...
-
Page 3: Safety And Warnings
This appliance is intended to be used in household and domestic use only. • Make sure that the damaged power cord is replaced by Kogan.com; a service centre authorised by Kogan.com or similarly qualified persons to avoid a hazard. The appliance is not intended to be operated using an external timer or a separate remote-control system. - Page 4 If the appliance is used improperly, for professional or semi-professional purposes, or if it is not used according to the instructions in this user guide, the warranty becomes invalid and Kogan.com reserves the right to refuse liability for any damage caused.
- Page 5 Power failure backup function • The unit has a backup function that reserves the status before a power failure. • If power failure occurs during a cooking process and power supply is resumed within a short time, the count-down of the cooking time continues where it left off. •...
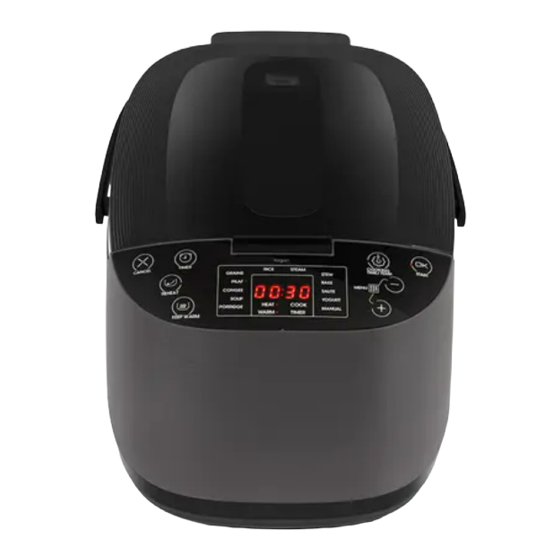
- Page 6 COMPONENTS Main unit Spoon Inner pot Power cord Steam container Measuring cup Scoop User guide...
- Page 7 OVERVIEW Removable condensation compartment Removable inner lid Handle Open button Inner lid lock Control panel Power socket Removable steam valve...
- Page 8 Cancel Cooking time and temperature settings Reheat Start Keep Warm Menu and Decrease value Timer Menu and Increase value Cooking stages Cooking programs...
-
Page 9: Operation
OPERATION Note: During the cooking process, if you want to open and close the lid (especially when there is a lot of water in the inner pot), make sure to slowly close it or wait for 1-2 minutes, so that the steam disperses and the pressure is released. - Page 10 Rinse the rice, put the washed rice in the inner pot. For the rice setting, add water to the level indicated on the scale inside the inner pot that corresponds to the number of cups of rice used. Flatten the rice so it is spread evenly.
- Page 11 Press the “+” or “-” button to select the desired program. Press the “OK” button to start cooking. When the cooking is finished, the appliance will beep and switch to Keep Warm mode automatically. The ‘warm’ indicator will light up, and screen count up keeps warm time.
- Page 12 Cooking Pilaf / Pilau Menu Default Time Time Regulation Pilaf 30min 10min – 2h Mix the washed rice with other ingredients and spices in the inner pot. Pour some water into the inner pot and close the lid. Press the “+” or “-” button to select the desired program. Press the “OK”...
- Page 13 Quick Recipe - Pilaf with pork • Pork: 300g • Rice: 2 cups • Oil: 35ml • Carrot: 150g • Onion: 100g • Garlic: 10g • Water: 2 cups • Salt: to taste • Spices: to taste Rinse the rice. Cut the meat into cubes 2-2.5cm. Carrots and onions cut into strips. Cut the garlic into halves.
- Page 14 Cooking Congee, Soup, Porridge or Stew • It is normal to find the porridge stickier if it is left in the warm-keeping mode for too long. • When you cook porridge, make sure to follow the water level indications accordingly. Menu Default Time Time Regulation...
- Page 15 When the cooking is finished, the appliance beeps and switches to warm keeping mode automatically. Steaming Menu Default Time Time Regulation Steam 25min 5min - 1h Note: To use the steam cooking mode, the steam container provided must be used. Try to ensure that the box fits appropriately.
- Page 16 Press the “+” or “-” button to select the desired program. Press the “OK” button to start cooking. Note The countdown does not go during the preheat stage. After the end of the preheat stage, the program starts cooking and counting down the time. When the cooking is finished, the appliance beeps and switches to warm keeping mode automatically.
- Page 17 Press the “+” or “-” button to select the desired program. Press the “OK” button to start cooking. When the cooking is finished, the appliance beeps and switches to warm keeping mode automatically. Open the lid and carefully take out the inner pot to cool down. After the inner pot has cooled down, put a plate or cake rack on top of the pot and then up over to take the cake out.
- Page 18 Sauté When the cooking is finished, the appliance beeps and switches to warm keeping mode automatically. • Cook only with the lid open Menu Default Time Time Regulation Sauté 15min 1min - 1h Wipe off the water outside of the inner pot and put it into the appliance. Add oil into the pot.
- Page 19 Yoghurt Menu Default Time Time Regulation Yoghurt 1min –12h Use your favourite recipe to make homemade yoghurt. Mix the ingredients in a deep plate and cover the plate with foodstuff film. The height of the plate should not exceed the height of the steam container. Pour 5 glasses of water into the inner pot and place the steam container.
- Page 20 When the cooking is finished, the appliance beeps and switches to standby mode automatically. Note: • Cool the yoghurt in the fridge. • Serve yoghurt with fresh berries, fruits and nuts. Reheating Menu Duration of Work Reheat Up to 12h Take cooled rice or other dishes and spread them evenly over the inner pot.
- Page 21 Setting the cooking time before and during the cooking process. You can adjust the cooking time before and during the cooking process for some menus, including: Grain, Pilaf, Congee, Soup, Porridge, Steam, Stew, Bake, Sauté, Yoghurt and Manual. Refer to the cooking timetable in each chapter for the detailed regulating range. After selecting the desired cooking mode, press the “Cooking Time/Temp”.
- Page 22 Manual • Manual mode allows you to change the time and temperature settings before and during the cooking process, and is ideal for preparing various recipes. Menu Default time Time Regulation Manual 30min 1min - 12h Default temperature Temperature regulation 100ºC 35-105ºС...
- Page 23 Press OK to confirm the temperature and run the cooking process. • The further press of the setting button returns to the time adjustment. • To check the set temperature during the cooking, press and hold the setting button. Setting the timer for delayed start cooking You can pre-set the delayed cooking time for some menus.
- Page 24 The hours’ indicator flashes. Use the “-” and “+” buttons to adjusts the hours. Press the “Cooking Time/Temp”. button to adjust minutes. The minutes’ indicator flashes. Use the “-” and “+” buttons to adjusts the minutes. Press OK to confirm the time and launch the timer.
- Page 25 Enable and disable the “Keep Warm” function Note: To check the cooking time of the selected mode, press and hold the “Cooking Time / Temp/” button for 3 seconds. The “Keep Warm” function can be deactivated or activated before and during cooking. The “Keep Warm”...
-
Page 26: Cleaning And Care
CLEANING & CARE • Unplug the appliance before cleaning. • Wait until the appliance has cooled down sufficiently before cleaning. • Make sure to clean the detachable inner lid regularly, otherwise, it will discolour and develop a foul odour. • Do not use scouring pads or other hard objects to clean the inner pot and top lid. - Page 27 • To remove the condensate compartment, pull the condensate compartment outside (4). • If the steam valve is not installed or not properly installed, leakage will happen during cooking. Before using the appliance, make sure to check if the steam valve is properly installed.
-
Page 28: Troubleshooting
TROUBLESHOOTING Problem Solution • If the appliance is positioned on an uneven or tilted surface, the texture of the cooked rice may be too hard or too soft as the amount of water becomes inconsistent. • The texture of rice varies depending on the brand of rice, where it was harvested and how long it was stored (new crop or old crop). - Page 29 • Make sure to follow the instructions in the user manual. selecting option. • If you cannot resolve the problem, do not disassemble the appliance. Contact kogan.com for further assistance. • You did not choose the correct cooking menu. For instance, you might be boiling water but have chosen a rice cooking menu.
- Page 30 NOTES...
- Page 32 Need more information? We hope that this user guide has given you the assistance needed for a simple set-up. For the most up-to-date guide for your product, as well as any additional assistance you may require, head online to help.kogan.com...
Need help?
Do you have a question about the KACKR4LMLTB and is the answer not in the manual?
Questions and answers