Table of Contents
Advertisement
Quick Links
Advertisement
Table of Contents

Related Manuals for BZB Gear BG-BFS


Summary of Contents for BZB Gear BG-BFS
- Page 1 BG-BFS User Manual...
-
Page 2: Attention
Attention Electrical Safety Installation and operation must be performed in accordance with local safety standards. Polarity of power supply The power supply of the product is DC 12V and following is the polarity of the power supply drawing. Handle with care Never move the camera by seizing the camera head. -
Page 3: Table Of Contents
Content ATTENTION ............................- 1 - 1.1 C ......................- 3 - AMERA NTERFACE XPLANATION 1.2 P ............................. - 3 - OWER ON 1.3 V ............................- 3 - IDEO OUTPUT 1.4 B ..........................- 4 - RACKET OUNTING 2. PRODUCT OVERVIEW ........................ - 5 - 2.1 P ........................ -
Page 4: Camera Interface Explanation
1. FAST INSTALLATION Camera Interface Explanation Figure 1.1 1. RESET 2. RS485 and alarm interface 3. DC12V Power Supply Socket 5. 3G-SDI Interface Power Indicator Network Interface 8. Auto Iris Interface 9. Function Key Audio Input Interface 10. Lens Interface 11.1. -
Page 5: Bracket Mounting
for installation. Then enter the username admin and password admin (factory default); press Enter to enter into the preview page, users can carry out PTZ control, video recording, playback, configuration and other operations. 2) 3G-SDI video output a. 3G-SDI video cable connection: S model refer to No5 in above Figure. b. -
Page 6: Product Overview
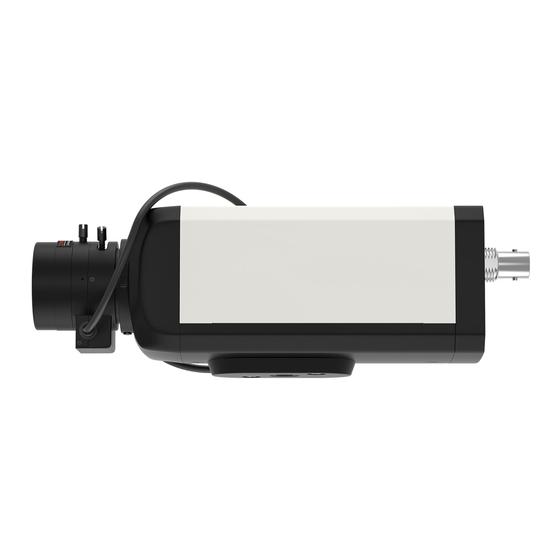
2. Product overview Product introduction 2.1.1 Dimension - 5 -... -
Page 7: Accessories
2.1.2 Accessories Power adapter User manual Accessories Warranty card Main Features 2.2.1 Camera performance This camera features advanced ISP processing algorithms to provide vivid images with a strong sense of depth, high resolution and fantastic color rendition. It supports H.264/H.265 encoding which makes motion video fluent and clear even with less than ideal bandwidth conditions. -
Page 8: Technical Specification
Technical specification Model Camera Parameter Sensor 1/2.8-inch high quality HD CMOS sensor Effective Pixels 16: 9; 2.07 megapixel Video Format 1080P60/30/25/59.94/29.97 ,720P60/30/25/59.94/29.97 Auto Iris DC driving mode Digital Zoom Minimum Illumination 0.5Lux (F1.8, AGC ON) 2D﹠3D DNR White Balance Auto/Manual/One Push/ 3000K/ 4000K/5000K/6500K Focus Auto/Manual Aperture... -
Page 9: Interface Instruction
Interface instruction 2.4.1 External Interface RS485 interface, alarm input output, audio input interface, 3G-SDI output, LAN, DC12V power interface, auto iris interface 2.4.2 RS-485 interface - 8 -... -
Page 10: Application Instruction
3. Application Instruction 3.1.1 Power-On Initial Configuration Connecting the DC12V power cable, and then the power indicator light will be flashing. 3.1.2 Video output 1) Network output: connect this product and your computer through network cable, then open the browser, enter the camera IP address (factory default 192.168.5.163) in the address bar, then to the login page and input a username and password (factory defaults are “admin”). - Page 11 [↑↓] Select: for selecting menu [← →] Change value: for modify parameters [MENU] Back: Press [MENU] to return [Home] OK: Press [Home] to confirm 3.2.1.1 Exposure Move the pointer to the (Exposure) in the Main Menu, click the【HOME】key and enter into the (Exposure sub menu) as shown below, EXPOSURE =================...
- Page 12 COLOR ================ WB Mode Auto Saturation AWB Sensitivity High Color style Default Color temp Middle [ ↑ ↓ ]Select [ ← → ]Change Value [Menu]Back WB MODE: Auto,3000K,4000K,5000K,6500K,Manual,One Push RED GAIN: 0~255(only available in Manual mode) BLUE GAIN: 0~255(only available in Manual mode) SATURATION: 60%, 70%, 80%, 90%, 100%, 110%, 120%, 130% Hue: 0~14 AWB Sensitivity: high/middle/low...
- Page 13 Contrast: 0~14 Sharpness:0~15 Flip-H: On/Off Flip-V: On/Off B&W mode: color, black/white Gamma: default/0.47/0.50/0.52/0.55 DCI: Dynamic Contrast: Off/1~8 3.2.1.4 NOISE REDUCTION Move the pointer to the (NOISE REDUCTION) in the Menu, click the【HOME】and enter the (NOISE REDUCTION) as follows NOISE REDUCTION =================...
- Page 14 VERSION ================= Version 2.0.0.2 2016-1-27 Back Note: version information would be different after FM upgrading. 3.2.1.7 RESTORE DEFAULT Move the pointer to the (RESTORE DEFAULT) in the Main Menu, click the【HOME】and enter the (RESTORE DEFAULT) as follow. RESTORE DEFAULT ================= Restore Default? [←...
-
Page 15: Network Connection
4. Network Connection 4.1 Connection Mode Direct connection: Connect the camera directly to the computer by using an ethernet cable. Internet connection mode: Connect the camera and computer to a router or switch and access via the local area network (LAN). Note: Ensure power and network connections are secured to prevent video issues caused by poor connection quality. -
Page 16: Webgui Log In
For the following steps refer to the diagram below. Click on the bubble for “Use the following IP address” In the IP address field enter a non-conflicting IP address on the same subnet as the camera. If there is another device with the same IP address you will not be able to connect. -
Page 17: Preview
Supported browsers for WebGUI access include Chrome, Firefox, and Safari 4.2.2 Preview After successful login into the management interface, it enters the video preview interface. In the preview screen, users can control PTZ, zoom, focus, video capture, sound, focus, full screen and set the preset position, run, delete and other operations. -
Page 18: Video Configuration
1) Local configuration Video Preview Mode: user can choose real-time priority or fluency priority: The delay will be small when under real time priority mode and fluency will be good when under fluency priority mode. Setting based on the user need (Default value: real time normal (2), real time best (1), fluency normal (3), fluency good (4) and fluency best (5)) Recording packing time(minute): Set recording video packing time (default is 10, range from 1~120 minutes) - Page 19 3) Video Parameters Focus: Focus mode, focus range, focus sensitivity can be set. Focus Mode: set the focus mode (the default auto, manual optional) Focus range: set the focus range (the default middle, the upper and lower optional) Focus Sensitivity: Set the focus sensitivity (default is low, high, medium optional) Exposure: Exposure mode, exposure compensation, back light compensation, anti-flicker, gain limit, wide dynamic, shutter speed, aperture value and brightness can be set.
-
Page 20: Network Configuration
4) Character-Overlapping Display date and time: Set whether to display the time and date (default display). Display Title: Set whether to display the title (default display). Font Color of Time: Set font color of time and date (default white, black, yellow, red, blue optional). -
Page 21: System Configuration
Alternate DNS server: Alternate DNS server settings. (Default 0.0.0.0). Click on the "Save" button, it will be valid when display "Save successful". 4) GB28181 Switch: set whether open GB28181, can check Time Synchronization: whether synchronization time is set, you can check Stream Type: stream type setting (the default main stream, secondary stream optional) Sign effective time (in seconds): 3600 Range 5-65535 Heartbeat time (seconds): 60 Range 1-65535... -
Page 22: Logout
MCU version V2.0.0.16 2015-12-18 Camera version V2.0.0.16 2015-12-18 Focus version V2.0.0.6 2015-12-11 Users only read the version information above which is consistent with the menu version but cannot modify. Different types of the machine has different information. Update file: Click "Browse ..." installation, to select the upgrade file in the pop-up window. Click on the "Upgrade"... -
Page 23: Warranty / Mission Statement
Check whether there is machinery or objects nearby that could be transmitting vibration to the camera. 4) Remote control does not work- Verify remote control address is set to 1. Check remote control batteries. Verify the camera is in the normal operating mode. Verify the OSD has been exited.
Need help?
Do you have a question about the BG-BFS and is the answer not in the manual?
Questions and answers