Advertisement
Quick Links
Instructions Manual
Caution: Please read the manual carefully before installation. This product is not
a toy. Please seek assistance from people with RC model experience for the
assembly and fl flying. This product is not a toy. Please seek assistance from
people with RC model experience for the assembly and fl flying
1
Advertisement

Related Manuals for H-KING Wargo MX2 3D


Summary of Contents for H-KING Wargo MX2 3D
- Page 1 Instructions Manual Caution: Please read the manual carefully before installation. This product is not a toy. Please seek assistance from people with RC model experience for the assembly and fl flying. This product is not a toy. Please seek assistance from people with RC model experience for the assembly and fl flying...
- Page 2 The Wargo Signature MX2 is the next step of my goal to provide a line of perfect 3D and aerobatic training aircraft. I have dedicated a lot of my flying career to teaching 3D aerobatics and helping pilots learn how to become better pilots.
-
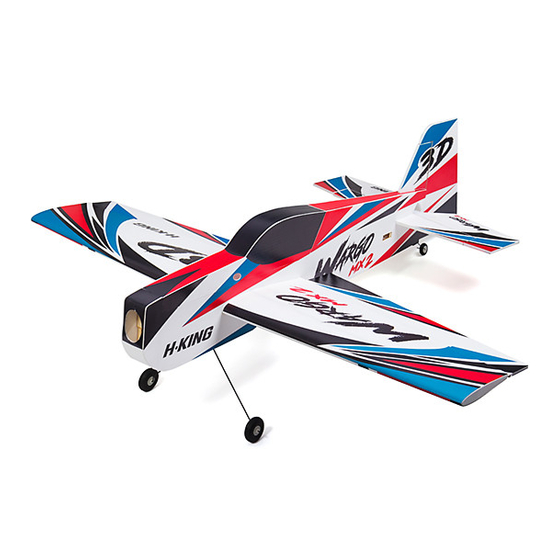
Page 3: Product Specifications
Open the package and check the contents carefully. If you have found any missing/ damaged parts, please contact our customer service for help. Product Specifications: Wingspan: 955mm Length: 983mm Wing area: 24 dm2 Brushless motor: 2216 2217 2834 (KV 1250) ESC: 30 A with BEC Propeller: 10 x 4.7 Lithium battery: 3s (1000 to 1500 mAh) 25c battery Servos: 9g plastic gear x 4... -
Page 4: Control Surface Deflections
Control Surface Deflections: Ailerons: high rates: 40 degrees, low rates: 25 degrees Elevator: high rates: 45 degrees, low rates: 25 degrees Rudder: high rates: 45 degrees, low rates: 25 degrees Flight Precautions: 1. Do not fly in bad weather with poor visibility. 2. - Page 5 1. Connect servo extension leads to the elevator 2. Feed the elevator and rudder servo cables and rudder servo cables. through the inside of the fuselage. 3. Install the rudder elevator and servos into the 4. Find the landing gear and install the wheels. airframe.
- Page 6 7. Carefully insert the elevator into the fuselage, 8. Carefully insert the horizontal stabiliser into noting that the elevator needs to be flipped the fuselage. Insert the elevator hinges into the upside down and back-to-front when inserted. horizontal stabiliser. Measure to ensure that the Once it is fully inserted, you can flip it over.
- Page 7 13. Use a small amount of thin CA glue to attach 14. Use a suitable foam glue to reinforce the the horizontal stabiliser to the fuselage. horizontal stabiliser to fuselage join on both Note: Do not use too much thin CA glue, as it sides top and bottom.
- Page 8 19. Insert the rudder hinges into the tail, leaving 20. Ensure that there is a rudder hinge gap of a hinge gap of about 1mm. about 1mm to allow it to movefreely. Use thin CA Adjust the height of the rudder so that the tail glue to attach the rudder hinges to the horizontal wheel can rotate freely.
- Page 9 25. Install the extended rocker arm asshown. 26. Install all ball heads as shown. 27. Setup the elevator linkages as shown. 28. Setup the rudder linkages as shown. 29. Setup the aileron linkages as shown. 30. Install a receiver. Connect all 4 servos and the ESC to the receiver.
- Page 10 Setup Tips & Tricks Travel Settings: Each Flight control must be set to its physical limits. This means as far as it will go, but no farther than it has to. You set this by selecting the servo, fully deflect the surface with the transmitter, then increase (or occasionally decrease) the percentage to where the flight surface will not travel any further.
Need help?
Do you have a question about the Wargo MX2 3D and is the answer not in the manual?
Questions and answers