
Subscribe to Our Youtube Channel
Related Manuals for Albrecht CDS ANKLE BRACE NEURO


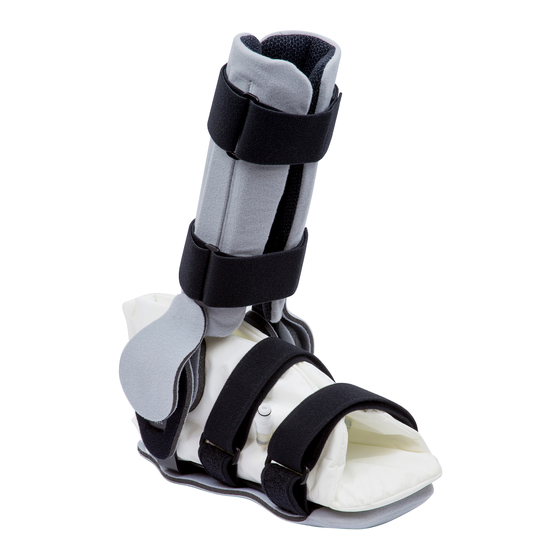
Summary of Contents for Albrecht CDS ANKLE BRACE NEURO
- Page 1 U S E R I N S T R U C T I O N S C D S A N K L E B R A C E N E U R O ® D Y N A M I C S P R I N G - L O A D E D A N K L E O R T H O S I S...
-
Page 2: Table Of Contents
Ankle Brace Neuro ® User Instructions Contents 1. Introduction ....................1.1. Foreword ..................... 1.2. Customer information .................. 1.3. Mode of operation ..................1.4. Application ....................1.5. Scope of delivery ..................1.6. Declaration of conformity ................1.7. Features ....................... 1.8. Indications .................... - Page 3 User Instructions 2.3. Attaching of the brace by the orthopaedic technician ......... 2.3.1. Deactivate the spring tension ............2.3.2. Setting rotation on the foot part ............2.3.3. Setting pronation or supination on the foot part ......2.3.4. Adjusting the vacuum foot rest ............
-
Page 4: Introduction
GmbH directly, before you use the brace. This particularly applies to the safety instructions. 1.3. Mode of operation Ankle Brace Neuro functions ®... -
Page 5: Features
User Instructions 1.7. Features 1.8. Indications • Therapy in dorsalextension The physician will prescribe the type of treatment to apply based on his or her • Small hinge with proven features: diagnostic findings. – Individual adjustment of the spring Generally, the use is indicated in: tension •... -
Page 6: Safety Instructions
Ankle Brace Neuro ® User Instructions • Currently there is no test for flammability. 1.10. Safety Instructions Exercise caution when using the orthosis in the direct vicinity of open flames such as The optimal effect of the brace is only lighters and cigarettes. -
Page 7: Adjustment By The Orthopaedic Technician
User Instructions 2. Adjustment by the orthopaedic technician 2.1. Fitting to the patient • Our CDS braces are constructed to be adjustable. ® • The position of the shell components can be changed and they can be shaped. • The hinge rods can be adapted to the shape of the extremity by using an orthopaedic bending iron. -
Page 8: Optional Installation Of The Brace Covers
Ankle Brace Neuro ® User Instructions 2.1.2. Optional installation of the brace covers Stick the big adhesive coin onto the hinge rod underneath the fine adjustment. Stick the three small adhesive coins onto the hinge. Hook-and-loop fasten the gripper to the calf pad. Pull the cut out pad over the hinge and hook-and-loop fasten it to the hinge rod. -
Page 9: Adjusting The Distance Between The Hinge Rods
User Instructions 2.1.3. Adjusting the distance between the hinge rods You can change the distance of the hinge rods from the lateral edge of the sole. To do so, loosen the screws in the sole plate. Move the hinge rods singly. When the optimal position of both rods has been found, fix the footbar again. -
Page 10: Adjusting The Brace
Ankle Brace Neuro ® User Instructions 2.2. Adjusting the brace 2.2.1. Setting the limitation Before setting the limitation, you must deactivate the spring tension. Turn the switch to “off”. Bring the brace into plantar extension. Then turn the stop screw with the supplied tool from the CDS ®... -
Page 11: Fine Adjustment
User Instructions 2.2.2. Fine adjustment Fine adjustment gives you the option of infinitely variable limitation (stop). Ensure that the spring tension is deactivated. Set the flexion stop according to the scale (0-15). The setting reduces the already set limitation. www.albrechtgmbh.com... -
Page 12: Changing The Working Range Of The Cds ® Ankle Brace In Extreme Dorsiflexion
Ankle Brace Neuro ® User Instructions 2.2.3. Changing the working range of the CDS Ankle Brace in ® extreme dorsiflexion In neurological patients it may be necessary to bring the working range of the Ankle Brace Neuro further into dorsiflexion than the factory setting. ®... -
Page 13: Attaching Of The Brace By The Orthopaedic Technician
User Instructions 2.3. Attaching of the brace by the orthopaedic technician 2.3.1. Deactivate the spring tension Before attaching the brace you must deactivate the spring tension. Turn the green switch to “off”. Bring the brace into plantar extension. 3 Open the strap fasteners To make it easier to apply the brace to the patient, adjust the length of the lower leg straps to their maximum length without unthreading them. - Page 14 Ankle Brace Neuro ® User Instructions 4 Attaching the brace Ensure that the pivot of the brace hinges matches the physiological pivot of the ankle. It is possible to adjust the thigh rods to the shape of the patient‘s leg by using a bending iron.
-
Page 15: Setting Rotation On The Foot Part
User Instructions 2.3.2. Setting rotation on the foot part The foot piece is preset to 0°. However, it is possible for you to set the angle of rotation to 15° or 30°. Remove the pad beneath the sole. Loosen the fixing screw with the supplied tool. Unscrew the adjusting screw. -
Page 16: Setting Pronation Or Supination On The Foot Part
Ankle Brace Neuro ® User Instructions 2.3.3. Setting pronation or supination on the foot part Loosen the screws of the two terminal blocks with the supplied tool. Turn the sole part into the desired pronation or supination and tighten the two screws again. -
Page 17: Adjusting The Vacuum Foot Rest
User Instructions 2.3.4. Adjusting the vacuum foot rest Adjust the straps to the desired length and shorten them as needed. Open the two foot straps. Place the brace on the patient’s leg. Close the two lower leg straps. Close the two foot straps. Attach the valve of the vacuum pump to the vacuum pad valve connector without pressing the grey release button. - Page 18 Ankle Brace Neuro ® User Instructions Aspirate all the air from the vacuum pad with the vacuum pump. Please note: the air is fully aspirated when you feel obvious resistance when pumping. Detach the valve of the vacuum pump from the vacuum pad valve connector of the by pressing the grey release button.
-
Page 19: Final Adjustment
User Instructions 2.3.5. Final adjustment After fastening the individual straps, check that the straps are the correct length and that the brace is in correct position, and correct if necessary. Ensure that the straps are not too tight so as not to interfere with the circulation. 2.3.6. -
Page 20: Setting The Spring Tension To The Intensity Needed By The Patient
Ankle Brace Neuro ® User Instructions 2.3.7. Setting the spring tension to the intensity needed by the patient The spring tension setting is displayed on the CDS housing by a scale from ® 0 to 15. The ranges above 15 and below 0 are marked in red. To prevent damage to the CDS hinge, the red range in the CDS... -
Page 21: Changing The Spring Tension
User Instructions Drehmoment in Nm bei Beugung 90° Torque in Nm Einstellungsstufen Settings 2.3.8. Changing the spring tension The spring tension can be adjusted according to the to treatment progress. Insert the tool as far as it will go into the side hole on the hinge. By turning clockwise or towards + the spring tension is increased and it is decreased by turning anticlockwise or towards -. -
Page 22: Removing The Brace
Ankle Brace Neuro ® User Instructions 2.3.9. Removing the brace 1 Deactivate the spring tension Before removing the brace you must deactivate the spring tension. To do so, turn the green switch to “off”. Bring the brace into plantar extension. To remove the brace, only open the clips and straps. -
Page 23: Cleaning, Maintenance And Disinfection
User Instructions 3. Cleaning, maintenance and disinfection The orthosis is designed to be maintenance-free. To ensure proper operation over the period of treatment the orthosis should be cleaned regularly (at least every 3 months) or as required, according to the following instructions. Hand wash at 30°C 3.1. -
Page 24: Technical Data
Ankle Brace Neuro ® User Instructions 4. Technical data Name Material Weight 1250g Padding material PU foam with PA hook and loop velour, partially silicone coated Strap material PA strap with PA hook and loop velour Brace material aluminium Vacuum pad PU foil Coating vacuum pad Cotton terry with PU coating... -
Page 25: Transfer Of The Brace
User Instructions 6. Transfer of the brace The brace is not intended for single use, but rather is intended for multiple use by a single person. We do not recommend transfer to other users. Should this be desired however, please ensure to pass on the care and cleaning instructions and have the brace checked by an authorized specialist dealer for safe and proper operation. - Page 26 Ankle Brace Neuro ® User Instructions...
- Page 27 User Instructions www.albrechtgmbh.com...
- Page 28 P A T E N T S : E P 0 8 4 1 0 4 4 U S 5 , 9 5 4 , 6 7 E P 3 3 5 2 7 1 3 F U R T H E R P A T E N T S P E N D I N G V E R S I O N : E N 0 9 .
Need help?
Do you have a question about the CDS ANKLE BRACE NEURO and is the answer not in the manual?
Questions and answers