
Related Manuals for TSC PEX-1121 Series


Summary of Contents for TSC PEX-1121 Series
- Page 1 PEX-1121/ PEX-1131/ PEX-1161 SERIES PEX-1221/ PEX-1231/ PEX-1261 SERIES THERMAL TRANSFER / DIRECT THERMAL PRINT ENGINE USER’S MANUAL...
- Page 2 Information in this document is subject to change without notice and does not represent a commitment on the part of TSC Auto ID Technology Co. No part of this manual may be reproduced or transmitted in any form or by any means, for any purpose other than the purchaser’s personal use, without the expressed...
- Page 3 Agency Compliance and Approvals EN 55032: Class A EN 55024 EN 55035 EN 61000 EN 60950-1 EN 62368-1 This is a class A product. In a domestic environment this product may cause radio interference in which case the user may be required to take adequate measures. FCC part 15B, Class A ICES-003, Class A This equipment has been tested and found to comply with the limits for a Class A...
- Page 4 Mexico UL 60950 KN 32 KN 35 K60950-1(2011-12) 이 기기는 업무용(A 급) 전자파적합기기로서 판매자 또는 사용자는 이 점을 주의하시기 바라며, 가정외의 지역에서 사용하는 것을 목적으로 합니다. GB 4943.1 GB/T9254, Class A GB 17625.1 此为 A 级产品,在生活环境中,该产品可能会造成无线电干扰, 在这种情况下,可能需要用户对干扰采取切实可行的措施。 Energy Star for Imaging Equipment Version 3.0 TP TC 004 TP TC 020 CNS 13438...
- Page 5 provided by manufacture. WARNING: Moving parts. Keep finger or body away from moving parts. CAUTION: For equipment with RTC (CR2032) battery or rechargeable battery pack Risk of explosion if battery is replaced by an incorrect type. Dispose of used batteries according to the Instructions as below. 1.
- Page 6 30mW 5470-5725MHz Hereby, TSC Auto ID Technology Co., Ltd. declares that the radio equipment type [Wi-Fi] IEEE 802.11 a/b/g/n is in compliance with Directive 2014/53/EU The full text of the EU declaration of conformity is available at the following internet address: http:// www.tscprinters.com...
- Page 7 This device has been evaluated for and shown compliant with the IC Specific Absorption Rate (“SAR”) limits when installed in specific host products operated in portable exposure conditions. (For Wi-Fi) This device has also been evaluated and shown compliant with the IC RF Exposure limits under portable exposure conditions.
-
Page 8: Table Of Contents
Suggestion of Ribbon Tension Adjustment ................. 28 6. TSC Console ......................... 30 6.1 Start TSC Console......................30 6.2 Set WiFi and Add to TSC Console Interface ..............32 6.3 TPH Care ........................34 6.5 Printer Function ......................35 - vii -... - Page 9 7 LCD Menu Function ......................36 7.1 Enter the Menu ......................36 7.2 Menu Overview ......................36 7.3 Setting ..........................38 7.3.1 TSPL ..............................38 7.3.2 ZPL2 ..............................40 7.3.3 SBPL ( Only available on EZS version firmware) ................ 43 7.4 Sensor ..........................
-
Page 10: Introduction
1. Introduction 1.1 Product Introduction Thank you very much for purchasing TSC bar code print engine. TSC’s innovative PEX-1000 Series print engine incorporates a robust die cast construction designed for years of reliability, ease of use, and cost-conscious serviceability. The PEX combines a precision print mechanism with high performance electronics to produce labels at up to 18 inches per second, the fastest in its class. -
Page 11: Product Specification
1.2 Product Specification Printer model PEX-1121/PEX-1221 PEX-1131/PEX-1231 PEX-1161/PEX-1261 Item Resolution 8 dots/mm (203 DPI) 12 dots/mm (300 DPI) 24 dots/mm (600 DPI) Printing method Thermal transfer and direct thermal Print speed 457mm (18”)/second 356 mm (14”)/second 152 mm (6”)/second Max. print width 104 mm(4.09”) Max. - Page 12 8 alpha-numeric bitmap fonts Internal font Monotype Imaging® true type font engine with one CG Triumvirate Bold Condensed scalable font 1D bar code Code 11, Code 39, Code 49, Code 93, Code128UCC, Code128 subsets A.B.C, Codabar, Standard 2 of 5, Industrial 2 of 5, Interleave 2 of 5, EAN-8, EAN-13, EAN-14, EAN-128, ITF14, UPC-A, UPC-E, EAN and UPC 2(5) digits add-on, MSI, PLESSEY, PLANET, Bar code POSTNET, RSS-Stacked, GS1 DataBar, China Post, Telepen, LOGMARS...
-
Page 13: Operations Overview
2. Operations Overview 2.1 Unpacking and Inspection This print engine has been specially packaged to withstand damage during shipping. Please carefully inspect the packaging and print engine upon receiving the bar code print engine. Please retain the packaging materials in case you need to reship the print engine. -
Page 14: Print Engine Orientation
2.2 Print Engine Orientation The PEX-1000 series are available in a left-hand configuration and a right-hand configuration. PEX-1121/ PEX-1131/ PEX-1161 series PEX-1221/ PEX-1231/ PEX-1261 series Right –hand model Left-hand model Note: This document is going to show the components inside the media compartment of a left- hand print engine. -
Page 15: Checking The Installation Space
2.3 Checking the Installation Space Please check the space for mounting the print engine into an applicator. Please refer to the dimensions in this section. - 6 -... - Page 16 - 7 -...
- Page 17 - 8 -...
- Page 18 - 9 -...
-
Page 19: Print Engine Overview
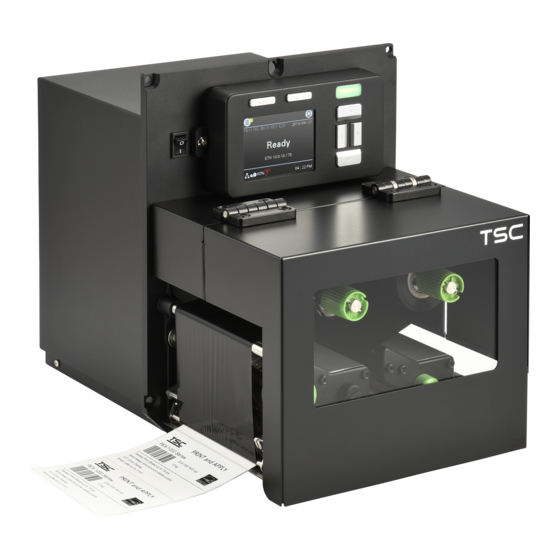
2.4 Print Engine Overview 2.4.1 Front View Soft keys Power switch LCD display Wi-Fi antenna LED indicator Navigational keys Media view window Print engine cover USB host - 10 -... -
Page 20: Interior View
2.4.2 Interior view Ribbon rewind spindle Ribbon tension adjustment knobs Print head pressure adjustment knobs Print head release lever Print engine cover open sensor Ribbon supply spindle Label guide bar release lever Media sensor position adjustment knob Platen roller Print head Media sensor Label guide - 11 -... -
Page 21: Rear View
2.4.3 Rear View GPIO interface (Applicator interface with DB15F connector +5V I/O) RS-232C interface inte Ethernet interface USB interface Note: Power cord socket The interface picture here is for reference only. Please refer to the Centronics interface product specification for the interfaces availability. -
Page 22: Operator Control
2.5 Operator Control Soft Keys Model Name & Firmware Version Status Navigational keys IP Address Icons 2.5.1 LED Indication This print engine has one three-color LED indicator. LED Color / Status Description Green/ Solid This illuminates that the power is on and the device is ready to use. This illuminates that the system is downloading data from PC to memory Green/ Flash or the print engine is paused. -
Page 23: Main
2.5.2 Main page Icons Indicated icon Indication Wi-Fi device is ready Ethernet is connected Bluetooth device is ready Remaining amount of ribbon(m) Pending documents in the printer Security lock Print head cleaning notice Print engine cover open Icon button Function the “Favorites”... -
Page 24: Setup
3. Setup 3.1 Setting up the print engine 1. Please refer to the section 2.3 to install the print engine to an applicator. 2. Make sure the power switch is off. 3. Connect the print engine to the computer with the provided USB cable or available connections. 4. -
Page 25: Loading The Ribbon
3.2 Loading the Ribbon Open the print engine cover. Note: There is no media supply spindle for standard model. Right –hand model Left-hand model Install the ribbon and paper core onto ribbon supply spindle and ribbon rewind spindle. Right –hand model Left-hand model Push print head release lever to open print head mechanism. - Page 26 Wind the ribbon rewind spindle counterclockwise roughly 3~5 circles until ribbon is smooth, properly stretched and wrinkle-free. Right –hand model Left-hand model Close the print head mechanism by pushing the print head release lever. Right –hand model Left-hand model Note: Please refer to video on TSC YouTube. - 17 -...
- Page 27 Loading path for ribbon Left-hand model * Ink coated outside wound * Ink coated inside wound Right –hand model * Ink coated outside wound * Ink coated inside wound - 18 -...
-
Page 28: Loading The Media
3.3 Loading the Media 3.3.1 Loading the Media 1. Open the print engine cover. Note: There is no media supply spindle for standard model. Right –hand model Left-hand model 2. Push open the print head release lever and label guide bar release lever for loading media. Right –hand model Left-hand model 3. - Page 29 4. Adjust the rear label guide (green) to fit the label width. Right –hand model Left-hand model 5. Adjust the front label guide (green) to fit the label width. Left-hand model Right –hand model 6. Move the media sensor by adjusting the media sensor position adjustment knob, make sure the gap or black mark sensor is at the location where media gap/black mark will pass through for sensing.
- Page 30 8. Set media sensor type and calibrate the selected sensor. Right –hand model Left-hand model Note: * Please calibrate the gap/black mark sensor when changing media. * Please refer to video on TSC YouTube. Loading path for media Right –hand model Left-hand model - 21 -...
-
Page 31: Loading Media In Peel-Off Mode
3.3.2 Loading Media in Peel-off Mode 1. Open the print engine cover. 2. Please refer to section 3.3.1 step 3~8 for loading media. Note: * Please calibrate the gap/black mark sensor before loading media in peel-off mode to avoid paper jam. * There are no peel-off sensor and liner rewind spindle for standard model. - Page 32 6. Feed the leading edge of liner through the peel-off roller. Right –hand model Left-hand model 7. Press the middle of the peel-off roller to close the peel-off roller release lever. Right –hand model Left-hand model 8. Close print head release lever and label guide bar release lever. Right –hand model Left-hand model - 23 -...
- Page 33 9. Press the FEED button to test. Right –hand model Left-hand model Loading path for media in peel-off mode Right –hand model Left-hand model - 24 -...
-
Page 34: Moveable Print Head Pressure Adjustment Knob
4. Moveable Print Head Pressure Adjustment Knob The moveable print head pressure adjustment knob has 5 levels of adjustment. Because the print engine’s paper alignment is to the left side (or right side/ PEX-1200 series) of mechanism, different media widths require different pressure to print correctly. -
Page 35: Ribbon Tension Adjustment Knob
This print engine has been fully tested before delivery. There should be no ribbon wrinkle presented on the media for general-purpose printing application. Ribbon wrinkle is related to the media thickness, print head pressure balance, ribbon film characteristics, print darkness setting…etc. In case the ribbon wrinkle happens, please follow the instructions below to adjust the print engine parts. - Page 36 The ribbon tension adjustment knob has 3 levels of adjustment. Because the print engine’s ribbon alignment is to the left side (or right side/ PEX-1200 series) of mechanism, different ribbon width require different tension to print correctly. Therefore it may require to adjust the ribbon tension knob to get your best print quality.
-
Page 37: Suggestion Of Ribbon Tension Adjustment
Suggestion of Ribbon Tension Adjustment For 4” width ribbon If the ribbon width is 4”, adjust both ribbon tension adjustment knobs to the #1 on ribbon supply & rewind spindles. (Factory default tension is #1) Ribbon Rewind Spindle Ribbon Supply Spindle Tension # 1 Tension # 1 For 3”... - Page 38 For 2” width ribbon If the ribbon width is 2”, adjust both ribbon tension adjustment knobs to the #3 on ribbon supply & rewind spindles. Ribbon Rewind Spindle Ribbon Supply Spindle Tension # 3 Tension # 3 - 29 -...
-
Page 39: Tsc Console
6. TSC Console TSC Console combine the Printer Management, Diagnostic Tool, CommTool and Printer Webpage settings, which enables you to adjust printer’s settings/status; change printers’ settings; download graphics, fonts and firmware; create a printer bitmap font; and send additional commands to printers at the same time. - Page 40 The printer will be added to TSC Console’s interface Select the printer and set the settings. For more information, please refer to TSC Console Users Manual. ※ - 31 -...
-
Page 41: Set Wifi And Add To Tsc Console Interface
6.2 Set WiFi and Add to TSC Console Interface Use USB or COM Port to set up the interface. Click Get to receive printer’s info and finish WiFi setting by clicking WiFi tab. Click Set and the priter will reset. - Page 42 Select the ways of searching WiFi devices. Click Discover to find the printer. Printer firmware version before A.12 and Alpha-2R/3R/4L, TDM series can only be discovered ※ through “IP Address” option. - 33 -...
-
Page 43: Tph Care
6.3 TPH Care TPH Care could check condition of the print head. Set the failure dots threshold for indicating errors when the threshold is reached. Note: If this option is gray, it means this printer does not support this function. To enable (ON)/ disable Warning Condition: If the unhealthy dot equals (OFF) the TPH Care... -
Page 44: Printer Function
6.5 Printer Function Printer Function could be found in Printer Configuration. “Printer Function” will be shown on the left side of the window. Functions Description Calibrate Sensor Detect media types and the size of the label RTC Setup Synchronize printer with Real Time Clock on PC Factory Default Initialize the printer to default settings Reset Printer... -
Page 45: Lcd Menu Function
7 LCD Menu Function 7.1 Enter the Menu ) to enter the “Menu”. Press the left side soft key (means Left soft Keys Use the navigational keys to select the “icon” (be marked in green) and press the right soft key (means ) to enter the selected item. - Page 46 There are six categories for the menu. You can easy to set the settings of print engine without connecting the computer. Please refer to following sections for more details. This “Setting” category can set up the print engine settings for TSPL & ZPL2. This "Sensor"option is used to calibrate the selected media sensor.
-
Page 47: Setting
7.3 Setting Press the right soft key to switch the TSPL, ZPL2, and SBPL. Select the item by navigational key and press right soft key to enter the selected item. 7.3.1 TSPL This “TSPL” category can set up the print engine settings for TSPL. Print Speed Slew Speed Back Speed... - Page 48 Use this option to setup printing darkness. The available Density setting range is from 0 to 15, and the step is 1. You may need to adjust your density based on selected media. The direction setting value is either 1 or 0. Use this item to setup the printout direction.
-
Page 49: Zpl2
7.3.2 ZPL2 This “ZPL2” category can set up the print engine settings for ZPL2. Darkness Print Speed Slew Speed BackFeed Speed Tear Off Tear Off Applicator Print Mode Stream Print Width Rewind List Fonts List Images List Formats List Setup Menu ZPL2 Control Prefix... - Page 50 203 dpi: 6 ips Use this item to setup feed speed. Setting value is up to Slew Speed 300 dpi: 4 ips 8 ips. 600 dpi: 3 ips Use this item to setup back feed speed. Setting value is BackFeed Speed 2 ips up to 6 ips.
- Page 51 This option is used to set the action of the media when you close the print head. Selections Description Feed Print engine will advance one label Head Close No Motion Print engine will calibration the sensor Calibration levels, determine length and feed label Print engine determine length and feed Length label...
-
Page 52: Sbpl ( Only Available On Ezs Version Firmware)
7.3.3 SBPL ( Only available on EZS version firmware) Dispenser Rewinder Print Type Mode Print Darkness Continuous Print Speed(S) Setting SBPL Slew Speed(S) BackFeed Speed(S) Offset Pitch Item Description Default This item is used to set the print mode. There are three modes as below, Print Mode Description... -
Page 53: Sensor
Sensor This option is used to calibrate the selected sensor. We recommend calibrate the sensor before printing when changing the media. Black Mark Auto Calibration Continuous Preprint Manual Standard Black Mark Calibration Continuous Auto Threshold Detect Fixed Menu Sensor Maximum Length Back side BMark... -
Page 54: Interface
Interface This option is used to set the print engine interface settings. Serial Ethernet Wi-Fi Menu Interface Bluetooth GPIO 7.5.1 Serial Comm. This option is used to set the print engine RS-232 settings. 1200 bps 2400 bps 4800 bps 9600 bps Baud Rate 19200 bps 38400 bps... -
Page 55: Ethernet
Stop Bit(s) This item is used to set the RS-232 Stop Bits. 7.5.2 Ethernet Use this menu to configure internal Ethernet configuration check the print engine’s Ethernet status, and reset the Ethernet module. Status Menu Interface Ethernet Configure Item Description Default Use this menu to check the IP address and MAC setting Status... -
Page 56: Bluetooth
DHCP: This item is used to ON or OFF the DHCP (Dynamic Host Configuration Protocol) network protocol. Configure DHCP Static IP: Use this menu to set the print engine’s IP address, subnet mask and gateway. SSID Use this menu to set the Wi-Fi SSID Security Use this menu to set the Wi-Fi security Open... - Page 57 Item Description Default This option is used to set the GPO_3 signal when PRINT END. Selections Description The applicator port is off. Label Label Waiting Label prints Ready format format for start for next sent processed print label signal not ready Data ready (Pin 14, ready...
- Page 58 When this option is enabled and the printer is paused, the error signal Error On Enable (GPO_2) is LOW. Pause When this option is enabled and the printer is Low Ribbon (GPO_1), the Ribbon Enable printer will generate a warning. Low Mode When the Ribbon Low Mode feature is enabled, this parameter Ribbon...
-
Page 59: Gpio-Db25 (Only Available On Ezs Version Firmware)
7.5.6 GPIO-DB25 (Only available on EZS Version firmware) Before BackFeed Motion Controlled After Mode 1 Ext 9 Pin Select Mode 2 Type 1 Type 2 External Signal Type 3 Type 4 Menu GPIO Interface Enable External Reprint Disable Enable Continuous Print Disable I/O Status I/O Signal... - Page 60 Item Description Default Set the Backfeed motion in dispenser mode BEFORE: Backfeed the media to the print head position before printing Before BackFeed Motion AFTER: Backfeed the label after dispensing CONTROLED: Backfeed motion will be controlled by external signal Set the output mode of the external signal pin 6 when using a 25-pin connector MODE1: Outputs the signal when the product has/does not have remaining print data.
-
Page 61: Advanced
7.6 Advanced Language Print Information Initialization Date Format Display Brightness Date Date & Time Time Format Menu Advanced Time Menu Lock Security Menu Password Ribbon Low Warning Warning Print Head Maintn. Reset Counter Interval Key Sound Contact Us Item Description Default Language English... - Page 62 This item is used to check print head status and to set the settings for print head care. Item Description This item is used to enable/disable the print head clean warning. If enable this feature, once print head has been Warning reached the setting mileage then the warning icon will be shown on print...
-
Page 63: File Manager
7.7 File Manager This feature is used to check the print engine available memory, show the files list, delete the files or run the files that saved in the print engine DRAM/Flash/Card memory. DRAM Menu File Manager FLASH CARD - 54 -... -
Page 64: Diagnostic
7.8 Diagnostic Print Config. Dump Mode Menu Diagnostic Print Head Diag Gap Display Sensor Diag Black Mark Diag Ribbon End Item Description This feature is used to print current print engine configuration to the label. On the configuration printout, there is a print head test pattern, which is useful for checking if there is any dot damage on the print head heater element. - Page 65 Numbers of download files Total & available memory space Print head check pattern Note: Checking dot damage requires 4” wide paper width. Captures the data from the communications port and prints out the data received by print engine. In the dump mode, all characters will be printed in 2 columns.
-
Page 66: Favorites
7.9 Favorites This feature can create customized menu list. You can organize the commonly used setting options to the Favorites list. Enter the “Favorites” Press and hold the left side soft key on Ready mode to enter the "Favorites". Left soft keys ... - Page 67 Delete option item Press and hold right side soft key on the item of favorite list, unit “Delete Favorites” setting screen pops up. Select “Yes” to delete this setting option item on “Favorites” list. Press and hold the right soft key Press right soft keys to delete the "Speed"...
-
Page 68: Troubleshooting
8 Troubleshooting The following guide lists the most common problems that may be encountered when operating this bar code print engine. If the print engine still does not function after all suggested solutions have been invoked, please contact the Customer Service Department of your purchased reseller or distributor for assistance. - Page 69 * Ribbon and media is loaded * Reload the supply. incorrectly * Clean the print head. * Dust or adhesive * Clean the platen roller. accumulation on the print * Adjust the print density and print speed. head. * Run self-test and check the print head * Print density is not set test pattern if there is dot missing in the Poor Print Quality...
- Page 70 * Calibrate the sensor sensitivity again. * Set the correct label size and gap size. * Enter LCD menu (or via DiagTool) to fine tune the parameter of Shift Y. * If using the software BarTender, please set the vertical offset in the driver. * Media sensor sensitivity is not set properly.
-
Page 71: Maintenance
9 Maintenance This session presents the clean tools and methods to maintain your print engine. 1. Please use one of following material to clean the print engine. Cotton swab Lint-free cloth Vacuum / Blower brush Printhead cleaning pen or 100% Ethanol or Isopropyl Alcohol 2. -
Page 72: Revise History
Revise History Date Content Editor 2021/2/9 Modify errors on table of contents Linda Add chp.7.5.6 – GPIO DB25 2021/3/2 Linda - 63 -... - Page 73 9F., No.95, Minquan Rd., Xindian Dist., No.35, Sec. 2, Ligong 1st Rd., Wujie Township, New Taipei City 23141, Taiwan (R.O.C.) Yilan County 26841, Taiwan (R.O.C.) TEL: +886-2-2218-6789 TEL: +886-3-990-6677 FAX: +886-2-2218-5678 FAX: +886-3-990-5577 Web site: www.tscprinters.com E-mail: apac_sales@tscprinters.com TSC Auto ID Technology Co., Ltd. tech_support@tscprinters.com...
Need help?
Do you have a question about the PEX-1121 Series and is the answer not in the manual?
Questions and answers