Table of Contents
Advertisement
Quick Links
Advertisement
Table of Contents

Related Manuals for sauter HK-D


Summary of Contents for sauter HK-D
- Page 1 Sauter GmbH Ziegelei 1 Phone : +49-[0]7433- 9933-0 D-72336 Balingen Fax: +49-[0]7433-9933-149 e-mail: info@kern-sohn.com Internet: www.sauter.eu Instruction manual mobile Leeb hardness tester SAUTER HK-D/HK-DB Version 2.0 04/2020 PROFESSIONAL MEASURING HK-D_HK-DB-BA-e-2020...
-
Page 2: Table Of Contents
V. 2.0 04/2020 Instruction manual mobile Leeb hardness tester Thank you for purchasing the digital Leeb hardness tester from SAUTER. We hope you will be very satisfied with the high quality of the hardness tester and its extensive functionality. For any questions, wishes and suggestions please do not hesitate to contact us. - Page 3 Notes on transport and storage conditions ..........32 Parts subject to wear and tear, which are not covered by the scope of warranty........................32 https://www.kern-sohn.com/shop/de/DOWNLOADS/ ....... 33 HK-D_HK-DB-BA-e-2020...
-
Page 4: Before Commissioning
Before putting the device into operation, check the delivery for any transport damage to the packaging, the plastic case and the device itself. Should this be the case, SAUTER must be contacted immediately. Precautions 1. the complete device must not be immersed in water or exposed to rain, which could cause unforeseeable damage, the battery or the display could be destroyed 2. -
Page 5: General Application And Test Area
2.2 General application and test area General application • for assembled machine parts and permanently installed parts • Measuring at recesses of moulded parts • Heavy work objects • Fault analysis of pressure boilers, steam generators and other equipment • In a narrow, difficult to access test area where the work item is installed •... - Page 6 Grey cast 93~334 92~326 iron Ductile Cast 131~387 127~364 Iron Aluminium 19~164 23~210 32~168 casting 23.8~84.6 22.7~85.0 23.8~85.5 alloys Brass 40~173 (copper- 13.5~95.3 Zinc alloys Bronze (Ku- Alu/ Ku-Zinc 60~290 alloy) Wrought 45~315 copper alloy Table 2 Strength σb(MPa) Material Structural Steel 350~522 374~780...
-
Page 7: Scope Of Delivery And Optionally Available Accessories
2.3 Scope of delivery and optionally available accessories Notes Display unit D-type rebound body Small stabilizing ring Cleaning brush Standard Screwdriver scope Hardness test block Only for HK-DB delivery Interface cable Software Optional Various other rebound sensors Table 3 Different types of support See table 4 rings Table 3... - Page 8 Min. strength d. Pattern with 10mm fixed coupling Min. coating thickness at ≥0.8mm ≥0.8mm ≥0.2mm ≥1.2mm Surface hardening Hardness Penetration 0.54mm 0.54mm 0.38mm 300HV diameter 24μm 24μm 12μm Penetration depth Hardness Penetration 0.54mm 0.54mm 0.32mm 600HV diameter 17μm 17μm 8μm Penetration depth Hardness...
-
Page 9: Working Conditions
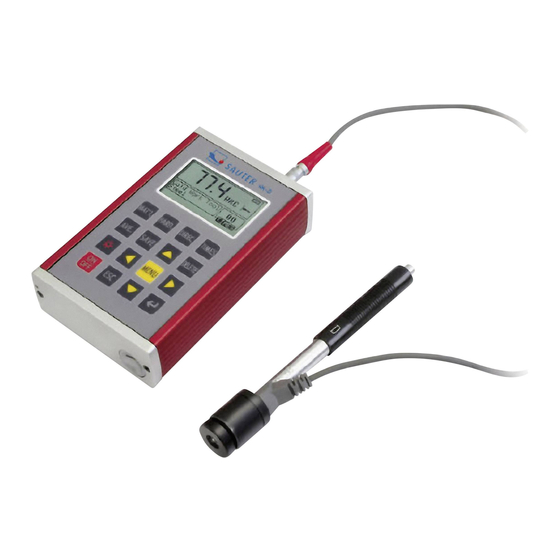
testing cylindrical inner surfaces R16.5~R30 testing spherical outer surfaces SR10~SR15 testing spherical outer surfaces SR14.5~SR30 testing spherical inner surfaces SR11~SR13 testing spherical inner surfaces SR12.5~SR17 testing spherical inner surfaces SR16.5~SR30 For testing cylindrical outer surfaces Radius is adjustable R10~∞ 2.4 Working conditions Temperatures: -10°C to +40°C Relative air humidity: ≤... - Page 10 The display unit 1. Housing 2. Connection for connecting cable 3. Connection for rebound sensor 4. Control buttons 5. LCD screen 6. Key description on the back of the housing The D-type rebound sensor 1. Release button 2. Charging Tube 3.
-
Page 11: The Leeb Test Principle
3.2 The LEEB test principle The basic principle is to use a rebound body of a specified weight, which is impacted on the test surface using a specified test force and then the impact velocity and rebound velocity of the rebound body are measured with the spherical test tip 1mm above the surface to be tested. -
Page 12: Testing
- Relative humidity (RH) 5% to 95%. - Hardness test block of hardness 790+/- 40HL included in delivery for model HK-DB Table 5 Hardness value v. Type ERROR Again- Leeb Standard Hardness Rebound sensor Display value availability Block 760±30HLD ±6 HLD 6 HLD 530±40HLD ±10 HLD... -
Page 13: Test Procedure
- Weighing down the test piece: this is not necessary for heavy test pieces. Medium- heavy objects are placed on a smooth and stable surface. The test piece should be placed absolutely flat and without wobbling. - A sufficient material thickness of the test piece is required, as well as the minimum material thickness. - Page 14 Localization The support ring of the rebound sensor is now pressed firmly onto the surface of the test piece, whereby the rebound direction should always be vertical to the surface to be tested. Testing - For testing, the release button on the upper side of the rebound sensor is pressed. It is assumed that the test piece as well as the device are in a fixed position at this time.
- Page 15 Table 6 Type Distance from the centre of Distance from the centre of the rebound the two indentations indentation to the corner of the test sensor piece Not less than(mm) Not less than(mm) D, DC D+15 Reading the measured value Print measurement result The special procedure is described in chapter 6.3.3 and 6.6 To switch off, press the...
-
Page 16: Special Operating Instructions
6 Special Operating Instructions - The replacement of a rebound sensor must always be carried out with the system switched off, otherwise the special type of rebound sensor cannot be detected automatically afterwards. It is even possible (with the instrument switched on) to damage the base board of the hardness tester. -
Page 17: Testing
The measuring instrument can be switched on or off in any display status by pressing the button. 7.3 Testing The hardness tester enters the main display after switching on. The following can be seen: Average- Hardness value Display scale Battery Measured Info value... - Page 18 The buzzer leaves a long beep if the value is not within the tolerance limit. When the preset number of rebounds has been reached, two short beeps will sound. After 2 seconds a short signal tone sounds and the average value is displayed. Key function - Use the key 【SAVE】wird to store the current measuring group in the memory.
-
Page 19: Menu- Structure Diagram
sensor. The hardness scale is converted to Leeb hardness if the current default setting is "Tensile strength measurement". - Use the key 【MAT'L】kann to select another material. Whenever this button is pressed, a continuous conversion is made under all existing material settings. The hardness scale is converted to Leeb hardness. - Page 20 print function memory manager ↓System Set Press the key 【ENTER 】wird to enter the submenu 【TEST Set 】zu. Using the keys 【 】und 【 】wird moves the cursor to the desired position and then 【ENTER 】gedrückt. 【 】 Note: 1. if 【Hardбb】 is set to Hard , the hardness scale obviously could not be 【...
- Page 21 Average times can be changed in the range of 1~32. The value is entered with the corresponding number key. The cursor automatically moves to the next number as you enter it. Press the key 【ENTER to confirm 】wird. Press the 【ESC button to cancel 】kann. Material adjustment 【...
- Page 22 Note: The arrow symbol ↓ on the lower left side of the menu and indicates that the 【 】 key. The symbol ↑ menu does not end yet. It can be scrolled down using the on the upper side of the menu indicates that the menu does not end yet. It can be 】...
-
Page 23: Setting Print
7.6 Setting Print On the main display, the key 【MENU 】betätigt to enter the main menu. Use the keys 【 】und 【 】wird to move the cursor to 【Print Function 】bewegt. With the key 【ENTER 】gelangt you can enter the 【Print function 】Menu. Use the keys 【... - Page 24 HK-D_HK-DB-BA-e-2020...
-
Page 25: Storage Management
The printer information includes the following: Name of the person testing, date, the type of rebound sensor, the rebound direction, average times, material, measurement group number, the individual measured value and the average value. If the information content of the first measuring group is the same as the following, such as the date, rebound sensor, rebound direction, average times, material and hardness scale, only the measuring group number, the individual measured value and the average value can be printed. - Page 26 Use the keys 【 】und 【 】wird to move the cursor to 【Memory Manager 】bewegt. With the button 【ENTER 】gelangt you can go to 【Memory Manager】Menu. If there is no data in memory, < No Memory! > appears on the display and you return to the main menu.
-
Page 27: Browse Stored Data Groups
Note:1 If the preset number of measuring groups exceeds the current offer, the current measuring groups between them are deleted. 2. there is no difference in the sequence of deleting whether the deletion is carried out from the first or the last measuring group, the sequence 1 to 5 or 5 to 1 can be entered. 3. -
Page 28: System Settings
Use the keys 【 】und 【 】kann to scroll from page to page to view the average value, test settings or individual value. The 【ESC】Taste returns to the previous page. 7.9 System settings From the main display on the screen, press 【ESC 】gedrückt to go to the main menu. Use the keys 【... -
Page 29: About The Software
If data has been deleted, additional measurements are required to reach the preset times. If the function is 【Auto Trans 】auf 【ON】gestellt, the value of the current measuring group can be transmitted via RS 232 (after measurement and after the average value has been displayed). -
Page 30: Calibration / Adjustment
This is included with the HK-DB, but not with the HK-D. It can also be purchased as an option. The hardness tester must also be calibrated if the device has not been used for a long period of time. It is sufficient to calibrate each individual rebound sensor once in conjunction with the display unit;... -
Page 31: Backlit Display
7.12 Backlit display With the help of the backlit display it is possible to work even under poor lighting conditions. With the key 【 】kann this can be switched on/off at any time after the hardness tester has been switched on. 7.13 Automatic switch-off - This Leeb hardness tester has an automatic switch-off function to save energy. -
Page 32: Service And Maintenance
Device cannot be Batteries are inserted Insert batteries the right switched on upside down, positive / way round negative pole measured connection with Sensor cable defective, value visible sensor cable replace Measured value Calibration data was lost Recalibrate too inaccurate 9 Service and maintenance 1. - Page 33 - Mini USB data transfer cable - Batteries Note: To view the CE declaration, please click on the following link: https://www.kern-sohn.com/shop/de/DOWNLOADS/ HK-D_HK-DB-BA-e-2020...
Need help?
Do you have a question about the HK-D and is the answer not in the manual?
Questions and answers