Table of Contents
Advertisement
Quick Links
Advertisement
Table of Contents

Related Manuals for sauter HMO


Summary of Contents for sauter HMO
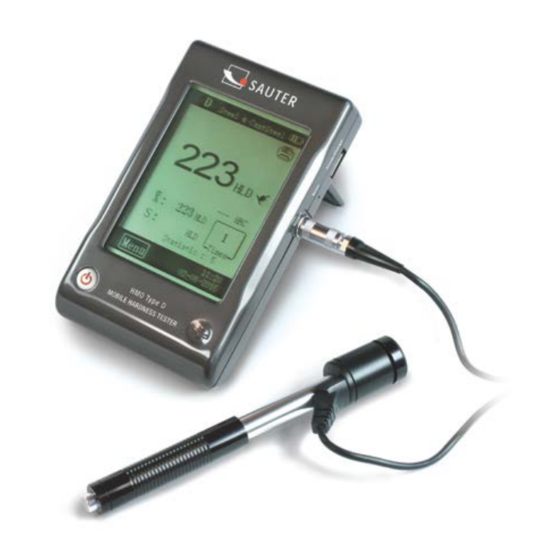
- Page 1 Sauter GmbH Ziegelei 1 Tel.: +49-[0]7433- 9933-199 D-72336 Balingen Fax: +49-[0]7433-9933-149 E-Mail: info@sauter.eu Internet: www.sauter.eu Instruction Manual Mobile digital Leeb Impact Hardness Tester SAUTER HMO Version 1.2 07/2015 PROFESSIONAL MEASURING HMO-BA-e-1512...
-
Page 2: Table Of Contents
Instruction Manual Mobile digital Leeb Impact Hardness Tester Thank you for buying a digital SAUTER Leeb impact hardness tester. We hope you are pleased with your high quality instrument and with its big functional range. If you have any queries, wishes or helpful suggestions, do not hesitate to call our service number. - Page 3 Hardness Test ....................29 Test preparation ........................29 Troubles and solutions ................30 Maintenance and Service ................30 Impact device maintenance ....................30 Storage of the report ......................30 Normal Maintenance procedure .................... 31 Service ............................. 31 Declaration of Conformity ................34 HMO-BA-e-1512...
-
Page 4: Overview
1 Overview 1.1 Application range of measurement principle Physically seen, HMO tester is a really simple dynamic hardness tester. An impact sensor with a hard metal tip is pressed with spring force against the surface of the test object. The surface might be slightly damaged, if the impact module strikes onto the surface, resulting a lack of kinetic energy. -
Page 5: Main Features
1.5 Technical Information 1.5.1 Display unit • HL Display Range: 0 ~ 1000 HL • Accuracy: ± 6 HL • Display of the main body: large LCD with adjustable contrast, backlight, Touch Screen • Unit Material: shock resistant ABS plastic HMO-BA-e-1512... -
Page 6: Impact Devices
• Weight: 228 g 1.5.2 Impact devices The HMO is fitted with the universal impact device D. Special impact devices are available for usage in extremely confined spaces with special components of geometry or surface finish. These additional types significantly extend the possibilities of application from HMO. - Page 7 Application: Surface of hardened components, coatings, thin walled or impact sensitive components (only small measuring indentation). Weight: 75 g 1.5.2.5 Impact device type D+15 Application: Particularly slim front section and with measuring coil moved back. Suitable for hardness measurements in grooves and on deepened surfaces. Weight: 80 g HMO-BA-e-1512...
- Page 8 Type D+15 1.5.2.6 Impact device type G Anwendung: Geeignet für Härtemessungen an schweren Gussteilen sowie soliden Schmiedeteilen. Gewicht: 250 g Type G 1.5.2.7 Support rings HMO-BA-e-1512...
-
Page 9: Display Unit Overview
It does not have to be polished. Any damage to the test piece surface will be minimal by testing with the HMO. At least, 2 or 3 test impacts should be performed at each measuring location and then, in all cases, the average should determine for the individual readings. -
Page 10: Quick Start Guide
3.3 Calibration information The test block has been calibrated in accordance with the dynamic hardness value L. The HMO Impact Hardness Tester has to be calibrated by the test block before the first use (see item 4.2.5.1). 4 Operation instruction 4.1 Display... -
Page 11: Measurement Mode
If “A” area is clicked, the dialog box which adjusts the contrast of the LCD, can be opened (see picture 4-2). Then it has to be clicked directly to “Contrast Adjustment” and the contrast can be adjusted on the touch screen. HMO-BA-e-1512... -
Page 12: Selecting The Type Of Impact Device
2. This operation is only valid in the main interface. 4.2 Using the Menu HMO Impact Hardness Tester selects the Multistage Menu Mode, as shown in picture 4-3. In Measuring Mode, MENU has to be clicked on the screen to display the menu: Fig. -
Page 13: Testing" Setup
4-6) and it is clicked on “Material Group” continuously, the material changes according to following sequence: Steel & Cast Steel→ Alloy Tool Steel→ Stainless Steel→ Grey Cast Iron→ Ductile Iron→ Cast Alloys→ Brass →Bronze→ Copper→ Forging Steel→ Steel & Cast Steel.. HMO-BA-e-1512... - Page 14 In measurement mode, the touch pen has to used to click on “Scale” logo to select the desired hardness scale or tensile strength. With the selected D Type impact unit, “Scale” has to be clicked continuously and the scale changes according to following sequence: Picture 4-9 HMO-BA-e-1512...
- Page 15 Values Setup Menu. The Limit Values have to be set by a click on the screen control panel. OK has to be clicked to confirm the Limit Values Setup. Click back to cancel the Limit Values Setup. Click to select a desired bit. Fig. 4-11 HMO-BA-e-1512...
-
Page 16: Printing Setup
4.2.1.5 Statistics HMO Impact Hardness Tester has got an automatic statistic function. If the impact times are up to the Statistic Times Value, value ( the mean value of the measured hardness value L) and „S“ value (the difference of the max. value and the min. value) are automatically formed and displayed on the screen. - Page 17 With “BACK” or “X” printing is cancelled and it is returned back to the upper menu. Note: HMP Impact Hardness tester can save about 800 data in memory. It will take a very long time to print out all data in memory. HMO-BA-e-1512...
-
Page 18: Memory Management
It has to be clicked to print a selected group of data. By clicking OK the test time of a selected group of data will be demonstrated. If “Browse Z to A” item has been selected, the menu is shown in picture 4-18. HMO-BA-e-1512... - Page 19 Confirm Menu. The touch pen is used to click “YES” or OK to confirm deletion or “NO” to cancel deletion. With “BACK” or “X” deletion is cancelled and returned back to the upper menu. Fig. 4-21 HMO-BA-e-1512...
-
Page 20: System Setting
The function-setting window can be opened by pressing the button to choose relative operation options. This item has to be clicked to conduct function-setting (see 4-23). It can be chosen to turn this function on or not. It has to be clicked directly ON or OFF to confirm the amendment. HMO-BA-e-1512... - Page 21 In System Setting menu, Language item has to be clicked to display the Language Setup menu (see below, fig.4-25). 4.2.4.3 Date/ Time IN System Setting Menu, it has to be clicked directly on Date/Time item to display the Date/Time setup menu. Fig. 4-26 HMO-BA-e-1512...
-
Page 22: Calibration
“Scale” (see picture 4-30). If HL was chosen, then the calibration menu is directly shown (see picture 4-32). If another scale has been chosen, it has to be selected from “Material” menu (see picture 4-31), then the calibration menu is shown (see picture 4-32). HMO-BA-e-1512... - Page 23 The standard impact direction is downward (see Appendix 1 in details). 3. In Appendix 3~7 the scale and the measurement range is shown. If the set date is out of the range, the instrument will show you a failure message. HMO-BA-e-1512...
- Page 24 The cross centre can be clicked with the touch pen for Step 1 to Step 3 in picture 4- 36 shown above. After completing the above three Steps, a rectangular frame will be automatically displayed in the middle of the window, see Picture 4-37: HMO-BA-e-1512...
-
Page 25: Information
The word “Power Shortage” will appear and the buzzer will beep once in two seconds to tell that it is time to charge. First, the USB plug of the charger has to be inserted into the right USB jack of the display unit, see Fig. 4-39: HMO-BA-e-1512... -
Page 26: Backlight
2. When the battery power is not sufficient, it will be displayed “power shortage”, and the buzzer will beep once a second. The display unit will automatically switch off after 10 seconds. 5 Data Printing HMO Impact Hardness Tester can be linked with the exclusive micro printer to print out the measured values. HMO-BA-e-1512... -
Page 27: Printer Link
5.3 Test report format A complete test report is shown in following picture: Note: The special contents of the test report hast o be preset in Items Menu (s. chapter 4.2.2.1). Date and time which are printed are real time. Fig.5-3 HMO-BA-e-1512... -
Page 28: Test Report Printing
5.4 Test report printing HMO Impact Hardness Tester offers various typing ways. The way of typing can be flexibly chosen in the actual use. 5.4.1 Automatic Printing If Auto Print is set to ON, the printer can automatically print during the measuring process. -
Page 29: Hardness Test
5 mm and the surface absorption layer (surface- hardening layer) should not be less than 0.8 mm. To perform accurate hardness measurements, the best way is to remove this layer before testing. HMO-BA-e-1512... -
Page 30: Troubles And Solutions
Printer no response Printer cable loose Re-linking If other troubles might occur, please contact with SAUTER GmbH or our distributor. 8 Maintenance and Service 8.1 Impact device maintenance After 1000- 2000 times use, the impact device and the impact body should be cleaned with a nylon brush. -
Page 31: Normal Maintenance Procedure
Note: HLD is the mean value of 5 Leeb Hardness values measured on the test block. HLD is the value marked on the test block. is the maximum value of 5 Leeb Hardness values measured on the test block. HMO-BA-e-1512... - Page 32 Shocks should be avoided. 4) The sample stability Any effective tests need to minimize possible interference from outside. This is very important for dynamic measurements, such as Leeb Hardness testing. Therefore, measurements are only allowed in a stable hardness testing system. HMO-BA-e-1512...
- Page 33 Appendix 4 Scale Range of DL Type Appendix 5 Scale Range of C Type Appendix 6 Scale Range of D+15 Type Appendix 7 Scale Range of G Type DESIGNED IN REGARD TO THESE STANDARDS: • ASTM A-956-02 • DIN 50156 HMO-BA-e-1512...
-
Page 34: Declaration Of Conformity
Dichiarazione di Dichiariamo con ciò che il prodotto al quale la presente dichiarazione si conformità riferisce è conforme alle norme di seguito citate. Mobile digital Leeb Impact Hardness Tester: HMO EU-Richtlinien Normen 2004/108/EC EN 61000-6-2 :2005...
Need help?
Do you have a question about the HMO and is the answer not in the manual?
Questions and answers