Fike CIE-A-200 Engineering And Commissioning Manual
Fire detection & alarm system control panel (suitable for sita devices)
Hide thumbs
Also See for CIE-A-200:
- User manual (30 pages) ,
- Installation and maintenance instructions (2 pages)
Table of Contents

Related Manuals for Fike CIE-A-200


Summary of Contents for Fike CIE-A-200
- Page 1 Engineering and Commissioning Manual Fire Detection & Alarm System Control Panel (Suitable for Sita Devices) 26-1746 Issue 1 SOLUTIONS Fire Protection Explosion Protection Overpressure Protection Pressure Activation 26-0xxx Issue 1...
- Page 2 Fike’s policy is one of continual improvement and the right to change a specification at any time without notice is reserved. Whilst every care has been taken to ensure that the contents of this document are correct at time of publication, Fike shall be under no liability whatsoever in respect of such contents.
-
Page 3: Table Of Contents
CIE-A-200 Control Panel Engineering and Commissioning Manual Contents Introduction ..........................6 System Design..............................6 Equipment Guarantee ............................6 Anti-Static Handling Guidelines ........................6 Warning ................................6 EMC .................................. 6 The CIE-A-200 System ........................ 7 Advantages of Addressable Systems ....................... 7 Control Panel .......................... - Page 4 CIE-A-200 Control Panel Engineering and Commissioning Manual General Operation of Control Panel ..................28 Control Panel Front ............................28 LED Indication..............................29 Fire Alarm Controls ............................30 System Controls............................. 31 User ..............................31 Supervisor ............................31 Engineer............................31 Access Levels and Codes ........................ 32 Access Level 0 (Normal): Controls Enabled LED off ................
- Page 5 CIE-A-200 Control Panel Engineering and Commissioning Manual Technical Data .......................... 61 Control Panel ..............................61 Control Panel Fuses and Protection ....................... 62 Resistor Colour Codes ........................... 62 Battery Calculations ......................... 62 Installation Checklist ........................ 63 Stage 1 ................................63 Stage 2 ................................63 Commissioning Checklist ......................
-
Page 6: Introduction
CIE-A-200 Control Panel Engineering and Commissioning Manual Introduction This Manual is intended as a guide to the engineering and commissioning principles of the CIE-A-200 Addressable Intelligent Fire Alarm and Detection system, and covers the system hardware information only. Due to the complexity and inherent importance of a system covering a ‘Life Protection Risk’, training on this equipment is essential, and commissioning should only be carried out by competent and approved persons. -
Page 7: The Cie-A-200 System
The CIE-A-200 system is defined as an Addressable Intelligent Detector System or an Addressable Fire Detection and Alarm System with Independent Distributed Intelligence. Distributed intelligence signifies that the signal processing is spread throughout the system, in order that the decisions about fires and faults are taken within the detector itself. -
Page 8: Control Panel
CIE-A-200 Control Panel Engineering and Commissioning Manual Control Panel Mounting the Control Panel First, identify the proposed location for the control panel. Ensure that the control panel will be easily accessible, and that account is taken of any subsequent work that may affect access. It should be located at the most likely point of access for the fire services. -
Page 9: Control Panel Disassembly
CIE-A-200 Control Panel Engineering and Commissioning Manual Control Panel Disassembly The backboard assembly is attached to the panel back box by two brackets on the bottom of the assembly, the two brackets hook into the back box. There is a single captive knurled screw in the centre at the top of the assembly which holds it in. -
Page 10: Cabinet Installation
CIE-A-200 Control Panel Engineering and Commissioning Manual Cabinet Installation Surface Mounting The three mounting holes should be used to secure the cabinet to a solid wall using suitable screws of at least 50mm in length. Ensure that a minimum gap of 50mm is left between the sides of the back box and any wall or projection (such as another box). -
Page 11: Cable Entry
CIE-A-200 Control Panel Engineering and Commissioning Manual Cable Entry The cable entry locations are provided by two rows of knockouts at the top, six on the back and one on the bottom. The bottom knockout should be used if the 12Ah battery box is used. -
Page 12: Addressable Circuit Wiring
CIE-A-200 Control Panel Engineering and Commissioning Manual Addressable Circuit Wiring Topology & Cabling All system wiring should be installed to comply with the current BS 5839: Pt 1 and BS 7671 (wiring regulations) and any other standards relevant to the area or type of installation. A cable complying with the current BS 5839: Pt 1: Category 1 (cables required to operate for prolonged periods during fire conditions) is required. -
Page 13: Loop Loading
It can detect the type of the device and, in the case of devices manufactured from March 2010, the subtype from the above list as well. For devices manufactured prior to this date, the CIE-A-200 OSP will attempt to detect the subtype and use the appropriate DLUs. The engineer can override the automatically detected subtype if required i.e. -
Page 14: General System Schematic
CIE-A-200 Control Panel Engineering and Commissioning Manual General System Schematic Loop End 1 SINGLE LOOP CONTROL PANEL Loop End 2 Sita Multipoint / ASD Sita MP I/O Sita MCP Remote Indicator Sita Loop I/O Module... -
Page 15: Control Panel Main Pcb - Control & Indicating Equipment (Cie)
USB for OSP Programming The USB for OSP Programming is used to connect a computer to the CIE. CIE-A-200 OSP and a USB-A to USB-B lead is required in order to program the CIE via a computer. Please note that an Earth Fault may be present when a computer is connected. -
Page 16: Panel Backplane Layout
CIE-A-200 Control Panel Engineering and Commissioning Manual Control Panel Backplane & Terminals The Termination PCB (also known as the backplane) is located at the rear of the main control panel back box. Panel Backplane Layout The connections on the top from left to right:... -
Page 17: Peripheral Bus (Pb_1 & Pb_2)
CIE-A-200 Control Panel Engineering and Commissioning Manual Peripheral Bus (PB_1 & PB_2) Communications between the panel and repeater is via a multi-drop RS-485 Peripheral Bus. 2-core 1.5mm screened fire resistant cable (i.e. FP200, Firetuff, Firecell) cable should be used for communications to the repeater. -
Page 18: Monitored Inputs (Mon_In_1 & 2)
CIE-A-200 Control Panel Engineering and Commissioning Manual Monitored Inputs (MON_IN_1 & 2) Monitored input set as a normally open input Maximum Voltage at contacts, 3.3 Volts. Maximum current 10mA. Monitored Inputs 1 & 2 will monitor for open and short circuit faults using a 3k3 EOL resistor. To activate the input, connect a 680R or 470R ‘triggering’... - Page 19 CIE-A-200 Control Panel Engineering and Commissioning Manual Monitored Outputs (MON_OUT_1 & 2) Outputs 1 and 2 are monitored circuits which are monitored for open and short circuit faults with a 10k EOL resistor. Sounders used on monitored outputs must be 24v conventional type sounders.
-
Page 20: Relay Outputs 1, 2 & Fault Relay Volt Free Contacts: No, Nc, Com
CIE-A-200 Control Panel Engineering and Commissioning Manual Relay Outputs 1, 2 & Fault Relay Volt Free Contacts: NO, NC, COM Relays 1, 2 and the Fault Relay are derived from single pole change over ‘volt-free’ relay contacts which are not fault monitored. The relay contacts are rated at 1A @ 30VDC. All inductive loads should be diode protected to prevent back EMF. -
Page 21: Addressable Loop: End1+, End1-, Scrn, End2+, End2-, Scrn
CIE-A-200 Control Panel Engineering and Commissioning Manual Addressable Loop: END1+, END1-, SCRN, END2+, END2-, SCRN The Loop addressable circuit must be connected to its End 1 and End 2 terminals. Once initialised the loop is powered from both ends. Communications run from Loop End 1... -
Page 22: Auxiliary Power: 30V, 0V, Scrn
CIE-A-200 Control Panel Engineering and Commissioning Manual Auxiliary Power: 30V, 0V, SCRN An auxiliary nominal 24V DC power supply is available to power ancillary devices requiring up to 30V DC. The maximum output current is 450mA. The Auxiliary Power output is protected by T500mA fuse F1. -
Page 23: 32V Power Input
CIE-A-200 Control Panel Engineering and Commissioning Manual 32V Power Input The panel requires a DC supply voltage of 27.5V – 33.5V which is supplied by the internal 150W switch mode PSU module. This provides all the power and battery charging requirements. -
Page 24: Cie Door Usb Port: User_Usb
USB lead to link the User USB port to a computer. This allows the site specific data to be customised as required. NOTE: It is imperative that the correct version of OSP is used to match your version of CIE-A-200 control panel. The use of an incompatible version may result in incorrect operation of the control panel. -
Page 25: Mains Supply & Batteries
The panel will not however shut down if the batteries reach the Lowest Voltage while the panel is running on the mains supply. The standby time will vary depending on the system loading. The CIE-A-200 panel requires 2 x 12V 7Ah or to increase battery standby times 2 x 12V 12Ah sealed lead acid batteries. -
Page 26: Fuses 1 And In Line Battery Fuse
CIE-A-200 Control Panel Engineering and Commissioning Manual The correct battery charger settings must be selected for the size of battery used, this is done using DIL switch S1 – 1 and S1 – 2. Battery Capacity Switch S1 - 1... -
Page 27: Battery Temperature Probe
CIE-A-200 Control Panel Engineering and Commissioning Manual Battery Temperature Probe There is a temperature sensor on the PCB; there is also provision for an external battery temperature probe part number 17-0162. This is on a fly lead which plugs into the PCB; it can be placed close to the battery for a more accurate battery temperature reading. -
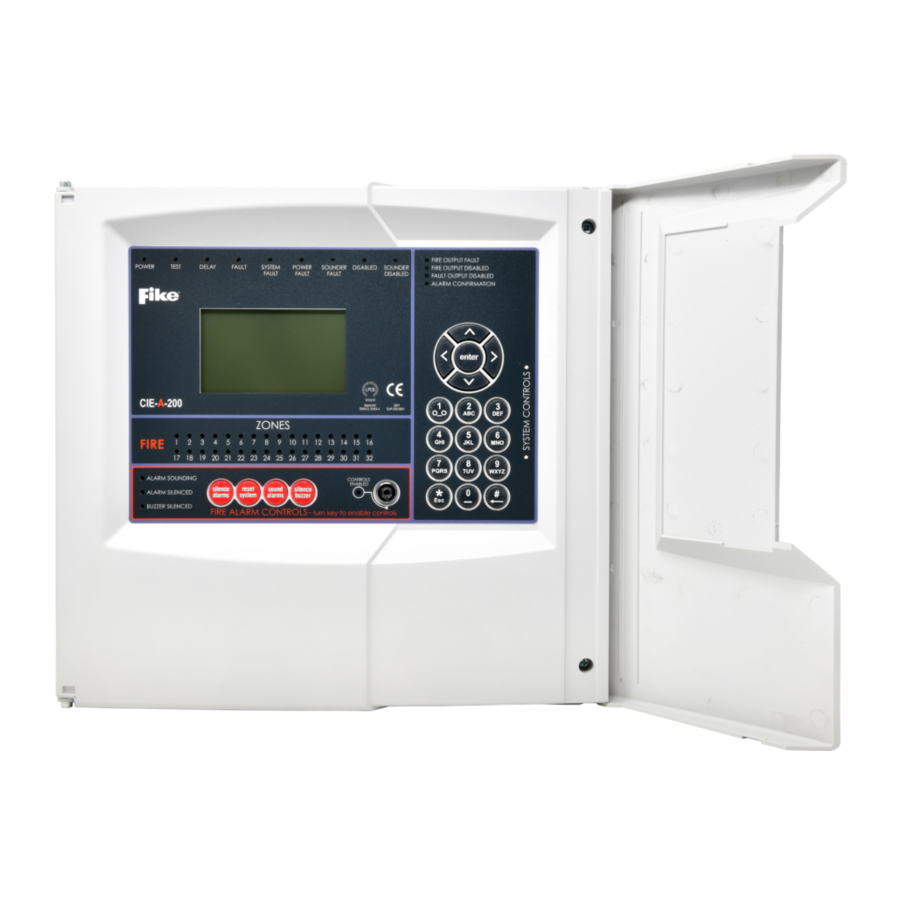
Page 28: General Operation Of Control Panel
CIE-A-200 Control Panel Engineering and Commissioning Manual General Operation of Control Panel Control Panel Front... -
Page 29: Led Indication
CIE-A-200 Control Panel Engineering and Commissioning Manual LED Indication The operation of the LED indications on the front of the control panel is described below. Description Colour State Reason This indicates that power is being supplied to the POWER Green... -
Page 30: Fire Alarm Controls
CIE-A-200 Control Panel Engineering and Commissioning Manual ALARM SOUNDING Yellow Continuous The alarm sounders have been activated from the Sound Alarms button on the panel. The alarms have been silenced whilst operating and ALARM SILENCED Yellow Continuous will stay silenced until another fire or relevant action occurs. -
Page 31: System Controls
CIE-A-200 Control Panel Engineering and Commissioning Manual System Controls User View Current Events Test Controls & Display View Current Events Supervisor Test Modes View Logs Delay On/Off Enable/Disable Time & Date Settings Find Device Diagnostics Access Levels View Current Events... -
Page 32: Access Levels And Codes
Level 1 (User), or the correct entry of the relevant code for access to all other levels, in order to protect against unauthorised access to the system. The codes may be changed using the CIE-A-200 OSP software or from the Engineers menu on the panel. -
Page 33: Access Level 1 (User): Controls Enabled Led On
CIE-A-200 Control Panel Engineering and Commissioning Manual Access Level 1 (User - 8737): Controls Enabled LED on At Access Level 1 (User), the main Fire Alarm Controls are enabled, and the following System Controls are accessible: 1. View Current Events ▼... -
Page 34: Access Level 2 (Supervisor): Controls Enabled Led Flashing Slowly
CIE-A-200 Control Panel Engineering and Commissioning Manual Access Level 2 (Supervisor - 7877): Controls Enabled LED flashing slowly At Access Level 2 (Supervisor), the main Fire Alarm Controls are enabled, and the following System Controls are accessible:... - Page 35 CIE-A-200 Control Panel Engineering and Commissioning Manual 1. View Current Events – Same as USER access page 33 2. Test Modes ▼ → Test Modes Test Controls & Display The Test Modes function causes the panel LEDs to illuminate, the LCD screen to blacken, the panel buzzer to sound and the keypad to be tested in order to verify their correct operation.
- Page 36 CIE-A-200 Control Panel Engineering and Commissioning Manual 3. View Event Logs The all event log keeps up to 1000 historic events. Options 2 to 6 sort the all events log into fire, fault, disablements, panel events & test events. This makes it easier to find specific types of event without having to look through the whole event log.
- Page 37 CIE-A-200 Control Panel Engineering and Commissioning Manual 5. Enable / Disable ▼ → Inputs Detection Zone This function allows the disablement or enablement of a detection-zone. Thus, all the input devices (Manual Call Points, detectors and inputs) within that detection-zone will be disabled. The control...
- Page 38 CIE-A-200 Control Panel Engineering and Commissioning Manual 6. Set Time & Date ▼ Set Time & Date. This allows the time and date to be adjusted. DST Settings. This allows the Daylight Saving Time to be adjusted. 7. Find Device This function allows the user to switch on the LED and sounder (if they are present) at any device on the loop in order to aid in locating its position.
- Page 39 CIE-A-200 Control Panel Engineering and Commissioning Manual Mains Supply Normal Low Voltage Over Voltage Earth Fault Voltage The normal voltage between 0V and Earth SCRN is 1.7V The panel will display an earth fault if this voltage is below 1V or above 2.5V.
-
Page 40: Access Level 3 (Engineer): Controls Enabled Led Flashing Quickly
CIE-A-200 Control Panel Engineering and Commissioning Manual Access Level 3 (Engineer - 3647): Controls Enabled LED flashing quickly At Access Level 3 (Engineer), the main Fire Alarm Controls are enabled, and the following System Controls are accessible:... - Page 41 CIE-A-200 Control Panel Engineering and Commissioning Manual 9. Loop Controls ▼ → Loop Controls Stop Loop This function performs a complete shutdown of every device on the loop. To ensure that every device is properly shutdown, it is important to stop the loop before removing power from the loop. If this is not done, it may cause random faults and stoppages during subsequent initialisation.
- Page 42 CIE-A-200 Control Panel Engineering and Commissioning Manual 10. View Edit Attributes ▼ → View Edit Attributes Device This function allows the user to view, and edit if required, the attributes for each loop device. These attributes include the device type, serial number, address, zone, description, input, output, detection and alarm information.
- Page 43 CIE-A-200 Control Panel Engineering and Commissioning Manual → Panel I/O Monitored Input Settings This will allow the engineer to view or change the operation of the Monitored I/P settings. Monitored Inputs can be programmed as follows. FIRE EVENT – I/P activation will mimic that of a remote fire input.
- Page 44 CIE-A-200 Control Panel Engineering and Commissioning Manual 13. Peripheral Bus ▼ → Peripheral Bus Sync Event Logs This will allow the engineer to sync the event logs of the main panel to the RDUs. 14. Auto Zoning ▼ → Auto Zoning Start Auto Zoning This will allow the engineer to change the zone of loop devices by triggering an alarm.
-
Page 45: Alarm Confirmation Technology
Cause & Effect sequence is reached. This function requires the use of a PC with CIE-A-200 OSP and it is not possible to use it without. In order to activate the function, install the devices as normal and refer to the CIE-A-200 OSP Programming Manual for... -
Page 46: Alarm Confirmation Delay
(depending on the programming of the system Cause & Effect). Selecting the Devices Any smoke detectors which are to utilise Alarm Confirmation must be selected using the CIE-A-200 OSP programming software. Smoke detectors not selected will operate in a standard manner (depending on the programming of the system Cause &... -
Page 47: Commissioning
You may run the initialisation backwards by reversing the loop connections, or one ended by removing one end of the loop. You may also use the CIE-A-200 OSP software to identify which devices have been found and initialised. Noting how far the device count on the control panel screen reached will indicate many faults, such as open or short circuit. -
Page 48: Commissioning
7. Test for correct operation. NOTE: It is imperative that the correct version of OSP is used to match your version of CIE-A-200 control panel. The use of an incompatible version may result in incorrect operation of the control panel. -
Page 49: Configuration Example
The CIE-A-200 User Guide should be explained and left with the responsible person on site, for storage in an accessible and known location, in order that the responsible person and the service engineer may keep... -
Page 50: Good Practice
The following suggestions are good practice if carried out during commissioning, and may help avoid common problems at a later date. The Fike Safety Technology Technical Support department may be unable to assist if the information is unavailable, and the guidelines not followed. -
Page 51: Configuration Printout And Drawings
CIE-A-200 Control Panel Engineering and Commissioning Manual Configuration Printout and Drawings Make a Text Report printout of the system configuration from CIE-A-200 OSP and store it safely on site along with an up to date site plan marked with devices, serial numbers and wiring order. -
Page 52: Initialisation
CIE-A-200 Control Panel Engineering and Commissioning Manual Initialisation Normal Readings Ensure that your addressable device loop has the correct continuity and insulation integrity. With a digital test meter there should be a continuity reading of approximately 1.2 ohms per 100m of 1.5mm cable, and no continuity should be read between cores. - Page 53 CIE-A-200 Control Panel Engineering and Commissioning Manual Finally the control panel will investigate any spur connections from Multipoint detectors. Spurring was a feature in earlier panels and devices which allowed up to 5 devices to be spurred from a Multipoint detector over a 20m distance (total).
-
Page 54: Initialisation Faults
CIE-A-200 Control Panel Engineering and Commissioning Manual Initialisation Faults Device Quantity Mismatch A device mismatch will occur if a device or devices have been physically removed from or added to the system and these changes have not been updated in the OSP and downloaded into the panel. - Page 55 CIE-A-200 Control Panel Engineering and Commissioning Manual Loop –ve Open Circuit If the system faces a Loop –ve open circuit during initialisation, the initialisation will not fail at that point, but continue as normal to the end of the loop. All devices will be operational (as long as no other faults exist).
-
Page 56: Earth Faults
CIE-A-200 Control Panel Engineering and Commissioning Manual Earth Faults General If the control panel detects a short circuit or leakage current to earth/screen from one of its supply rails (either 0V or +Ve) an Earth Fault will be displayed. The voltage between 0V and Earth SCRN can be checked with a DVM. The normal voltage is 1.7V. -
Page 57: General Fault Finding
CIE-A-200 Control Panel Engineering and Commissioning Manual General Fault Finding Common Faults In the event that inexplicable or random faults continue after any obvious indication has been dealt with, take the following steps. Verify that the addressable device loop cable readings are correct and suitable. Take particular note of the screen resistance and rectify any faults found. -
Page 58: Intermittent And Recurring Faults
CIE-A-200 Control Panel Engineering and Commissioning Manual Intermittent and Recurring Faults Smoke Sensor Failed – Signal High Ensure that the correct device is being investigated by comparing its description with the device address, and / or the serial number. Do not remove or add devices with the loop active. -
Page 59: Important Note
CIE-A-200 Control Panel Engineering and Commissioning Manual Loop Open Circuit If random or recurrent Loop O/C faults are reported then check the entire system for the following: Loose connections. Ensure all terminals are tight. Broken Connectors. If the terminal is over-tightened the main body of the connector may become broken, causing an intermittent open circuit. -
Page 60: Advanced Connections
CIE-A-200 Control Panel Engineering and Commissioning Manual Advanced Connections Monitored Relays Duonet Control Panel SINGLE LOOP CONTROL PANEL MO+ MO- The relay must be dioded for polarisation and suppression as shown. These diodes should be marked 1N1004 or similar, and may already be located on the relay PCB if it is designed for Fire Alarm Systems. -
Page 61: Technical Data
CIE-A-200 Control Panel Engineering and Commissioning Manual Technical Data Control Panel CIE-A-200 Control and Indicating Equipment Dimensions W x H x D 353mm x 333mm x 117mm No. of zones 32 zones Number of loops 1 Loop No of devices... -
Page 62: Control Panel Fuses And Protection
CIE-A-200 Control Panel Engineering and Commissioning Manual Control Panel Fuses and Protection Single Loop Addressable Panel Loop output 1.2A current limiter Monitored Outputs 1 and 2 750mA trip polyfuse Auxiliary 24V DC supply T500mA Time Delayed 20mm Glass Mains T4A Time Delayed 20mm Ceramic (in mains terminal block) Battery Charger 1.2A current limiter... -
Page 63: Installation Checklist
CIE-A-200 Control Panel Engineering and Commissioning Manual Installation Checklist Use the following checklist to ensure that your work is correct and that the commissioning engineer has the necessary information to complete the commissioning of the system. The commissioning engineer will require this sheet, along with ‘Loop Continuity and Insulation Test Results’, correctly marked ‘as-wired’... -
Page 64: Commissioning Checklist
CIE-A-200 Control Panel Engineering and Commissioning Manual Commissioning Checklist The following checklist may be used to ensure that all steps are taken. It serves as a reminder only and may need additional items added if required. Step 1 Description Commissioning... -
Page 65: Loop Continuity And Insulation Test Results
CIE-A-200 Control Panel Engineering and Commissioning Manual Loop Continuity and Insulation Test Results After installation of the cable, and termination into all the relevant back-boxes, ensure that the link pins (legacy devices only) are installed as necessary in order to be able to take cable continuity and insulation readings. -
Page 66: Fire Alarm System Notice
CIE-A-200 Control Panel Engineering and Commissioning Manual FIRE ALARM SYSTEM NOTICE To Enable the Control Panel Keypad The user controls are accessed from Access Level 2 (USER) which is reached as follows: Enter your access code, eg 1234, followed by ENTER, or insert the KEY and turn it clockwise. - Page 67 CIE-A-200 Control Panel Engineering and Commissioning Manual Note The Fire alarm system installed in this building utilises ‘ALARM CONFIRMATION’ technology to help eliminate false alarms. Please read and understand the following information in order to make the most effective use of the system.
-
Page 68: Device Details
CIE-A-200 Control Panel Engineering and Commissioning Manual Device Details Record your device attributes on the following form. Copy as required for all devices in the system. SITE DETAILS: CONTROL PANEL NO.: LOOP NO.: DESCRIPTION: DESCRIPTION: DEVICE SERIAL DEVICE DESCRIPTION ZONE... -
Page 69: Engineers Notes
CIE-A-200 Control Panel Engineering and Commissioning Manual Engineers Notes... - Page 70 CIE-A-200 Control Panel Engineering and Commissioning Manual Engineers Notes...
- Page 71 CIE-A-200 Control Panel Engineering and Commissioning Manual Engineers Notes...
-
Page 72: Index
CIE-A-200 Control Panel Engineering and Commissioning Manual Index 32V Power Input ...................................23 Access Level 0 (Normal) ................................32 Access Level 1 (User) ...................................33 Access Level 2 (Supervisor) ................................34 Access Level 3 (Engineer) ................................41 Access Levels ....................................32 Addressable Circuit Wiring ................................12 Addressable Loop ..................................21 Alarm Confirmation Technology ..............................54... -
Page 73: Important Points
CIE-A-200 Control Panel Engineering and Commissioning Manual Important Points Use a 2-core 1.5mm with screen fire rated cable as per the specifications in “Cable Specification” and “Network Cable Specification”. Connect all the devices in a complete loop (returning from the last device to the control panel).
Need help?
Do you have a question about the CIE-A-200 and is the answer not in the manual?
Questions and answers