Advertisement
Quick Links
Advertisement

Related Manuals for Feelworld A737


Summary of Contents for Feelworld A737
- Page 1 7" Full HD On-camera Monitor Support 4K HDMI Input User Manual...
- Page 2 Product Overview Thank you for purchasing our photography, broadcasting kits color LCD monitor, which adopts advanced integrated digital signal processing circuits and professional IPS LED panel, which makes it high brightness, low power consumption, stable performance, low radiation etc. It is equipped with HDMI, AV signals inputs, which make it wide application, casing compact, simple operation, and portable convenient and strong compatibility.
- Page 3 ● Keep the product away from the heat source, such as radiator, water heater, stoves or other heating products. ● Avoid prolonged exposures to the sun as the LCD screen will be damaged. ● Please use the adapter in accessory, or use the qualified battery if need.
- Page 4 Features ● IPS LCD panel, Support 4K UHD HDMI input. 3840×2160p (30/29.97/25/24/23.98 Hz), 4096×2160p (24Hz) ● Histogram is a quantitative tool to inspect image brightness, to guide photography exposure control. ● Analog stereo L/R, Embedded Audio Display ● Focus Assist (Focus edge can be Red, Green, Blue). ●...
-
Page 5: Table Of Contents
CONTENTS 1. Product Description ------------------------- 5 2. Operation Instruction ---------------------- 11 3. Menu Instruction ---------------------------- 12 4. Technical Parameters ---------------------- 22 5. Trouble Shooting ---------------------------- 23... -
Page 6: Product Description
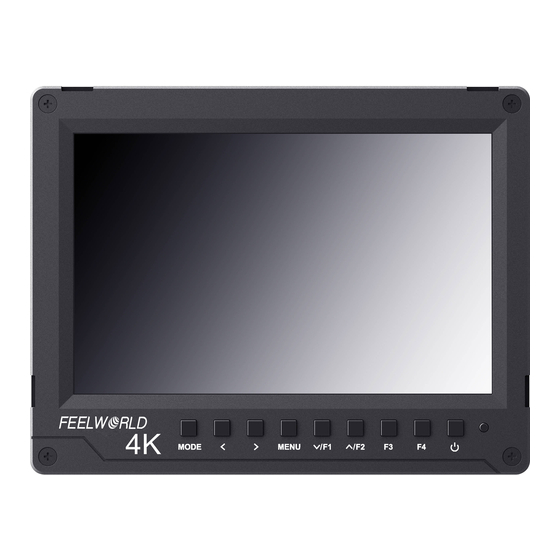
1. Product Description 1.1 Front Panel Features 1. Power Indicator light: when power on/standby, it turns red; when signal in, it turns green! : Power on/off 3. F4: Custom button, enter secondary menu item F (self-defined button), then self-define the function as user need. - Page 7 It can be custom button when not in OSD. See F4. 7. MENU: Menu button >: Volume up, in OSD menu to increase the value of analog on the menu. <: Volume down, in OSD menu to decrease the value of analog on the menu.
- Page 8 : Earphone port 4. AV: AV signal input, to input the AV signal into the monitor through the assorted port 5. HDMI: HDMI (High Definition Multimedia Interface) signal input : DC power input interface, pole of the power should match the image. Built-in Speaker 1.3 Matching VIDEO Cable (optional) The input of the VIDEO signal is 3.5mm four section plug (as the...
- Page 9 1.4 HDMI Lock 1. HDMI Locking Plate 2. Locking Screw Use HDMI locking plate to lock the plug of HDMI cable, then put the locking plate close to the monitor, and finally bolt the locking screw to lock the plate with the monitor. As the picture below (arrow direction) 1.5 Sunshade ①...
- Page 10 ③ Complete Shape ④ Sunshade Application First, open the sunshade ①, and match the sticker on the sunshade inside to the marked part of the sunshade frame ②, press the side of the sunshade frame, ③ smooth and press 3 sides on the sunshade, ④...
- Page 11 ●Sony F970 battery plate for battery of Sony DV: Sony F970 F960 F950 F930 F770 F750 F730 F570 F550 F530 QM91D QM91 QM90D QM90 QM71D QM71 QM70D QM70 QM51D QM51 FM71 FM70 series ●LP-E6 battery plate for battery of Canon DV: Canon LP-E6 ●D28S battery plate for battery of Panasonic DV: Panasonic D55 554S D54SE D40 D35 D33 D32 D28 D25 D22...
-
Page 12: Operation Instruction
2. Operation Instruction After correctly connect to the power supply, the indicator will turn (Red), press to turn on monitor power, the indicator will be Yellow, and then input AV or HDMI signals, the indicator will turn Green from Yellow. 2.1 Press “MENU”... -
Page 13: Menu Instruction
Menu Instruction P2P, Zoom ALL, L/R Zoom, U/D Zoom, Aspect Ratio, Anamorphic Mode, Nine Grid all functions that associated with the image magnification function are non-supported in 4K Mode. ● Image (Including 2 pages) Menu of Page One ★ Pic. Mode: Dynamic, Standard, Mild, User Select ‘user’... - Page 14 ★ Saturation: 0~100 To adjust color concentration. ★ Sharpness: 0~100 Also called ‘Resolution’, is an indicator for the image plane definition and image edge sharpness. If sharpness is higher, then the details contrast on the image is higher, the image is more clearly. ★...
- Page 15 ● Setting (including 2 pages) Menu of Page One ★ Language: English,中文, Español, Português, Français, Nederlands, Deutsch,日本語 To select the display menu language. ★ Aspect Ratio: Just Scan, Panorama, Auto., 4:3, 16:9, Zoom 1, Zoom 2 To select the image Aspect Ratio. ★...
- Page 16 ★ Camera Mode: Off, 480P, 1080i. To select the same display system with Camera. ★ Zoom All: 0~100 When select this function, to adjust the image to Zoom in or Zoom out. Menu of Page Two ★ OSD Time: Off, 10s, 20s, 30s The function is to adjust the menu time.
- Page 17 ★ Power On: Manual, Auto. When select the Auto., the monitor will turn on when input power. But if select the manual , it is standby when input power, need to press button to turn on the power. ★ USB Upgrade When need to upgrade the native data application software, copy the file to the U disk, connect the USB cable with upgrade USB port, press “>”...
- Page 18 ★ Safe Frames: Off, 96%, 93%, 90%, 85%, 80%, 2.35:1 To select the screen marker. ★ Image Freeze: Off, On The current picture still (capture function). ★ Image Flip: Off, H_V Flip, H Flip, V Flip Image Flip function. ★ Check Field: Off, Mono, Red, Green, Blue. To switch among Color, Mono, Red, Green, Blue.
- Page 19 Menu of Page Two ★ Zoom: Off, 4X, 9X, 16X Image Zoom function, to help the photographer observe more careful image by changing it. ★ Anamorphic: Off, 1.3X, 2.0X, 2.0X MAG It uses together with some side screen film lens to restore the real proportion of scene.
- Page 20 situation to select red, green and blue. ★ Over Exposure: Off, On To Turn On or Off this function. ★ Exposure Lever: 1~100 IRE When exposure exceeds the preset value, the monitor screen appear the twill, it is to reflect the picture exposure conditions, so as to suggest the photographer adjust the aperture to obtain proper exposure.
- Page 21 Menu of Page Three ★ Ratio Marker: Off, 4:3, 13:9, 14:9, 15:9, 16:9, 1.85:1, 2 2.35:1 Image display ratio marker. ★ Mark Color: Red, Green, Blue, Black, White. To select the above high contrast mark color according to different image. ★...
- Page 22 ● Custom Button Setting F1~F4 ★ F1 F2 F3 F4: Center Marker, Safe Frames, Check Field, Focus Assist, Aspect Ratio, Camera Mode, Image Flip, P2P, Image Freeze, Histogram, False Colors, Over Exposure, Embedded Audio, Nine Grid, Zoom, Anamorphic To set the 4 shortcut custom button F1, F2, F3, F4 in the front panel.
-
Page 23: Technical Parameters
4. Technical Parameters Panel Size 7.0 inch Panel Type IPS LCD Resolution 1920×1200 pixels Backlight Dot Pitch 0.07875(W) x 0.07875 (H)mm Aspect Ratio 16:10 Brightness 450cd/㎡ Contrast 1200:1 Viewing Angle 80°/80°(L/R) 80°/80°(U/D) Input Signal HDMI / AV Video Color System PAL-4.43 / NTSC-3.58 480i /480p /576i /576p 720p(60/59.94/50/30/29/25/24/23.98)... -
Page 24: Trouble Shooting
Trouble Shooting Only black and white or monochrome picture ① please check saturation, brightness & contrast adjustment. ② Please check "Check Field" is in black and white or monochrome image or other condition. NO Image after put on the power ①...
Need help?
Do you have a question about the A737 and is the answer not in the manual?
Questions and answers