
Related Manuals for Chauvin Arnoux P 310


Summary of Contents for Chauvin Arnoux P 310
- Page 1 FR - Notice de fonctionnement GB - User’s manual P 310 pH MÈTRE MILLIVOLTMÈTRE THERMOMÈTRE pH METER MILLIVOLTMETER THERMOMETER...
- Page 2 Français Vous venez d’acquérir un pH Mètre P 310 et nous vous remercions de votre confiance. Pour obtenir le meilleur service de votre appareil : • lisez attentivement cette notice de fonctionnement, • respectez les précautions d’emploi SIGNIFICATION DES SYMBOLES UTILISÉS ATTENTION, risque de DANGER ! L’opérateur doit...
-
Page 3: Table Of Contents
Français SOMMAIRE 1. CARACTÉRISTIQUES TECHNIQUES..............4 2. PRÉSENTATION DE L’APPAREIL ................5 2.1 FACE AVANT ......................5 2.2 FACE ARRIÈRE ....................... 6 2.3 FACE INFÉRIEURE ....................6 3. UTILISATION....................... 7 3.1 BRANCHEMENT ET MISE EN MARCHE .............. 7 3.1.1 SÉLECTION DU (DES) PARAMÈTRE(S) AFFICHÉ(S) ......7 3.2 MESURE ET RÉGLAGE DE LA TEMPÉRATURE .......... -
Page 4: Caractéristiques Techniques
Français 1. CARACTÉRISTIQUES TECHNIQUES Plages de mesure En pH : de 0 à 14pH Résolution : 0,01pH En mV : de -2000 à +2000mV Résolution : 1mV En température : Correction automatique (par sonde à résistance de platine 100Ω à 0°C – CEI751) : de -10 à... -
Page 5: Présentation De L'appareil
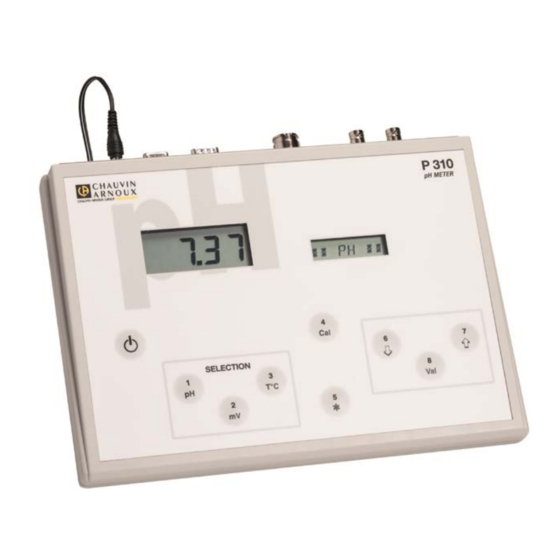
Français 2. PRÉSENTATION DE L’APPAREIL 2.1 FACE AVANT Affichage LCD 2000 points Affichage alphanumérique à 8 caractères 9 touches : Touche d’arrêt / marche Touche de sélection (désélection) de la mesure pH Touche de sélection (désélection) de la mesure mV Touche de sélection (désélection) de la mesure température Touche de calibrage (du paramètre mesuré) Réglages des sorties enregistreur... -
Page 6: Face Arrière
Français Touche de décrémentation Touche d’incrémentation Touche de validation 2.2 FACE ARRIÈRE Fiche BNC pour électrode pH, Entrée pour électrode de référence pH séparée, Fiche BNC pour électrode mV, Entrée pour électrode de référence mV séparée, Fiche 5 broches pour sonde de température, Connecteur sub.d 9 voies mâles pour sorties enregistreur, Connecteur sub.d 9 voies femelles pour sortie RS 232, Prise du bloc d’alimentation. -
Page 7: Utilisation
Français 3. UTILISATION 3.1 BRANCHEMENT ET MISE EN MARCHE Déballer l’appareil, le bloc d’alimentation, les solutions d’étalonnage et le manuel d’utilisation. Brancher les différentes sondes utilisées. Brancher le bloc d’alimentation dans la prise « Power ». (Le P310 doit impérativement être utilisé avec le bloc d’alimentation fourni). Appuyer sur la touche ARRET / MARCHE : L’alphanumérique indique le (ou les) dernier(s) paramètre(s) mesuré(s). - Page 8 Français Appuyer sur la touche : ACTIVE L’alphanumérique indique : ** pH ** Puis : Le numérique indique la valeur du pH. 7.00 ** pH ** Le P310 affiche en alternance : 0.00 ** mV ** Pour désactiver la mesure mV : Appuyer sur la touche : INACTIVE L’alphanumérique indique :...
-
Page 9: Mesure Et Réglage De La Température
Français Si aucun paramètre n’est activé, le P310 indique en alternance : 0.00 AUCUNE ENTREE SELECTEE 3.2 MESURE ET RÉGLAGE DE LA TEMPÉRATURE La sonde de température (résistance de platine 100Ω à 0°C) est connectée sur la fiche verrouillable 5 broches. Elle permet la mesure de la température. -
Page 10: Correction Automatique
Français 3.2.2 CORRECTION AUTOMATIQUE Placer la sonde température dans le liquide à tester. La correction automatique remplace l’action du correcteur manuel qui est alors sans effet. Il ne faut pas oublier que la réponse de la sonde n’est pas instantanée mais que le temps dépend du gradient de température. -
Page 11: Correction Manuelle
Français 3.2.3 CORRECTION MANUELLE Cette fonction est utilisable si la sonde de température n’est pas branchée. Pour le réglage, il faut afficher la température du produit à mesurer. En sortie d’usine, ce paramètre est réglé à 25.0. 25.0 *TC MAN* Exemple : solution ou étalon à... -
Page 12: Mesure Et Calibrage Du Ph
Français 3.3 MESURE ET CALIBRAGE DU PH Précaution concernant l’électrode pH : Avant chaque opération, s’assurer que l’électrode est correctement branchée. Electrode combinée sur fiche BNC (électrode pH) Electrode séparée, électrode de mesure sur fiche BNC (électrode pH), électrode de référence sur borne jaune 2mm (réf pH) Les électrodes à... - Page 13 Français Electrode et sonde de température rincées, mises dans le tampon n°1 (pH 7,00). Appuyer sur la touche : L’alphanumérique indique en alternance : AUTO Calibrage automatique : Calibrage manuel : Appuyer sur une touche du clavier (sauf A/M et CAL) AUTO Lorsque l’alphanumérique indique : 1 TAMPON...
- Page 14 Français TAMPON 2 L’alphanumérique indique successivement : STABIL VALIDE 8 Puis lorsque la valeur du numérique est stabilisée : Appuyer sur la touche : 55.0 Si la calibration est correcte : L’afficheur numérique indique la pente de l’électrode de verre (en mV/pH) ACCEPTE L’appareil revient ensuite en position mesure de pH :...
- Page 15 Français AUTO Lorsque l’alphanumérique indique : 1 TAMPON L’alphanumérique indique en alternance : 2 TAMPONS Appuyer sur une touche du clavier (sauf A/M et CAL) 1 TAMPON Lorsque l’alphanumérique indique : TAMPON 1 L’alphanumérique indique successivement : STABIL VALIDE 8 Puis lorsque la valeur du numérique est stabilisée : Appuyer sur la touche :...
- Page 16 Français Appuyer sur la touche : AUTO L’alphanumérique indique en alternance : MANUEL Appuyer sur la touche du clavier (sauf A/M et CAL) MANUEL Lorsque l’alphanumérique indique : 1 TAMPON L’alphanumérique indique en alternance : 2 TAMPONS Appuyer sur une touche du clavier (sauf A/M et CAL) 1 TAMPON Pour calibrage manuel 1 tampon, lorsque le numérique indique :...
-
Page 17: Message D'erreur
Français Appuyer sur la touche : pour valider. CALIBRAGE 1 TAMPON : L’appareil revient en position mesure. CALIBRAGE 2 TAMPONS : Electrode rincée mise dans le tampon n°2 (pH 9,00) TAMPON 2 L’alphanumérique indique successivement : STABIL 6 – 7 et 8 Puis lorsque la valeur du numérique est stabilisée : Appuyer sur les touches :... - Page 18 Français Vérifier les solutions tampon. L’appareil revient au début de la séquence de calibrage. Si l’électrode de mesure est défectueuse (50mV/pH > pente > 60mV/pH), REFUSE L’alphanumérique indique : Vérifier la valeur de la température. Nettoyer la sonde de pH (vérifier l’état de la boule de verre) et si nécessaire, la plonger dans une solution de HCI 0,1 mol.L Le numérique reste en mesure pH.
-
Page 19: Mesure Et Calibrage Des Paramètres En Mv
Français 3.4 MESURE ET CALIBRAGE DES PARAMÈTRES EN MV : Précautions concernant l’électrode mV : Avant chaque opération, s’assurer que l’électrode est correctement branchée. Electrode combinée sur fiche BNC (électrode mV) Electrode séparée, électrode de mesure sur fiche BNC (électrode mV) L’électrode de référence sur borne jaune 2 mm ( réf. - Page 20 Français Appuyer sur la touche : CAL mV L’alphanumérique indique : STABIL 6 – 7 et 8 Appuyer sur les touches : Pour amener le numérique à la valeur de la solution + 146mV Appuyer sur la touche : pour valider. pH Mètre Millivoltmètre Thermomètre P310...
-
Page 21: Potentiel De Différentes Électrodes De Référence
± 4mV ± 4mV 4.1 RÉGLAGE DES SORTIES ENREGISTREURS : Le P 310 possède une sortie enregistreur par paramètre : Standard : 0-5 V Ces sorties sont réglables sur n’importe qu’elle plage de ces paramètres et se situent sur le connecteur 9 voies mâles, sur la face arrière de l’appareil. -
Page 22: Réglage Sortie D'usine
Français ⑤ “Commun” OV en ⑥ Sortie pH en ⑦ mV en ⑨ T°C en 4.1.1 REGLAGE SORTIE D’USINE : Lors de la première utilisation ou après une réinitialisation : 0/100 (0V) 100/100 (5V) 2,00 12,00 -500 +500 T°C 4.1.2 REGLAGE DES BUTEES (0/100 ET 100/100) DE LA SORTIE ENREGISTREUR: Activer le paramètre dont vous voulez modifier les butées. - Page 23 Français Appuyer sur les touches : Pour amener le numérique à la valeur du 0/100 voulue. Appuyer sur la touche : pour valider. L’alphanumérique indique successivement : 100/100 Le 100/100 correspond au 5V : Le numérique indique la valeur actuelle de ce réglage. Appuyer sur les touches : Pour amener le numérique à...
-
Page 24: Réinitialisation
Français 4.2 RÉINITIALISATION Par suite d’une coupure secteur, d’une perturbation magnétique ou hertzienne, des valeurs erronées peuvent affecter les mémoires. Une réinitialisation s’impose pour que le P310 fonctionne normalement. 4.2.1 PROCEDURE DE REINITIALISATION : Appuyer sur la touche : VAL **** L’alphanumérique indique : Puis sur les touches : VAL *123*... -
Page 25: Sortie Numérique Série Rs 232/V24
Français En mV : Asymétrie 000 mV Sortie ENR 0/100 = -500 100/100 = +500 En Température : Température manuelle 20,0°C Température automatique aucun décalage Sortie ENR 0/100 = 0 100/100 = 100 4.3 SORTIE NUMÉRIQUE SÉRIE RS 232/V24 Cette sortie permet de faire très simplement l’acquisition de données avec un ordinateur ou une imprimante. - Page 26 Français Format du caractère : 8 bits sans parité, avec 2 bits stop Vitesse de transmission : 2400 bauds Transfert d’une chaîne de 30 octets, soit 10 octets (9+CR) par paramètre. Il existe 2 modes de demande de transmission : 1 Demande par front : la ligne de commande doit passer de 5V à...
-
Page 27: Cas D'anomalie
Français 5. EN CAS D’ANOMALIE ANOMALIES CONSEILS Vérifier l’alimentation 230 V. Pas d’affichage Vérifier le branchement du bloc d’alimentation dans la prise d’alimentation « Power ». Vérifier le branchement de la sonde T°C Pas de lecture de la température Vérifier la valeur de la sonde extérieure (107 Ω... -
Page 28: Règles De Sécurité
Français 6. RÈGLES DE SÉCURITÉ L’alimentation secteur doit respecter les caractéristiques : 230 V ± 10% 50-60 Hz - 5W. Le bloc d’alimentation tient lieu de sectionneur de tension. L’intérieur de l’appareil doit toujours être maintenu propre et sec. ... -
Page 29: Maintenance
: 02 31 64 51 55 (centre technique Manumesure), 01 44 85 44 85 (Chauvin Arnoux). Pour les réparations hors de France métropolitaine, sous garantie et hors garantie, retournez l’appareil à votre agence Chauvin Arnoux locale ou à votre distributeur. pH Mètre Millivoltmètre Thermomètre P310... -
Page 30: Pour Commander
Français 8. POUR COMMANDER 8.1 ÉTAT DE LIVRAISON • 1pH Mètre P 310 • 1 notice de fonctionnement • 2 solutions tampon pH • 1 Alimentation 9V • 1 Adaptateur 2mm/4mm • 1 cordon référence commune Le tout conditionné dans une boîte en carton. - Page 31 English Thank you for purchasing your pH Meter P 310. For best results with your device: • Read these operating instructions carefully, • Observe the precautions of use. MEANINGS OF THE SYMBOLS USED WARNING, risk of DANGER! The operator must refer to this user’s manual whenever this danger symbol...
- Page 32 English CONTENTS 1. TECHNICAL CHARACTERISTICS ................ 33 2. DESCRIPTION OF THE INSTRUMENT ..............34 2.1 FRONT PANEL ....................... 34 2.2 REAR PANEL ......................35 2.3 BOTTOM ........................ 35 3. USE ..........................36 3.1 CONNECTION AND STARTING UP ..............36 3.1.1 SELECTION OF THE PARAMETER(S) DISPLAYED ......
-
Page 33: Technical Characteristics
English 1. TECHNICAL CHARACTERISTICS Measurement ranges In pH: from 0 to 14pH Resolution: 0,01pH In mV: from -2000 to +2000mV Resolution: 1mV In temperature: Automatic correction (by platinum resistance probe 100Ω at 0°C – CEI751) : from -10 to 200°C Resolution: 0,1°C Manual correction: from 0 to 150°C... -
Page 34: Description Of The Instrument
English 2. DESCRIPTION OF THE INSTRUMENT 2.1 FRONT PANEL LCD display, 2000-point Alphanumeric display, 8 characters 9 keys: On/Off key pH measurement selection/deselection key mV measurement selection/deselection key Temperature measurement selection/deselection key Calibration key (calibration of the parameter measured) Adjustments of the recorder outputs P310 pH Meter Millivoltmeter Thermometer... -
Page 35: Rear Panel
English Decrementation key Incrementation key Validation key 2.2 REAR PANEL BNC connector for pH electrode, Input for separate pH reference electrode, BNC connector for mV electrode, Input for separate mV reference electrode, 5-pin plug for temperature probe, 9-channel male D-sub connector for recorder outputs, 9-channel female D-sub connector for RS232 output, Connector for the power supply unit. -
Page 36: Use
English 3. USE 3.1 CONNECTION AND STARTING UP Unpack the instrument, the power supply unit, the calibration solutions and the operating manual. Connect the various probes used. Connect the power supply unit to the "power supply" connector. (The P310 must be used with the power supply unit provided). Press the Off/On key: The alphanumeric display indicates the last parameter(s) measured. - Page 37 English Press the key. ACTIVE The alphanumeric display indicates: ** pH ** Then: The numerical display indicates the pH. 7.00 ** pH ** The P310 displays, in turn: 0.00 ** mV ** To deactivate the mV measurement: Press the INACTIVE The alphanumeric display indicates: ** pH ** Then:...
-
Page 38: Temperature Adjustment And Measurement
English If no parameter is activated, the P310 indicates, in turn: 0.00 AUCUNE ENTREE INPUT SELECTEE SELECTED 3.2 TEMPERATURE ADJUSTMENT AND MEASUREMENT The temperature probe (platinum resistance, 100Ω at 0°C) is connected to the lockable 5-pin plug. It is used to measure the temperature. It compensates for the variation of electrode response in pH measurements. -
Page 39: Automatic Correction
English 3.2.2 AUTOMATIC CORRECTION Place the temperature probe in the liquid to be tested. Automatic correction replaces the action of the manual corrector, which is then inoperative. It must not be forgotten that the response of the probe is not instantaneous, and that the response time depends on the temperature gradient. -
Page 40: Manual Correction
English 3.2.3 MANUAL CORRECTION This function can be used if the temperature probe is not connected. For the adjustment, the temperature of the product to be measured must be displayed. The factory setting of this parameter is 25.0. 25.0 *TC MAN* Example: solution or standard at T°C 20.0: Deactivate the other parameters (see §... -
Page 41: Measurement And Calibration Of The Ph
English 3.3 MEASUREMENT AND CALIBRATION OF THE pH Precaution concerning the pH electrode: Before each operation, make sure that the electrode is correctly connected. Combined electrode to BNC jack (pH electrode) Separate electrode, measurement electrode, to BNC jack (pH electrode), reference electrode to 2mm yellow terminal (pH ref) Liquid electrolyte electrodes will be filled with 1 mol.L KCl and used with the... - Page 42 English Press the key. The alphanumeric display indicates alternately: AUTO Automatic calibration: Manual calibration: Press any key on the keypad (except 0/1 (Off/On) and CAL) AUTO When the alphanumeric display indicates: 1 TAMPON The alphanumeric display indicates alternately: buffer 2 TAMPON buffer Press any key on the keypad (except Off/On and CAL) 2 TAMPON...
- Page 43 English VALIDE 8 Then, when the digital display has stabilized: validated Press the key. 55.0 If the calibration is correct: The digital display unit indicates the slope of the glass electrode (in mV/pH) ACCEPTE The instrument then changes back to the pH measurement mode: Note: The instrument accepts slope values between 50 and 60mV/pH.
- Page 44 English Press any key on the keypad (except Off/On and CAL) 1 TAMPON When the alphanumeric display indicates: buffer TAMPON 1 The alphanumeric display indicates successively: buffer STABIL VALIDE 8 Then, when the digital display has stabilized : Press the key.
- Page 45 English Press any key on the keypad (except Off/On and CAL) MANUEL When the alphanumeric display indicates: TAMPON The alphanumeric display indicates alternately: buffer 2 TAMPON buffer Press any key on the keypad (except Off/On and CAL) 1 TAMPON For manual calibration with 1 buffer, when buffer the numerical display indicates: 2 TAMPON...
-
Page 46: Error Message
English TAMPON 2 The alphanumeric display indicates successively: buffer STABIL 6 – 7 et 8 Then, when the digital display has stabilized: Press the to adjust the digital display to the value of the 9.00 buffer solution Press the key to validate. If the calibration is correct, the digital display indicates the slope of the glass 55.0 ACCEPTE electrode (in mV/pH):... -
Page 47: Measurement And Calibration Of The Parameters In Mv
English The instrument returns to the beginning of the calibration sequence. If the asymmetry is incorrect (the instrument accepts asymmetries between 6.00 and 8,00) REFUSE The digital display indicates: Clean the pH probe. Replace the mol.L KCl solution of the reference electrode. Replace the pH probe. -
Page 48: Measurement
English 3.4.1 MEASUREMENT: Press the ACTIVE to switch to the mV measurement mode **mV** If another parameter is activated, the mV reading is displayed in alternation with the other parameter. 3.4.2 CALIBRATION (WITH MICHAELIS SOLUTION): The oxidation-reduction potential Eh of a solution is equal to the potential read (E read) plus the potential of the reference electrode (E ref). -
Page 49: Potentials Of Various Reference Electrodes
English Press the key to adjust the digital display to the value of the solution + 146mV. Press the key to validate. 4. POTENTIALS OF VARIOUS REFERENCE ELECTRODES If the work is done at a temperature other than 25°C or with a reference electrode other than (Ag, AgCl, 1 mol.L KCl), the potential E read will be different from that indicated on the label. -
Page 50: Adjustment Of The Recorder Outputs
English 4.1 ADJUSTMENT OF THE RECORDER OUTPUTS: The P 310 has one recorder output per parameter: Standard: 0-5V These outputs can be adjusted in any range of these parameters and are available on the 9-male-contact connector on the back of the instrument. -
Page 51: Adjustment Of The Range Limits (0/100 And 100/100) Of The Recorder Output
English 4.1.2 ADJUSTMENT OF THE RANGE LIMITS (0/100 AND 100/100) OF THE RECORDER OUTPUT: Activate the parameter of which you want to modify the limits. Deactivate the other parameters. Example: pH Press the ENR pH The alphanumeric display indicates successively: 0/100 0/100 corresponds to 0V: The numerical display indicates the present setting. -
Page 52: Reset
English Press the key to adjust the numerical display to the desired 100/100 value. Press the key to validate. The P310 then returns to the pH measurement mode. The adjustment procedure is the same for the other parameters. ATTENTION: THE RECORDER OUTPUT OF A PARAMETER IS INOPERATIVE (0V) IF THE PARAMETER IS NOT ACTIVATED. -
Page 53: Value After Reset
English VAL *123* The alphanumeric display indicates: VAL *INIT The P310 returns to the measurement mode. Following this reset, all of the adjustments must be redone. 4.2.2 VALUE AFTER RESET: Alternating measurements: In pH : Asymmetry 0.00 pH Slope 58.2 mV/pH REC output 0/100 = 2.00 100/100 = 12.00... -
Page 54: Rs 232/V24 Serial Digital Output
English 4.3 RS 232/V24 SERIAL DIGITAL OUTPUT This output makes data acquisition with a computer or a printer very simple. CHARACTERISTICS OF THE SERIAL LINK: LAB P310 Reception, RXD Transmission, TXD Request line Logical ground Character format: 8 bits, no parity, 2 stop bits Transmission speed: 2400 baud Transfer of a string of 30 bytes, or 10 bytes (9+CR) per parameter. -
Page 55: Is Something Goes Wrong
English 5. IS SOMETHING GOES WRONG PROBLEM ADVICE Check the 230V supply. No display Check the connection of the power supply unit to the power connector. Check the connection of the temperature probe Check the value of the probe No external temperature reading (107Ω... -
Page 56: Safety Rules
English 6. SAFETY RULES The mains supply must have the following characteristics: 230V ±10% 50-60Hz-5W. The power supply unit serves as voltage disconnect device. The interior of the instrument must always be kept clean and dry. If the instrument is used in a way not in conformity with the specifications, the protection provided by the instrument may be impaired. -
Page 57: Maintenance
This instrument should be checked at least once a year. For checking and calibration, contact one of our accredited metrology laboratories (information and contact details available on request), at our Chauvin Arnoux subsidiary or the branch in your country. 7.3 REPAIR For all repairs before or after expiry of warranty, please return the device to your distributor. -
Page 58: To Order
English 8. TO ORDER 8.1 DELIVERY CONDITION • 1 P 310 pH Meter Millivoltmeter Thermometer • 1 user manual • 2 solutions tampon pH • 1 9V power supply unit • 2mm to 4mm banana plug adapter • 1 test lead common reference All packed in a cardboard box.
Need help?
Do you have a question about the P 310 and is the answer not in the manual?
Questions and answers