Advertisement
Quick Links
Poseidon 3268 – starting guide
Poseidon 3268
Starting Guide – Poseidon 3268
First steps for I/O & temperature control with Poseidon
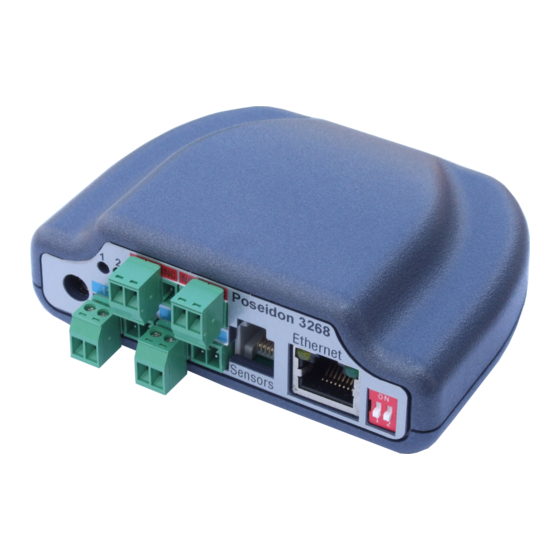
1) Connecting the Poseidon 3268
1.1) Check the DIP switches. For installation, set them as shown
in the picture (DIP1=Off, DIP2=Off).
1.2) Output (double-throw relay contact) to turn on/off
external devices (fans, A/C, heating, horn, etc.)
1.3) Connect the power adapter to an outlet (230 / 110V)
and to the Poseidon 12V power supply connector.
1.4) Dry contact inputs to connect sensors with Dry
Contact outputs (buttons, relay contacts, door contacts).
1.5) Temperature or humidity sensors (IT bus interface)
(Temp-1Wire or Humid-1Wire), RJ12 jack must click in.
1.6) Connect Poseidon to the Ethernet (patch cable to switch, or cross-over cable to PC)
•
Green POWER LED on the RJ45 socket lights up – power supply is OK
•
Yellow LED on the RJ45 socket flashes – connection to 10 Mbit network is OK
Output 1
Accessories
600 239
Gas Leak Detector
Flood detector
600 240
600 005
Temp-1Wire 3m
Oficjalny dystrybutor:
ATEL ELECTRONICS
Input On Input Off
Flammable gas detector, 12V, Dry Contact output
Water level detector, Dry Contact output
Temperature sensor, 3m cable (1m = 600 242 , 10m = 600 056)
www.atel.com.pl
e-mail: cust@atel.com.pl
Poseidon 3268
Output Off
NO NC
45-231 Opole
ul. Oleska 121
HW group
Output On
NO NC
tel. +48 (77) 455 60 76
fax. +48 (77) 455 80 56
Advertisement

Related Manuals for HW Group Poseidon 3268


Summary of Contents for HW Group Poseidon 3268
- Page 1 Poseidon 3268 – starting guide HW group Poseidon 3268 Starting Guide – Poseidon 3268 First steps for I/O & temperature control with Poseidon 1) Connecting the Poseidon 3268 1.1) Check the DIP switches. For installation, set them as shown in the picture (DIP1=Off, DIP2=Off).
- Page 2 PowerEgg 600 240 I1..I4 of a Poseidon) and switch (connect to O1 / O2 O1 / O2 of a Poseidon 3268) 2) Configuring the IP address address – UDP Config The UDP Config executable is located in the root of the...
- Page 3 Poseidon 3268 – starting guide HW group 3) Configuring the Poseidon with a web browser Enter the IP address of the device to the address field in your web browser, or run UDP Config and click the IP address in the list of devices.
- Page 4 Poseidon 3268 – starting guide HW group 4) Flash Setup – Detecting sensors Click the “Flash Setup” link at the main page to open a graphic configuration interface. Adobe Flash player must be installed in your web browser. You can find it on...
Need help?
Do you have a question about the Poseidon 3268 and is the answer not in the manual?
Questions and answers