Table of Contents
Advertisement
Advertisement
Table of Contents

Related Manuals for TRENDnet TWG-431BR


Summary of Contents for TRENDnet TWG-431BR
-
Page 2: Table Of Contents
Dynamic routing protocols ..................19 SSL VPN Server Setup ....................... 58 Bandwidth Control ....................... 23 SSL VPN Client Setup (Windows) ..................59 Dynamic DNS ....................... 25 High Availability ................63 Wake on LAN (WoL) ..................... 26 © Copyright 2019 TRENDnet. All Rights Reserved. - Page 3 Scheduled automatic reboot ..................70 Console access ......................71 Troubleshooting ................79 Router Default Settings ....................71 Appendix ..................80 Reset your router to factory defaults ................71 Upgrade your router firmware ..................72 © Copyright 2019 TRENDnet. All Rights Reserved.
- Page 4 Advanced SPI, NAT and SNAT protects against Internet attacks. The TWG-431BR comes fully integrated with Router Limits’ comprehensive web management system, designed to give users more control over the activity on their network.
- Page 5 Supports web browser (HTTP, HTTPS), CLI, SSH and Telnet management Content Filtering Manage screen time, filter content, track web use and browsing history, as well as device level controls and more. Advanced web content filtering service powered by Router Limits™ © Copyright 2019 TRENDnet. All Rights Reserved.
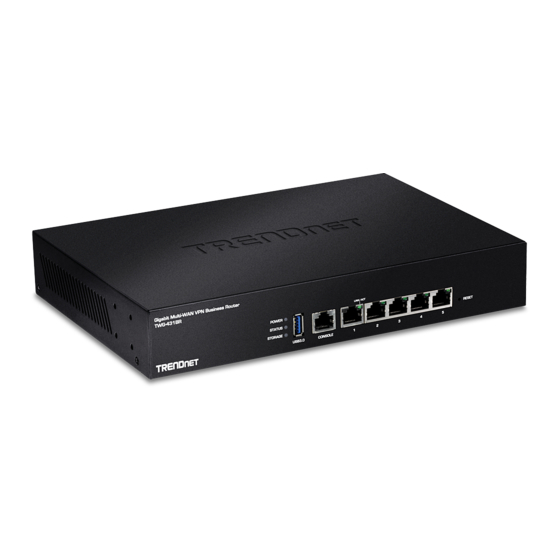
- Page 6 TWG-431BR TRENDnet User’s Guide Product Hardware Features Rear Panel View Front Panel View USB 3.0 Reset Gigabit Ports Indicators Port Button On(-)/Off(o) RJ-45 Power Port Power Switch Console Port © Copyright 2019 TRENDnet. All Rights Reserved.
- Page 7 15 seconds and release to reset the device to factory defaults. Power Port Connects the included power adapter to supply device power. On(-)/Off(o) Turns the device power On(-) or Off(o). Power Switch © Copyright 2019 TRENDnet. All Rights Reserved.
- Page 8 TWG-431BR TRENDnet User’s Guide Applications © Copyright 2019 TRENDnet. All Rights Reserved.
-
Page 9: Product Overview
• When installing the Router on a level surface, attach the rubber feet to the bottom of each device. The rubber feet cushion the hub and protect the hub case from scratching. Note: The look of the router may be different than what is actually displayed. © Copyright 2019 TRENDnet. All Rights Reserved. -
Page 10: Basic Installation And Configuration
4. After you have the unit powered on and have connected your computer into the Active LAN port, open your web browser and type the IP address of the router in the address bar, then press Enter. The default IP address is 192.168.10.1. © Copyright 2019 TRENDnet. All Rights Reserved. -
Page 11: Product Hardware Features
Reboot in the top right corner then click the Reboot button. 9. Click System at the top, then click VLAN Setup. 7. In the Admin Password section, enter and confirm your new Admin Password. © Copyright 2019 TRENDnet. All Rights Reserved. - Page 12 14. In the DHCP Setup section, enter the desired IP address settings for your DHCP server. 11. Under VLAN#1, click the Network button in the action column on the right. 12. Under IP setup, configure the router IP address settings, match the requirements of your network. © Copyright 2019 TRENDnet. All Rights Reserved.
- Page 13 Dynamic IP, Static IP, and PPPoE. If you are unsure of the connection mode, please contact your ISP. 19. After you have selected the appropriate mode and entered your settings, click Save at the bottom of the page. © Copyright 2019 TRENDnet. All Rights Reserved.
- Page 14 TRENDnet User’s Guide 20. After you save your changes, the device will prompt you to reboot in the top right 21. Click Reboot in the top right corner, then click the Reboot button. corner. © Copyright 2019 TRENDnet. All Rights Reserved.
-
Page 15: Basic Router Settings
1. Open your web browser and go to IP address http://192.168.10.1. Your router will prompt you for a user name and password. 2. The default User Name and Password are below. • User Name: admin • Password: admin © Copyright 2019 TRENDnet. All Rights Reserved. -
Page 16: Change Your Administrator Password
NTP server to obtain time and date settings. ▪ Time Zone – Click the drop-down list to select the appropriate time zone. ▪ Daylight Savings Time – Enable or disable daylight savings time depending on the time zone. © Copyright 2019 TRENDnet. All Rights Reserved. -
Page 17: Create Time Schedules
Start Time – Manually define a start time for the schedule. • End Time – Manually define an end time for the schedule. Note: The time period is specified in 24 hour format. © Copyright 2019 TRENDnet. All Rights Reserved. -
Page 18: Change Lan Ipv4 Address Settings
IP Address – Enter the new LAN IPv4 address. (e.g. 192.168.50.1) • Netmask – Enter the new LAN IPv4 subnet mask. (e.g. 255.255.255.0) Click Save at the bottom. Then click Reboot at the top right to commit the changes. © Copyright 2019 TRENDnet. All Rights Reserved. -
Page 19: Configure Lan Ipv4 Dhcp Server Settings
Internet websites (e.g. If entering 8.8.8.8, this DNS server will be provided DHCP clients instead of the router’s LAN IPv4 address to resolve Internet domain names such as trendnet.com ) • DNS2 IP – Enter the IPv4 address of your secondary DNS (Domain Name System) server for Internet domain name resolution to be distributed to DHCP clients. - Page 20 Static Lease IP Setup to be added as a static DHCP settings before automatically requesting a new lease (IP address settings) from the reservation. internal DHCP server. Click Save at the bottom. Then click Reboot at the top right to commit the changes. © Copyright 2019 TRENDnet. All Rights Reserved.
-
Page 21: Add Static Dhcp Reservations
You can also click the drop-down list to select from a list of network devices detected by the router that have been assigned IPv4 address settings through DHCP. (e.g. AA:BB:CC:DD:EE:FF) © Copyright 2019 TRENDnet. All Rights Reserved. -
Page 22: Configure Wan Interfaces For Internet Connectivity
ISP (Internet Service Provider), then click Save. Note: Please note that the router will use one set of DNS servers for all WAN interfaces. 3. Under the WAN List next to WAN1, click Edit. © Copyright 2019 TRENDnet. All Rights Reserved. -
Page 23: Ipv6 Settings
7). PPPoE • Link-Local • 2. Click on System and click on IPv6 Setup. 6to4 • 4. Click Save at the bottom. Then click Reboot at the top right to commit the changes. © Copyright 2019 TRENDnet. All Rights Reserved. -
Page 24: Virtual Lans (Vlans)
7. Click Save at the bottom. Then click Reboot at the top right to commit the changes. 4. For the VLAN Mode, select Enable. Note: If using multiple WAN mode, under Specify WAN Port, you can select which WAN to direct the outbound traffic for the VLAN. © Copyright 2019 TRENDnet. All Rights Reserved. - Page 25 VLAN 50 IP interface 192.168.50.1 as the Internet gateway and gateway to other local IP subnets. Additional VLANs can be created on the router and switch in which 802.1Q VLAN traffic can pass through the same single 802.1Q VLAN tag/trunk link. © Copyright 2019 TRENDnet. All Rights Reserved.
-
Page 26: Static Routes
Interface: This option configure an interface route. If choosing this option, click the drop-down list and select the interface. • Metric: Enter the metric or priority of the route. The metric range is 1-255, the lowest number 1 being the highest priority. © Copyright 2019 TRENDnet. All Rights Reserved. -
Page 27: Dynamic Routing Protocols
• Distribute OSPF over RIP: If you are using both RIP and OSPF dynamic routing protocols at the same time, this option will distribute OSPF routes over RIP protocol to other RIP enabled devices. © Copyright 2019 TRENDnet. All Rights Reserved. - Page 28 1 being the highest priority. • RIP – Selecting Enable will distribute the network route to other RIP enabled devices. • OSPF – Selecting Enable will distribute the network route to other OSPF enabled devices. © Copyright 2019 TRENDnet. All Rights Reserved.
- Page 29 RIP routes over OSPF protocol to other OSPF enabled devices. Under OSPF network settings, check the network interfaces to enable OSPF and enter the Area ID. © Copyright 2019 TRENDnet. All Rights Reserved.
- Page 30 1 being the highest priority. • RIP – Selecting Enable will distribute the network route to other RIP enabled devices. • OSPF – Selecting Enable will distribute the network route to other OSPF enabled devices. © Copyright 2019 TRENDnet. All Rights Reserved.
-
Page 31: Bandwidth Control
Note: If you are using multi-WAN mode, you can combine the total download bandwidth of the WAN connections. Please note that performance throughput is limited of up to 200Mbps per WAN connection in multi-WAN mode. © Copyright 2019 TRENDnet. All Rights Reserved. - Page 32 TWG-431BR TRENDnet User’s Guide 4. Click Save at the bottom. Then click Reboot at the top right to commit the changes. © Copyright 2019 TRENDnet. All Rights Reserved.
-
Page 33: Dynamic Dns
• Password: This is the password to login to your Dynamic DNS service account. • Interval – This specified the time interval between each DDNS update sent the DDNS service provided. Please refer to your DDNS service provider requirements. © Copyright 2019 TRENDnet. All Rights Reserved. -
Page 34: Wake On Lan (Wol)
• Hour/Minute: Specify the hour and minute (24-hour format). Note: If setting a schedule, please make sure the router time settings are setup correctly under System > Time Server. © Copyright 2019 TRENDnet. All Rights Reserved. -
Page 35: Usb Mode
Config Backup/Recovery: Sets the USB mode to backup router configuration. Export Log to CSV: Sets the USB mode to export logging to .csv file. 4. Click Save at the bottom. Then click Reboot at the top right to commit the changes. © Copyright 2019 TRENDnet. All Rights Reserved. -
Page 36: Firewall & Security Settings
WAN1 only and inbound connections requests on WAN2 will be denied. Choosing ALL WAN will allow will enable the rule on all WAN interfaces. © Copyright 2019 TRENDnet. All Rights Reserved. -
Page 37: Ip Filtering
• Protocol – Click the drop-down list to select the protocol for the service to filter: All, TCP, UDP, or ICMP. • Schedule – Allows you to select a schedule when the IP filter rule should be enabled or disabled. © Copyright 2019 TRENDnet. All Rights Reserved. - Page 38 • Destination Port Group – Click the drop-down the select a predefined port or port range group. You can create predefined port groups under Advanced > Port Group. • Interface – Click the drop-down list to select the destination interface for the IP filter. © Copyright 2019 TRENDnet. All Rights Reserved.
-
Page 39: Mac Filtering
Note: Additionally, you can specify a specific IP address/range, port, and local interface to apply the access control rule. This can be a different IP address/range and does not need to be same as the IP address(es) of the MAC addresses added to the list. © Copyright 2019 TRENDnet. All Rights Reserved. -
Page 40: Applications
MAC Address –Enter the MAC address you would like to filter or deny traffic and click Add to add to the list. (e.g. a1:b2:c3:d4:e5:f6) Note: You can filter by MAC address or IP address. © Copyright 2019 TRENDnet. All Rights Reserved. - Page 41 TWG-431BR TRENDnet User’s Guide 4. Click Save at the bottom. Then click Reboot at the top right to commit the changes. © Copyright 2019 TRENDnet. All Rights Reserved.
-
Page 42: Dmz Host
1. Log into your router management page (see “Access your router management page” on page 7). 2. Click on System, click on WAN Setup, and next to the WAN interface you would like to assign a DMZ host, click Edit. © Copyright 2019 TRENDnet. All Rights Reserved. -
Page 43: Multiple Wan Configuration
“Access your router management page” 4. Click Save at the bottom. Then click Reboot at the top right to commit the changes. on page 7). 2. Click on System and click on WAN Setup. © Copyright 2019 TRENDnet. All Rights Reserved. - Page 44 This may cause connectivity/stability issues with some applications or devices. WAN Weight – The weight is distributed as percentage across all WAN interfaces. Enter a number 1-10 to assign the WAN weight. The higher © Copyright 2019 TRENDnet. All Rights Reserved.
- Page 45 • Failure Count – Click the drop-down list to set the maximum number of failed ping requests before interface status is considered to be down or failed. 4. Click Save at the bottom. Then click Reboot at the top right to commit the changes. © Copyright 2019 TRENDnet. All Rights Reserved.
-
Page 46: Web Management System (Router Limits™)
Enabled with bandwidth monitoring (reduces LAN > WAN performance) – Enables Routers Limits functionality with the additional bandwidth monitoring function. Note: Enabling the option with bandwidth monitoring will significantly decrease LAN to WAN performance. © Copyright 2019 TRENDnet. All Rights Reserved. - Page 47 7. After your Router Limits account has been created and your router paired, you will automatically be brought to your web management dashboard. The Current Status on your router will display Online that the content management service is running and paired with your online account. © Copyright 2019 TRENDnet. All Rights Reserved.
-
Page 48: Router Limits Content Management
Content filters and scheduling can be assigned for each group. By default, new devices are assigned to the Guest group. New groups can be created and devices reassigned to new groups for easy management. © Copyright 2019 TRENDnet. All Rights Reserved. - Page 49 History – This page will display the Internet access history through your router. This page will also displays timestamps of when websites were accessed and which devices access each site. Exceptions – This setting allows you to configure exceptions and allow access. © Copyright 2019 TRENDnet. All Rights Reserved.
- Page 50 You can access and manage your Router Limits account configuration settings through https://routerlimits.com and logging in. If behind your router, you can also access your account by going to Services > Router Limits™ in your router management page and clicking Manage Account. © Copyright 2019 TRENDnet. All Rights Reserved.
-
Page 51: Virtual Private Networking (Vpn)
Important Note: For any tunneling or VPN method used, to avoid IP address conflict and to ensure connectivity, it is required that each end (LAN IP network or single client) of the VPN tunnel is configured with a different IP network or subnet. © Copyright 2019 TRENDnet. All Rights Reserved. -
Page 52: Pptp Vpn Server
LAN network via full tunneling. If the LAN IP address is entered, PPTP VPN clients will be Local Subnet settings as 0.0.0.0/0 and click Add. allowed to access router LAN and not the Internet. © Copyright 2019 TRENDnet. All Rights Reserved. - Page 53 TWG-431BR TRENDnet User’s Guide 10. Click Save at the bottom. Then click Reboot at the top right to commit the changes. © Copyright 2019 TRENDnet. All Rights Reserved.
-
Page 54: Setting Up The Pptp Vpn Client (Windows)
8. Click the VPN type drop-down list and select Point to Point Tunneling Protocol (PPTP). 4. Under VPN, click Add a VPN connection. 9. Click the Type of sign-in info drop-down list and select User name and password. © Copyright 2019 TRENDnet. All Rights Reserved. -
Page 55: L2Tp Vpn Server
PPTP VPN System > L2TP Server Setup connection to your TWG-431BR router. Click Save. You can enable and configure the L2TP VPN server on your router to allow remote computers or mobile devices with L2TP support to connect securely over the Internet and access the company LAN network. - Page 56 Add to add to the Routing Rule List. (e.g. 192.168.10.0/24) Note: If you want allow L2TP VPN clients to access any local subnet, you can leave the Local Subnet settings as 0.0.0.0/0 and click Add. © Copyright 2019 TRENDnet. All Rights Reserved.
-
Page 57: Setting Up The L2Tp Vpn Server With Ipsec Encryption (Psk)
8. Click the WAN ID drop-down list to select the correct WAN interface for the L2TP over IPsec server. 9. Click Save at the bottom. 10. Click on System, click on PPTP/L2TP Account Setup, and click Create Account. © Copyright 2019 TRENDnet. All Rights Reserved. -
Page 58: Setting Up The L2Tp Vpn Client (Windows) With Ipsec Encryption (Psk)
Local Subnet settings as 0.0.0.0/0 and click Add. 3. Click VPN in the left panel. 13. Click Save at the bottom. Then click Reboot at the top right to commit the changes. 4. Under VPN, click Add a VPN connection. © Copyright 2019 TRENDnet. All Rights Reserved. - Page 59 6. Enter a name in the Connection name field. authentication or if not, you will be prompted when attempting to establish L2TP with IPsec VPN connection to your TWG-431BR router. Click Save. 7. Enter the Internet WAN IP address, DNS, or dynamic DNS hostname of your router to connect over the Internet.
-
Page 60: Ipsec (Internet Protocol Security)
Note: Changing the LAN IP address of your router will change the LAN IP network of your router. Example: VPN Router A LAN IP Settings: 192.168.10.1 / 255.255.255.0 VPN Router B LAN IP Settings: 192.168.100.1 / 255.255.255.0 5. Click the Mode drop-down list and select LAN-to-LAN. © Copyright 2019 TRENDnet. All Rights Reserved. - Page 61 10. In the Remote Host field, enter the remote WAN1 IP. (e.g. 10.10.10.20) This can also be a domain name (ex: dynamic DNS host name) 12. For the DPD setting, select Enable. 11. Enter the Pre-Shared Key (PSK) for the IPsec VPN tunnel. (e.g. 1234567890) © Copyright 2019 TRENDnet. All Rights Reserved.
- Page 62 13. For the IKE Policy, IKE Mode: Main, IKE Authentication: SHA1, and DH Group: DH2. 14. For the IPsec Policy, ESP Authentication: SHA1, and Perfect Forward Secrecy: Enable/DH Group: DH2. 15. Click Save at the bottom. Then click Reboot at the top right to commit the changes. © Copyright 2019 TRENDnet. All Rights Reserved.
- Page 63 10. In the Remote Host field, enter the remote WAN1 IP. (e.g. 10.10.10.20) This can also be a domain name (ex: dynamic DNS host name) 11. Enter the Pre-Shared Key (PSK) for the IPsec VPN tunnel. (e.g. 1234567890) 5. Click the Mode drop-down list and select LAN-to-LAN. © Copyright 2019 TRENDnet. All Rights Reserved.
- Page 64 14. For the IPsec Policy, ESP Authentication: SHA1, and Perfect Forward Secrecy: Enable/DH Group: DH2. 15. Click Save at the bottom. Then click Reboot at the top right to commit the changes. 12. For the DPD setting, select Enable. © Copyright 2019 TRENDnet. All Rights Reserved.
-
Page 65: Setting Up Ipsec Server Vpn (Psk)
IPsec VPN settings on your router. Please refer to 5. Click the Mode drop-down list and select Client-to-LAN. your third party IPsec VPN User’s Guide/Manual for configuring the VPN settings. © Copyright 2019 TRENDnet. All Rights Reserved. -
Page 66: Secure Socket Layer Vpn (Ssl) / Openvpn
VPN, it is not required however, strongly recommended to setup the Dynamic DNS feature on your router to prevent any issues with VPN connectivity if your public (WAN) Internet IP address dynamically changes. © Copyright 2019 TRENDnet. All Rights Reserved. -
Page 67: Ssl Vpn Client Setup (Windows)
4. If prompted to run the file, click Run. 6. At the license agreement window, review the license agreement and click I Agree. © Copyright 2019 TRENDnet. All Rights Reserved. - Page 68 7. At the choose components window, click Next. 9. At the prompt to install the TAP-Windows adapter, click Install. 10. At the installation completion window, click Next. 8. At the install location window, click Install. © Copyright 2019 TRENDnet. All Rights Reserved.
- Page 69 15. After right-clicking the icon, the menu will appear. Click Connect to establish your VPN connection to your router. 12. Copy the client configuration file(s) (client.ovpn) downloaded from the router to the following path without any sub-folders. C:\Program Files\OpenVPN\config © Copyright 2019 TRENDnet. All Rights Reserved.
- Page 70 You will be able to access resources securely from your router LAN network over the Internet such as shared folders, media, files, etc. Note: To disconnect your VPN client connection, right click OpenVPN system tray icon and select Disconnect. © Copyright 2019 TRENDnet. All Rights Reserved.
-
Page 71: High Availability
Save at the bottom. High availability allows you to configure multiple TWG-431BR routers to backup routers as fault tolerance in case the primary router fails. The TWG-431BR 1 master and 5 standby in a high availability cluster. In the example below, we will use 2 TWG-431BR routers in a high availability cluster. - Page 72 8. In the Virtual IP Setup list, under VLAN1, click on Edit. 9. For the Service, select Enable. 10. Under Virtual IP Settings, for the Virtual IP, enter 192.168.10.1 and enter an 8 character password in the Password field. © Copyright 2019 TRENDnet. All Rights Reserved.
- Page 73 8. In the Virtual IP Setup list, under VLAN1, click on Edit. 5. Change the IP Address to 192.168.10.2 and click Save at the bottom of the page. 9. For the Service, select Enable. 6. Click on System and click on High Availability. © Copyright 2019 TRENDnet. All Rights Reserved.
- Page 74 12. Connect the routers to the network and verify the high availability configuration by testing Internet connectivity from the LAN/VLAN1 side switch and disconnecting the LAN/VLAN1 link on the master router from the network. © Copyright 2019 TRENDnet. All Rights Reserved.
-
Page 75: Router Maintenance And Monitoring
Please note that modifying the port will affect SSH access from all allowed interfaces. • Host Key Footprint – The RSA key used for SSH management can be randomly generated to a new key by clicking Generate Key. © Copyright 2019 TRENDnet. All Rights Reserved. -
Page 76: Diagnostic Tools
IP address or domain name. Destination Host – Enter the host IP address test connectivity. Max. Hops – Enter the max number of hops for the traceroute and click Start to start the traceroute test. © Copyright 2019 TRENDnet. All Rights Reserved. -
Page 77: Backup And Restore Your Router Configuration Settings
4. A separate file navigation window should open. 5. Select the router configuration file to restore and click Upload (Default Filename: config.bin). If prompted, click Yes or OK. 6. Wait for the router to restore settings. © Copyright 2019 TRENDnet. All Rights Reserved. -
Page 78: Scheduled Automatic Reboot
• Hour/Minute: Specify the hour and minute (24-hour format). Note: If setting a schedule, please make sure the router time settings are setup correctly under System > Time Server. © Copyright 2019 TRENDnet. All Rights Reserved. -
Page 79: Console Access
Router IP Address 192.168.10.1 4. Wait for the router to settings to factory default. Router Subnet Mask 255.255.255.0 DHCP Server IP Range 192.168.10.101-192.168.199 Default WAN Mode 4 WAN (Ports 2-5) / 1 LAN (Port 1) © Copyright 2019 TRENDnet. All Rights Reserved. -
Page 80: Upgrade Your Router Firmware
TRENDnet may periodically release firmware upgrades that may add features or fix 2. Click on Maintenance and click on Upgrade Firmware. problems associated with your TRENDnet router model and version. To check if there is a firmware upgrade available for your device, please check your TRENDnet model and version using the link. -
Page 81: Snmp Settings
7). 2. Click on System and click on Management. 3. Review the settings below. 4. Click Save at the bottom. Then click Reboot at the top right to commit the changes. © Copyright 2019 TRENDnet. All Rights Reserved. -
Page 82: Check The Router Status Information
If there is VLAN information displayed, the VLAN is currently enabled/active. • WAN# - Displays the current WAN Mode, IP address, MAC address, default gateway, and total bytes transmitted and received through the interface. © Copyright 2019 TRENDnet. All Rights Reserved. -
Page 83: View Routing Table And Arp Entries
“Access your router management page” on page 7). 2. Click on Status and click on Local System Log. Note: You can click Refresh to refresh the current logging display or clear to completely delete all logging. © Copyright 2019 TRENDnet. All Rights Reserved. -
Page 84: Smtp Email Notification
In the receiver email list, you can enter all of the recipients for the email notifications. 4. Click Save at the bottom. Then click Reboot at the top right to commit the changes. © Copyright 2019 TRENDnet. All Rights Reserved. -
Page 85: Technical Specifications
IP address filtering: TCP, UDP, ICMP (Up to 64 entries) IPsec Encryption: 3DES, AES-128/192/256 • • Content filtering: URL (HTTP only), Keyword, P2P, IM (Up to 64 entries) IPsec Authentication: MD5, SHA1, SHA256 © Copyright 2019 TRENDnet. All Rights Reserved. - Page 86 Diagnostic tools: Built-in ping & traceroute network utilities • MIB II RFC 1213 Power • Input: 100 – 240V AC, 50/60Hz, 0.5A • Output: 12V DC, 1.5A external power adapter • Max. consumption: 17.4W MTBF • 318,350 hours © Copyright 2019 TRENDnet. All Rights Reserved.
-
Page 87: Troubleshooting
Q: I am not sure what type of Internet Account Type I have for my Cable/DSL connection. How do I find out? Answer: Contact your Internet Service Provider (ISP) for the correct information. © Copyright 2019 TRENDnet. All Rights Reserved. -
Page 88: Appendix
2. In the Network Preference window, next to "Show:", select Network In MAC OS 10.4, from the Show drop-down list, select Built-in Status. You'll see your network status and your IP address settings displayed. Ethernet and select the TCP/IP tab. © Copyright 2019 TRENDnet. All Rights Reserved. - Page 89 3. You may be prompted to enter a security key in order to connect to the network. 4. Enter in the security key corresponding to the wireless network, and click Connect. © Copyright 2019 TRENDnet. All Rights Reserved.
- Page 90 This equipment has been tested and found to comply with the limits for a Class B digital device, TRENDnet hereby declare that the product is in compliance with the essential requirements pursuant to Part 15 of the FCC Rules. These limits are designed to provide reasonable and other relevant provisions under our sole responsibility.
- Page 91 An RMA number is required in order to initiate warranty service support the event that the RMA unit needs to be replaced, TRENDnet may replace it with a for all TRENDnet products. Products that are sent to TRENDnet for RMA service must refurbished product of the same or comparable model.
- Page 92 OF SUCH DAMAGES, AND LIMITS ITS LIABILITY TO REPAIR, REPLACEMENT, OR REFUND evidence of the original purchaser's date of purchase. Replacement products may be OF THE PURCHASE PRICE PAID, AT TRENDNET'S OPTION. THIS DISCLAIMER OF LIABILITY refurbished or contain refurbished materials. If TRENDnet, by its sole determination, is...
Need help?
Do you have a question about the TWG-431BR and is the answer not in the manual?
Questions and answers