Pfeiffer Vacuum QMG 250 PRISMAPRO Quick Start Manual
Hide thumbs
Also See for QMG 250 PRISMAPRO:
- Operating instructions manual (74 pages) ,
- Operating instructions manual (30 pages) ,
- Translation of the original (88 pages)

Related Manuals for Pfeiffer Vacuum QMG 250 PRISMAPRO


Summary of Contents for Pfeiffer Vacuum QMG 250 PRISMAPRO
- Page 1 SUPPLEMENTARY INFORMATION Translation of the Original QMG 250 PRISMAPRO ® Quick Start Guide...
- Page 2 2/18...
-
Page 3: Table Of Contents
Table of contents Table of contents Quick Start Scope of delivery Installing the Analyzer Installing the electronic unit Establishing the Ethernet connection Connecting the current supply Changing the host computer IP address Connecting the PrismaPro Web UI PV MassSpec Installing PV MassSpec Starting PV MassSpec and adding devices Performing a vacuum analysis with PV MassSpec Carrying out leak detection with helium or other test gas... -
Page 4: Quick Start
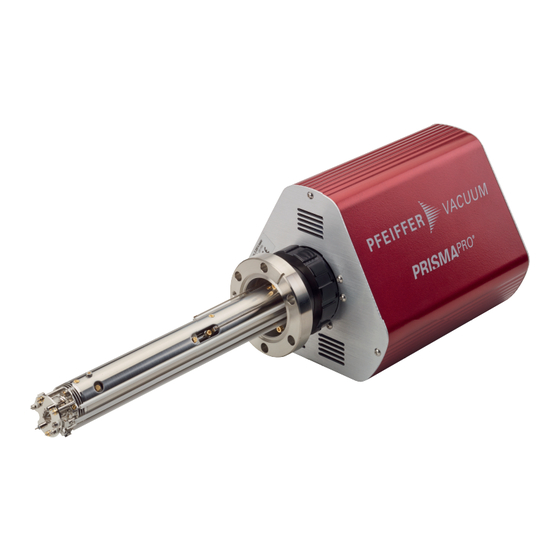
(Link: https://youtu.be/DkezYz9KC6Q) 1.1 Scope of delivery The scope of delivery includes the following parts: ● QMG 250 PrismaPro ─ Analyzer QMA 250 with transport protection and intermediate piece (EM variant only) ─ Electronic unit QME 250 ─ SP 250 Power supply unit ─... -
Page 5: Installing The Electronic Unit
Quick Start QMA 250 F QMA 250 M Fig. 1: Installing the QMA 250 Analyzer 1 Installation tool 2 Transport protection and lock Installing the Analyzer on a vacuum system Connection flange: DN 40 CF-F 1. Place the Analyzer in the installation tool supplied. 2. -
Page 6: Establishing The Ethernet Connection
Quick Start Fig. 3: QME connection with earthing tongue Procedure 1. Slide the fastening nut over the end of the analyzer. 2. Place the O-ring on the end of the analyzer. 3. Roll the O ring down the analyzer until it sits in the groove. 4. -
Page 7: Connecting The Prismapro Web Ui
Quick Start 5. Right-click on the existing connection (e.g. LAN). 6. Select Properties. 7. Select Internet Protocol Version 4 (TCP/IPv4). 8. Select Properties. 9. In the Properties menu under Use the following IP address, enter the IP address 192.168.1.xxx and Subnet mask 255.255.0.0. –... -
Page 8: Pv Massspec
You can find the access credentials in the PrismaPro Web UI under the "HELP" menu. Fig. 5: Link of PV MassSpec on the desktop Procedure 1. Open the directory in the Pfeiffer Vacuum Cloud. 2. Download the software. 3. Start the software installation by double-clicking " PVMassSpec_Installer.exe". -
Page 9: Performing A Vacuum Analysis With Pv Massspec
IP address(es) of your PrismaPro units/unit. If you do not know the IP addresses, you can find them using the "Mass Spec Search" program: Windows "Start" > All Programs > Pfeiffer Vacuum > Mass Spec Search 2. Select the "Main" window and click "Configuration > Connections (Sensors)" in the menu bar. - Page 10 PV MassSpec Fig. 8: Example: Air components Fig. 9: Axes options Performing a vacuum analysis with PV MassSpec 1. To obtain the best results, ensure that the vacuum on the analyzer is ≤ 1 x 10 hPa. 2. In the main window (Main), click "Vacuum Diagnostics" in the respective PrismaPro line to carry out a quick vacuum system check.
-
Page 11: Carrying Out Leak Detection With Helium Or Other Test Gas
PV MassSpec 3. In the next window, click "Start". – The PrismaPro switches on the filament emission, scans the masses, and displays the signals as ion currents on the Y axis. The PrismaPro uses the Faraday detector and identifies the sig- nals based on the typical gas components in the vacuum analysis. -
Page 12: Collecting Data With The "Quick Monitor
PV MassSpec 2.5.1 Collecting data with the "Quick Monitor" Fig. 11: Quick Monitor To capture data, you can use the default "Quick Monitor" recipe. This executes a 0–50 u scan for ba- sic residual gas analysis. Or you can create your own recipe. Collecting data with the "Quick Monitor"... -
Page 13: Creating A New Recipe
PV MassSpec 2.5.2 Creating a new recipe Fig. 12: Acquisition Control 13/18... - Page 14 PV MassSpec Fig. 13: Selecting masses, total pressure, and device parameters to record Parameter Description Parameter Add multiple steps that run in sequence. Function "Normal" is generally used for data acquisition. Ionizer Presets There are 2 sets of ion source settings you may select (e.g., one for high and one for low pressure.) Start Mode...
-
Page 15: Executing A Recipe
– The cycle stops, and the software stores the data file, which remains displayed on the screen for analysis. 8. "Acquisition Start" allows you to restart the cycle. 2.6 Analyzing saved data Default storage location: C:\Pfeiffer Vacuum\data\MM-DD-YYYY You can ● view the chronological sequence ● zoom into diagram areas... - Page 16 PV MassSpec ● hide and show data ● export data in ASCII format Analyzing saved data ► In the menu, click "Runs > Load Run *" to load a saved run and evaluate the data. 16/18...
- Page 17 PV MassSpec 17/18...
Need help?
Do you have a question about the QMG 250 PRISMAPRO and is the answer not in the manual?
Questions and answers