Table of Contents
Advertisement
Quick Links
Advertisement
Table of Contents

Related Manuals for Haier JZT-QHA9331P


Summary of Contents for Haier JZT-QHA9331P
- Page 1 专用号: 0220500488 巴基斯坦项目JZT-QHA9331P 替换单编号: 版号:第 1 版 英文说明书会签表 设计时间: 2018/05/11 版式设计: 版式审核: 委托人落实意见 部门 会签意见 共 条,明细如下: 各 灶 具 设 部 计 小 微 门 项目负责人签字: 共 条,明细如下: 会 海 外 市 签 场 小 微 签字: 批准 签字:...
- Page 2 USERS OPERATING INSTRUCTIONS INSTALLATION INSTRUCTIONS BUILT-IN GAS COOKING HOBS...
- Page 3 Dear Customer, Thank you for having purchased and given your preference to our product. The safety precautions and recommendations reported below are for your own safety and that of others. They will also provide a means by which to make full use of the features offered by your appliance.
-
Page 4: Important Safety Precautions And Recommendations
IMPORTANT SAFETY PRECAUTIONS AND RECOMMENDATIONS IMPORTANT: This appliance is designed and manufactured solely for the cooking of domestic (household) food and is not suitable for any non domestic application and therefore should not be used in a commercial environment. The appliance guarantee will be void if the appliance is used within a non domestic environment i.e. - Page 5 • CAUTION: this appIiance must only be installed in a permanently ventilated room in compliance with the applicable regulations. • Do not carry out cleaning or maintenance operations on the appliance without having previously disconnected it from the electric power supply. •...
- Page 6 To avoid burns and scalds, young children should be kept – away. • WARNING: Unattended cooking on a hob with fat or oil can be • surfaces. • WARNING: When correctly installed, your product meets all safety requirements laid down for this type of product category. However special care should be taken around the underneath of the appliance as this area is not designed or intended to be touched and may contain sharp or rough edges, that may cause...
-
Page 7: Features And Technical Data
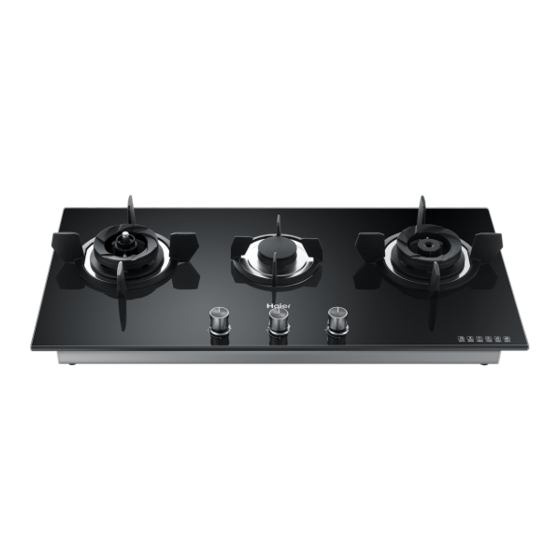
FEATURES AND TECHNICAL DATA Model:JZT-QHA9331P(12T) Fig. 1.1... -
Page 8: Gas Burners
GAS BURNERS Left (Ultra Rapid) 4,50 kW Inner Brass Burner +outer Brass Burner Middle(Auxiliary) 1,60 kW single Burner Right(Ultra Rapid) 4,50 kW Inner Brass Burner +outer Brass Burner CONTROLS DESCRIPTION Burner control knob (1.Left burner) Burner control knob (2.Middle burner) Burner control knob (3.Right burner) Temperature Sensor (*),Only Left Burner has Inner Brass Burner... - Page 9 ■ LOW BATTERY INDICATION FUCTION When the battery voltage is too low to ensure the DRY FIRE FUNCTION to work normally, the hob will alarm (about 10 seconds) to remind you to change the battery in time. In this case it cann’t be ignited by the left burner,but it can be ignited by other burner without DRY FIRE FUNCTION.
-
Page 10: How To Use The Cooktop
HOW TO USE THE COOKTOP GAS BURNERS which control the safety valves. Turning the knob, so that the indicator line points to the symbols printed on the panel, achieves the following functions: – symbol closed valve maximum – symbol minimum Fig. -
Page 11: Installing The Battery
INSTALLING THE BATTERY Firstly, install two pcs of No. 1 batteries in the battery box at the bottom of the gas hob, and then perform the ignition and fire size adjustment according to the order of illustration. (illustrated in fig. 2.3) Battery Battery Fig. - Page 12 ADJUSTING THE AIR EJECTION When the flame is in poor condition, adjust the handle at the bottom of the hob to increace or reduce air amount(illustrated in fig. 2.4,fig. 2.5 and fig. 2.6),in order to combust completely. When the flame is long and yellow(incompletele combustion flame), turn clockwise to adjust the handle to ncrease the amount of air intake according to the position shown in the b ) L i f t i n g f l a m e...
- Page 13 OPERATING OF THE DRY FIRE PROTECTION FUNCTION BURNER Choose the PANS a) shape:To ensure contact closely between the temperature sensor and the pan, the pan bottom must be flat ,and the diameter is at least 100mm. b) material:Due to different thermal conductivity of pot, the accuracy of sensor temperature detection can be affected.The ceramic, aluminum alloy and ceramic layer (mainly heat insulating layer) with poor thermal conductivity are not suitable for the burner.
-
Page 14: Choice Of The Burner
CHOICE OF THE BURNER The suitable burner must be chosen according to the diameter and the capacity used. As an indication, the burners and the pots must be used in the following way: DIAMETERS OF PANS WHICH MAY BE USED ON THE BURNERS BURNERS MINIMUM MAXIMUM... -
Page 15: Cleaning And Maintenance
CLEANING AND MAINTENANCE GENERAL ADVICE • Before you begin cleaning, you must ensure that the appliance is COOKING HOBS WITH switched off and disconnected from GLASS LID (optional) the electrical power supply. • Important: The use of suitable protective clothing/gloves recommended when handling or cleaning of this appliance. - Page 16 PAINTED PARTS AND SILKSCREEN PRINTED SURFACES Clean using an appropriate product. Always dry thoroughly. IMPORTANT: these parts must be cleaned very carefully to avoid scratching and abrasion. You are advised to use a soft cloth and neutral soap. CAUTION: Do not use abrasive substances or non-neutral detergents as these will irreparably damage the surface.
- Page 17 1,6,9 pan support 2,10 inner burner 3,11 outer burner 4 senser 5,12 dual burner crown 7 single burner 8 single burner crown 13,15 ignition electrode (G) 14,16 probe (P) Fig. 3.1...
-
Page 18: Installation
INSTALLATION IMPORTANT : • The appliance is designed and approved for domestic use only and should not be installed in a commercial, semi commercial or communal environment. Your product will not be guaranteed if installed in any of the above environments and could affect any third party or public liability insurances you may have. - Page 19 • heat-resistant; Extractor • made from thermal hood conductivity material. Air vent Gas hob Thermal Clearance protection installed barrier Door Space for Fig. 4.1b connections Fig. 4.1c Measures (mm) Description (minimum) (minimum) JZT-QHA9331P...
-
Page 20: Ventilation Requirements
VENTILATION REQUIREMENTS The appliance must be installed in compliance with applicable local regulations concerning ventilation and the evacuation of exhaust gases. Intensive and prolonged use may require extra ventilation, e.g. opening a window, or more efficient ventilation increasing the mechanical suction power if this is fitted. CHOOSING SUITABLE SURROUNDINGS The room where the gas appliance is to be installed must have a natural flow of air so that the gas can burn(in compliance with appliance local regulations). -
Page 21: Gas Section
GAS SECTION GAS INSTALLATION REQUIREMENTS Important ! • Before installation, make sure that the local distribution conditions (gas type and pressure) and the adjustment of this appliance are compatible. The appliance adjustment conditions are given on the plate or the label. •... - Page 22 Fig. 5.1a Appliance inlet pipe ISO 228-1 (male) 1/2” G Cylindrical Hose holder Gasket (installed before Floating nut leaving factory) (included in the rigid pipe or Hose clamp flexible hose) Rubber hose (not supplied) Rigid pipe or Flexible hose (not supplied) (included Gasket) Fig.
- Page 23 GAS CONNECTION WITH RUBBER HOSE If not fitted,fit the gas hose holder as indicated in fig. 5.1a snd 5.1c. Connect the appliance to the gas supply using a suitable rubber hose. The hose must comply with the applicable local regulations and be of the correct construction for the type of gas being used.
- Page 24 GAS CONNECTION WITH RIGID PIPES OR A FLEXIBLE PIPE Important! If not fitted,remove the hose holder from the appliance innet pipe with spanner before fitting. When connecting the appliance to the gas supply with rigid pipes or a flexible pipe make sure that •...
- Page 25 Part number:0220500488 Supplier number:V******...
Need help?
Do you have a question about the JZT-QHA9331P and is the answer not in the manual?
Questions and answers