Table of Contents
Advertisement
Advertisement
Table of Contents
Troubleshooting

Related Manuals for Xylem Goulds ResiBoost RB111512


Summary of Contents for Xylem Goulds ResiBoost RB111512
- Page 1 INSTRUCTION MANUAL IM325 ResiBoost Variable Frequency Controller...
-
Page 3: Table Of Contents
Table of Contents Table of Contents 1 Introduction and Safety......................3 1.1 Introduction.......................... 3 1.2 Safety............................. 3 1.2.1 Safety terminology and symbols.................3 1.2.2 Spare parts........................4 1.2.3 User safety........................4 1.2.4 Protecting the environment..................5 2 Transportation and Storage...................... 6 2.1 Examine the delivery......................6 2.1.1 Examine the package.................... - Page 4 Table of Contents 7.4 Prime the pump......................... 31 7.4.1 Negative suction head pumps.................. 31 7.4.2 Positive suction head pumps..................31 7.5 Start the pump........................31 7.6 Change the direction of rotation..................31 7.7 Set the operating pressure....................32 8 Troubleshooting........................33 8.1 Faults, causes, and remedies...................
-
Page 5: Introduction And Safety
This includes any modification to the equipment or use of parts not provided by Xylem. If there is a question regarding the intended use of the equipment, please contact a Xylem representative before proceeding. -
Page 6: Spare Parts
1 Introduction and Safety Hazard level Indication A hazardous situation which, if not avoided, could result WARNING: in death or serious injury A hazardous situation which, if not avoided, could result CAUTION: in minor or moderate injury Notices are used when there is a risk of equipment NOTICE: damage or decreased performance, but not personal injury. -
Page 7: Protecting The Environment
• Clean-up of spills Exceptional sites CAUTION: Radiation Hazard Do NOT send the product to Xylem if it has been exposed to nuclear radiation, unless Xylem has been informed and appropriate actions have been agreed upon. Recycling guidelines Always follow local laws and regulations regarding recycling. -
Page 8: Transportation And Storage
2 Transportation and Storage 2 Transportation and Storage 2.1 Examine the delivery 2.1.1 Examine the package 1. Examine the package for damaged or missing items upon delivery. 2. Record any damaged or missing items on the receipt and freight bill. 3. -
Page 9: Product Description
3 Product Description 3 Product Description 3.1 Product overview ™ ResiBoost is a variable frequency drive (controller) intended to be used with an electric pump for constant pressure systems. Not suitable for drainage systems with/without level control. A water system is only occasionally required to run at maximum capacity and the amount of water withdrawn varies over time. -
Page 10: Pump Specifications
3 Product Description Table 1: Packaged systems data Packaged Drive Model Volts Max Output Pump Model Motor Current System Model Amps Setting 13159RB115 RB111512 3HM05N07M6 10.3 BBQE 2294RB115 RB111512 5HM03N07M6 10.3 BBQE 13120RB230 RB12309 0.75 3HM04N05M6 FBQE 13150RB3 RB32310 3HM05N07T6 PBQE 22125RB230 RB12309... -
Page 11: Installation
4 Installation 4 Installation Precautions WARNING: • Observe accident prevention regulations in force. • Use suitable equipment and protection. • Always refer to the local and/or national regulations, legislation, and codes in force regarding the selection of the installation site, plumbing, and power connections. 4.1 Electrical requirements •... -
Page 12: Hydraulic Installation
4 Installation WARNING: Do NOT install this pump in swimming pools or marine areas. Failure to follow these instructions could result in serious personal injury, death and/or property damage. CAUTION: Electrical Hazard Risk of electrical shock or burn. The equipment manufacturer has not evaluated this unit for use in swimming pools. -
Page 13: Pressure Tank Installation
4 Installation • Suction piping should be no smaller than the suction connection on the pump. Keep suction piping as short and direct as possible. Avoid multiple elbows and unnecessary fittings to minimize friction loss. Refer to the pump manual to ensure that the NPSHr is maintained. -
Page 14: Components For Correct Installation
4 Installation 4.3.2 Components for correct installation Figure 2 Figure 4 Figure 3 ResiBoost INSTRUCTION MANUAL... -
Page 15: Electrical Installation
4 Installation Number Component Included in the kit Notes Electric pump √ Union with check valve √ Minimum pressure switch to prevent dry running (or other level control switch) Electric pump bleed / priming cap Vacuum pressure gauge Filter Non-return valve with filter (foot valve) Discharge pressure gauge Union... -
Page 16: Low Water Input Connection
4 Installation 115 V models are supplied with an input power supply cable with NEMA 5-15 plug. Connect the plug to a NEMA 5-20 GFCI receptacle. 230V models are supplied with an input power supply cable with a NEMA 6-20 plug. Connect the plug on 230V models to a NEMA 6-20 GFCI receptacle. - Page 17 4 Installation INPUT Figure 6 5. Check that all the cables are secure and close the FRONT cover, making sure not to crush the cables between the cover and the controller housing. Fasten the 6 cover screws. Tighten to 17.7 in-lb. ResiBoost INSTRUCTION MANUAL...
-
Page 18: System Description
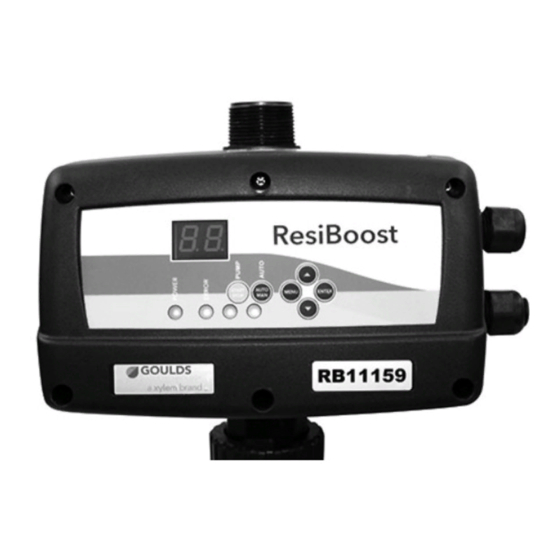
5 System Description 5 System Description 5.1 User interface 2 10 Figure 7: User interface Number Description This button is used to switch between AUTOMATIC and MANUAL Mode. In AUTOMATIC Mode, the controller operates the pump to maintain the pressure setpoint. In MANUAL Mode, the controller operates the pump based on the Start/Stop button. -
Page 19: Start-Up And Initial Programming
5 System Description 5.2 Start-up and Initial Programming Refer to Figure 7: User interface on page 16 for an explanation of the buttons on the user interface. 1. Check that all the electrical, mechanical, and hydraulic connections have been made. Mechanical installation on page 9, Hydraulic installation... -
Page 20: Operating Parameters
5 System Description NOTICE: – In AUTOMATIC mode, the pump runs if the pressure of the system is below the Pressure Drop (dP) value. – If necessary, press (2) to set MANUAL mode and turn off the pump. 5.2.1 Operating parameters Refer to Figure 7: User interface on page 16 for an explanation of the buttons on the user... -
Page 21: Programming
5 System Description Parameter Description Total number of times the A4 (Minimum Pressure) alarm has been triggered. Total number of times the A5 (Pressure Sensor Fault) alarm has been triggered. Total number of times the A6 (Over Temperature) alarm has been triggered. Total number of times the A7 (Short Circuit) alarm has been triggered. - Page 22 5 System Description • Press (2) to enter MANUAL mode. • Press and hold (3) for 3 seconds to access The BASIC MENU (MB). The Mode LED (10) flashes. • Press (4) or (5) to edit the value of the parameter. •...
- Page 23 5 System Description Parameter Description Range Unit Default Minimum Pressure Setting 0.0–(SP-6.0) - an A4 alarm (Minimum 0.0: Disabled Pressure) is triggered when the system pressure drops below the value for longer than the time set in dL (Minimum Pressure Delay Timer).
-
Page 24: Advanced Menu(Ma) Parameters
5 System Description Parameter Description Range Unit Default Dry Run Limit - This 10–80 parameter sets the percentage of Motor Current Setting (A) below which will trigger an A1(No Water) alarm. For example, if the value of A is set to 10A and the value of dr is set to 65%, then an A1 alarm will be triggered if the output... -
Page 25: Art Function (Automatic Reset Test)
5 System Description Parameter Description Range Unit Default Acceleration Time - 01–20 Hz/sec Minimum time required for the frequency of the motor to go from minimum to maximum frequency. Deceleration Time - 01–20 Hz/sec Minimum time required for the frequency of the motor to go from maximum to minimum frequency. -
Page 26: Alarms
6 Alarms 6 Alarms 6.1 Alarms and warnings Refer to Figure 7: User interface on page 16 for an explanation of the buttons on the user interface. When an alarm is triggered or the controller is locked, the fault LED (8) is illuminated and steady and the pump is stopped. -
Page 27: Alarms And Troubleshooting
6 Alarms 6.1.1 Alarms and troubleshooting Alarm Name Description Alarm Code This information is to be used by professional installers Controller Reaction or qualified personnel only. No Water/Loss of Prime/Dry Pump This alarm can be caused by: The controller will attempt to restart the pump according •... - Page 28 6 Alarms Alarm Name Description Alarm Code This information is to be used by professional installers Controller Reaction or qualified personnel only. Overcurrent This alarm can be caused by: The controller will attempt to restart the pump 3 times. • Using wrong motor (wrong voltage or phase). After the 4th trip, the controller will require a manual •...
- Page 29 6 Alarms Alarm Name Description Alarm Code This information is to be used by professional installers Controller Reaction or qualified personnel only. Minimum Pressure This alarm can be caused by: The controller will attempt to restart the pump according • The system pressure has dropped below the to the ART function.
- Page 30 6 Alarms Alarm Name Description Alarm Code This information is to be used by professional installers Controller Reaction or qualified personnel only. Short Circuit WARNING: The controller will attempt to restart the pump 3 times. Repeated exposure to Short Circuit After the fourth trip, the controller will require a manual conditions can damage the alarm reset.
- Page 31 6 Alarms Alarm Name Description Alarm Code This information is to be used by professional installers Controller Reaction or qualified personnel only. Under Voltage This fault can be caused by: The controller will restart when the input voltage is • The controller detected a low input voltage. within the valid range.
-
Page 32: System Setup And Operation
7 System Setup and Operation 7 System Setup and Operation 7.1 Parameters to check upon startup Check the following programming parameters upon startup: Display for RB1 and RB3 Description Enter the rated current value of the motor indicated on the motor nameplate. Entering the incorrect value can result in damage to the motor, pump, or trigger an unanticipated overcurrent alarm. -
Page 33: Prime The Pump
7 System Setup and Operation 7.4 Prime the pump • Prime the pump using the priming cap on the intake pipe (when applicable) or following the instructions in the manual provided with the pump. 7.4.1 Negative suction head pumps • Fill the intake pipe by pouring water into the priming hole in the intake pipe of the pump. -
Page 34: Set The Operating Pressure
7 System Setup and Operation Press (5) to select rotation direction. Press (6) to confirm. Exit the menu Enter AUTOMATIC mode, press (1) , and the Mode LED (10) is illuminated and steady. 7.7 Set the operating pressure Refer to Figure 7: User interface on page 16 for an explanation of the buttons on the user interface. -
Page 35: Troubleshooting
8 Troubleshooting 8 Troubleshooting Precautions WARNING: • Observe accident prevention regulations in force. • Use suitable equipment and protection. • Always refer to the local and/or national regulations, legislation, and codes in force regarding the selection of the installation site, plumbing, and power connections. Electrical Hazard: Before any service or maintenance, disconnect the system from the power supply and wait at least 2 minutes before starting work on or in the unit. - Page 36 8 Troubleshooting All discharge valves are open and the pump does not start Cause Solution Pressure setpoint is lower than the incoming pressure. Increase the pressure setpoint inside the controller. Incoming pressure is higher than the value set by the dP (Pressure Increase the dP (Pressure Drop) parameter.
-
Page 37: Product Warranty
9 Product Warranty 9 Product Warranty Commercial warranty Warranty. For goods sold to commercial buyers, Seller warrants the goods sold to Buyer hereunder (with the exception of membranes, seals, gaskets, elastomer materials, coatings and other "wear parts" or consumables all of which are not warranted except as otherwise provided in the quotation or sales form) will be (i) be built in accordance with the specifications referred to in the quotation or sales form, if such specifications are expressly made a part of this Agreement, and (ii) free from defects in material and... - Page 38 9 Product Warranty materials, coatings and other "wear parts" or consumables all of which are not warranted except as otherwise provided in the quotation or sales form) will be free from defects in material and workmanship for a period of from the date of installation or from the product date code, whichever shall occur first, unless a longer period is provided by law or is specified in the product documentation (the “Warranty”).
- Page 40 For more information on how Xylem can help you, go to www.xylem.com Xylem Inc. Visit our Web site for the latest version of this document...
Need help?
Do you have a question about the Goulds ResiBoost RB111512 and is the answer not in the manual?
Questions and answers
What is the motor current setting value for the pump. Where can this be located.
The motor current setting value for the Xylem Goulds ResiBoost RB111512 pump is referred to as "Imax," which represents the maximum current supplied. The value varies according to the model of the controller. This information can be found in the ResiBoost Instruction Manual under the "System Description" section.
This answer is automatically generated