
Subscribe to Our Youtube Channel
Related Manuals for Durr Dental Vector


Summary of Contents for Durr Dental Vector
- Page 1 Vector scaler Installation and operating instructions 0297 9000-615-32/02 *9000-615-32/02*...
- Page 3 10.1 Display/handling ... . . Vector scaler ....10.2 Adjustment options ...
-
Page 4: Table Of Contents
Contents 12.4 Cleaning the sleeve part and adapter of the handpiece hose . . 13 Reprocessing ....Appendix 13.1 Risk analysis and categorisation . . 32 17 Handover record . - Page 5 All other Here you will find the possible conse- languages are translation of the original manual. quences of ignoring the warning These operating instructions apply to Vector Follow these measures to avoid the ❯ Scaler: danger.
- Page 6 Important information Medical device Use a face mask. Serial number Use protective clothing. Order number Rinse with water. Lot designation Dispose of correctly in accordance with Rinse with instrument cleaner. EU Directive 2012/19/EU (WEEE). Type BF application part Rinse with instrument disinfectant. Steam sterilise at 134 °C Copyright information All circuits, processes, names, software pro-...
- Page 7 Only agents approved by the manufacturer may be used. Application with hydroxyapatite and/or fluoroapa- tite as polishing agent is not intended for Vector Easy, Vector Easy Pro or Vector Scaler. 9000-615-32/02 2012V003...
- Page 8 Important information Specialist personnel NOTICE Operation Negative effects on the EMC due to Unit operating personnel must ensure safe and non-authorised accessories correct handling based on their training and Use only Dürr Dental parts or accesso- ❯ knowledge. ries specifically approved by Dürr Den- Instruct or have every user instructed in han- ❯...
- Page 9 Important information 2.12 Transport The original packaging provides optimum protec- tion for the unit during transport. If required, original packaging for the unit can be ordered from Dürr Dental. Dürr Dental will not accept any responsi- bility or liability for damage occurring dur- ing transport due to the use of incorrect packaging, even where the unit is still under guarantee.
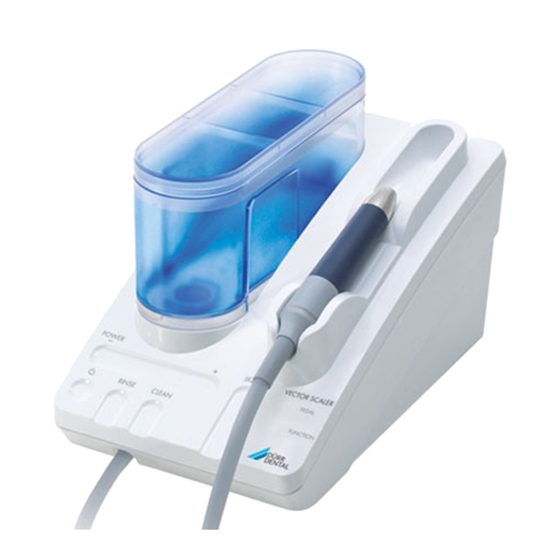
- Page 10 Product description Product description Overview Vector scaler Unit base Handpiece hose Fluid container Scaler tool kit torque wrench with integra- Valve ted PREMIUMLINE instrument P1 - P4 Cover for fluid container Torque wrench for PREMIUMLINE instru- Mains cable ments P1 - P4...
-
Page 11: Unit Base
(yel- Vector Scaler ..... 2032-50 low)) ......2032100008 –... - Page 12 Product description Technical data Electrical data – power supply unit Rated voltage V AC 100 - 240 Mains frequency 50 - 60 Current consumption 1 - 0.5 Protection class Type of protection IP 20 Electrical data – basic unit and handpieces Voltage V DC Electrical power of Scaler handpiece...
- Page 13 Product description Ambient conditions during transport and storage Temperature °C -15 to +60 Relative humidity Max. 95 Air pressure 75 - 106 Electromagnetic compatibility (EMC) Interference emission measurements Interference voltage at the power supply connection Compliant CISPR 11:2009+A1:2010 Electromagnetic interference radiation Compliant CISPR 11:2009+A1:2010 Emission of harmonics...
- Page 14 Product description Electromagnetic compatibility (EMC) Interference immunity measurements on the supply input Immunity to conducted disturbances, induced by radio- frequency fields – AC mains voltage IEC 61000-4-6:2013 0.15–80 MHz Compliant ISM frequency bands 0.15–80 MHz 80% AM at 1 kHz Immunity to voltage dips, short interruptions and voltage variations Compliant...
- Page 15 Product description Order number and serial num- Type plate ber for the handpieces The type plate is located on the rear of the The serial number of the handpieces is device. located in the area marked in grey. ID number for tool kits There is an ID number on the Scaler tool kits.
-
Page 16: Fluid Container
Product description Operation Handpiece On the Scaler LED handpiece, the Vector basic unit generates a spatial vibration of the instru- ment tip (transverse to the instrument axis) with an amplitude of approx. 20–120 mm. During treatment using the Scaler handpiece, fluid is applied as a constant stream. - Page 17 Assembly Installation Assembly Establishing the electrical connections Requirements The connection ports are located in the recess The room chosen for installation must satisfy the on the rear of the unit. following requirements: Requirements: – Closed, dry room ü Correctly installed power outlet in the vicinity of –...
-
Page 18: Flexible Foot Switch Cable
ü Disconnect the foot pedal cable from the unit and foot switch (if previously connected). Before carrying out the pairing process, make sure that no other Vector device with a flexible foot switch is running dur- ing the process within a range of around 10 m. - Page 19 Assembly Commissioning Performing pairing between the flexible foot switch and the device: Switch on the device ❯ Function check To finish the initial start-up process, all of the POWER LIQUID connections must be checked to make sure they PEDAL are securely seated and leak-tight. FUNCTION RINSE CLEAN...
-
Page 20: Scaler Handpiece
PEDAL Scaler handpiece FUNCTION RINSE CLEAN Overview The Vector Scaler handpiece is suitable for the efficient removal of dental calculus and of con- crement. POWER The power is adjusted in the POWER operating panel. The Vector Scaler handpiece enables optimum... -
Page 21: Light Conductor
These instruments are specially designed for use with the Vector Scaler device. No other instruments must be used. 6 LEDs are integrated into the front section of the handpiece. The light conductor is located under the front cover. -
Page 22: Scaler Steri-Box
The battery can then be inserted later All parts which can be sterilised are optimally stored in the special Vector Scaler steri-box. Changing the battery – "15.4 Inserting or chang- For steam sterilisation the steri-boxes are placed ing the battery in the flexible foot switch". -
Page 23: Vector Toolcard
After using a water-based active ingredient the ❯ unit should be thoroughly rinsed using warm water. All instruments must be regularly checked with the Vector toolcard in order to check the degree of wear, "15.2 Checking instrument wear". 9000-615-32/02 2012V003... - Page 24 Usage 10 Operation POWER (power setting) 1 – 5 LEDs light up depending on 10.1 Display/handling the power setting selected (5 LEDs = maximum power) Scaler handpiece inserted: Tip: The power setting can also be POWER and LIQUID adjustment possible adjusted during treatment.
- Page 25 Usage LED flashing: the vibration behaviour The LEDs for POWER and LIQUID are of the instrument is impaired. only active and light up when a handpiece is inserted. – Contact pressure of the instru- ment is too high during treatment If no handpiece is inserted, the settings –...
-
Page 26: Initial Start-Up After A Break In Treatment For More Than
10.3 Preparing the device for treat- CLEAN The cleaning process lasts around 10 minutes. ment During this step Vector cleaner cleaning fluid is Switch on the unit. pumped through the lines, whereby these are is cleaned of any deposits. WARNING Cleaning can be started whenever required. - Page 27 Usage Attach Scaler handpiece To prevent the instrument from being overtightened, the torque wrench slips when the required torque is reached. No ratcheting sound can be heard. Always use the torque wrench to screw the ❯ instrument on and off. When screwing the instrument on, slowly turn the torque wrench approx.
- Page 28 2 mm. with the cover fitted and intact. Thanks to the minimal pain generation, treatment with the Vector Scaler can also be carried out on acute, painful parodontopathies. WARNING Risk of infection due to lack of aerosol...
- Page 29 Usage Hold the instrument at an angle of approx. 10° ❯ against the tooth and work away from the tooth. – Scaler instrument P2, 60 mm, curved right, for the removal of subgingival deposits POWER 2–4 LEDs: 40 % - 80 % operating perform- ance Keep the instrument constantly in motion: in ❯...
- Page 30 Usage – Scaler instrument P4, 120 mm, for the 12 Cleaning removal of supragingival coatings on smooth surfaces and for interdental areas. 12.1 Cleaning of the outside surfa- POWER 2–3 LEDs: 40 % - 60 % operating perform- All outside surfaces must be cleaned and disin- ance fected if they are contaminated or soiled.
- Page 31 Usage 12.2 Activating the cleaning proc- Pour 2 sealing caps (approx. 40 ml) of Vector ❯ cleaner undiluted into the empty fluid con- ess of the device tainer. We recommend that cleaning is per- formed every 4 weeks. The cleaning process can be started at any time as required.
- Page 32 Cleaning the fluid container RINSE (rinsing/disinfecting): As a result of the rinsing with water the The fluid container should regularly cleaned and special cleaner Vector cleaner is removed descaled. from the system. Any residue of the How soon descaling is required depends primar- cleaning agent could cause irritation in the ily on the hardness of the water used.
-
Page 33: Cleaning The Sleeve Part And Adapter Of The Handpiece Hose
Usage 12.4 Cleaning the sleeve part and adapter of the handpiece hose Pull off the handpiece hose from the hand- ❯ piece. Unscrew and remove the sleeve part. ❯ Clean the sleeve part and the adapter of the ❯ handpiece hose with a hygienic, soft brush and a moist, lint-free cloth. -
Page 34: Reprocessing
Usage 13 Reprocessing Important information! The reprocessing notes in accordance 13.1 Risk analysis and categorisa- with ISO 17664 have been independently tion tested by Dürr Dental for the preparation of the device and its components for their A risk analysis and categorisation of medical reuse. - Page 35 Usage The reprocessing method was validated as fol- Comply with all national directives, standards ❯ lows: and specifications for the cleaning, disinfection – Pre-cleaning and sterilisation of medical products as well as the specific specifications for dental practices – FD 350 Disinfection wipes (Dürr Dental) and clinics.
-
Page 36: Preparation At The Operating Location
Usage 13.3 Preparation at the operating Start the rinsing process: ❯ Press the RINSE button for at least 2 seconds. location RINSE Wear protective gloves. Wear protective goggles. The LED flashes – the rinsing process takes ❯ around 30 seconds and ends automatically. Use a mask. -
Page 37: Fection Bath
Usage Check the Scaler handpiece light conductor for Place instruments in small parts baskets into ❯ ❯ its light transmission, replace if necessary. the cleaning bath. 13.5 Manual cleaning, intermedi- ate rinsing, disinfection, final rinsing, drying in the cleaning and disinfection bath A disinfectant or combined cleaning and disinfec- tant agent is required for manual disinfection. - Page 38 Usage Intermediate rinsing Disinfection After the action time prescribed by the manufac- Place the removable parts of the handpiece ❯ turer: (Scaler cover, light conductor), instrument hold- Rinse all components under running water for ers of the tool kits (without instruments) and ❯...
-
Page 39: Manual Cleaning, Intermediate Rinsing, Disinfection, Final Rinse
Malfunctions in the handpiece due to improper handling during cleaning or 20 ml disinfecting The handpieces of the Vector must ❯ only be cleaned or disinfected in a suit- able container in an ultrasonic bath. The handpieces must NOT be fully ❯... - Page 40 Usage Place instruments in small parts baskets into Screw Scaler instruments onto the rinsing ❯ ❯ the ultrasonic bath. adapter one after another and rinse through each of the instruments at least 3 times using a 20-ml disposable syringe. 20 ml Comply with the cleaning agents' action times ❯...
- Page 41 Scaler hand- improper handling during cleaning or piece. disinfecting The handpieces of the Vector must ❯ only be cleaned or disinfected in a suit- able container in an ultrasonic bath. The handpieces must NOT be fully ❯...
-
Page 42: Automatic Cleaning, Intermediate Rinsing, Disinfection, Final Rinse, Drying
Usage Rinse handpiece through at least 3 times using Selection of the machine cleaning agents and ❯ a 20-ml disposable syringe. disinfectants The following properties are required: – Material compatibility with the product – Corresponds with the manufacturer's specifi- cations of the CD 20 ml For further information, see: "General informa- tion". -
Page 43: Check For Function
Usage 13.8 Check for function 13.10 Steam sterilising After the end of the cleaning and disinfection ❯ WARNING cycle, check the components for any residual soiling and moisture. If necessary, repeat the Health risk due to incorrect sterilisa- cycle. tion Check the components for damage and ❯... -
Page 44: Issue Clearance For The Parts For Sterilisation
13.12 Storing parts for sterilisation The hose system is disinfected using a ready-to- Comply with the stated storage conditions: ❯ use, aldehyde-free solution of Vector/RinsEndo – Store the parts protected against contami- Disinfection. nation Pull off the hose connection from the hand- ❯... -
Page 45: Hours
"13 Reprocessing". Touch the RINSE (rinsing/disinfecting) button ❯ for at least 2 seconds. RINSE LED flashes – the Vector/RinsEndo Disinfec- ❯ tion is rinsed into the system and the proc- ess ends automatically. The Vector/ RinsEndo Disinfection remains in the system until the next treatment. -
Page 46: Maintenance
Usage 15 Maintenance 15.2 Checking instrument wear Instrument wear can be checked using the Vec- 15.1 Changing the valve in the tor toolcard: fluid container The valve on the underside of the fluid container must be cleaned regularly and checked for blockages and leaks. -
Page 47: Replacing The Light Conductor In The Scaler Handpiece
Usage 15.3 Replacing the light conductor 15.4 Inserting or changing the bat- in the Scaler handpiece tery in the flexible foot switch The light conductor must be checked regularly A new battery should be inserted in the flexible for light transmission. Over the course of time it foot switch prior to initial start-up in wireless becomes opaque or takes on a milky colour. - Page 48 Usage Opening the cover: Press both pins on the flexible foot switch ❯ together at the same time and lift the cover off. Checking the battery: Press the button to the left of the battery. ❯ Inserting the battery: Green LED lights up: battery power is OK. Insert the battery in the holder.
-
Page 49: Troubleshooting
Troubleshooting Troubleshooting 16 Tips for operators and service technicians Prior to working on the unit or in case of danger, disconnect it from the mains. Any repairs exceeding routine maintenance may only be carried out by qualified personnel or our service. - Page 50 Troubleshooting Error Possible cause Remedy Pulsed application of fluid is Grey rubber seal is missing or Mount a new rubber seal. ❯ defective. not clean, or fluid drips out afterwards Fluid container is empty. Fill the fluid container. ❯ The O-ring on the valve of the Replace the O-ring or the ❯...
-
Page 51: Flexible Foot Switch
Troubleshooting Error Possible cause Remedy Orange "FUNCTION" LED The treatment was interrupted Clean the affected areas and ❯ as water may be present in the dry using the air and water lights up or flashes following areas: syringe. between the handpiece and the handpiece hose. - Page 52 Appendix Appendix 17 Handover record This document confirms that a qualified handover of the medical device has taken place and that appropriate instructions have been provided for it. This must be carried out by a qualified adviser for the medical device, who will instruct you in the proper handling and operation of the medical device. Product name Order number (REF) Serial number (SN)
- Page 56 Hersteller/Manufacturer: DÜRR DENTAL SE Höpfigheimer Str. 17 74321 Bietigheim-Bissingen Germany Fon: +49 7142 705-0 www.duerrdental.com info@duerrdental.com...
Need help?
Do you have a question about the Vector and is the answer not in the manual?
Questions and answers