Table of Contents
Advertisement
Advertisement
Table of Contents

Related Manuals for DataLocker DL4 FE


Summary of Contents for DataLocker DL4 FE
- Page 1 DL4 FE User Guide DataLocker Inc. January 2021 DL4 FE - User Guide...
-
Page 2: Table Of Contents
Formatting Your DL4 FE on Windows ........ - Page 3 Locking Your Managed DL4 FE ........
-
Page 4: At A Glance
Available as a SSD or a more economical HDD, the DL4 FE meets the strictest security requirements while offering large-capacity storage (up to 15.3 TB) and an easy-to-use touchscreen for setup and use. -
Page 5: Best Practices
* Advertised capacity is approximate. Some space is required for onboard software. ** Speed varies with host hardware, software, and usage. Tests were performed on 1TB HDD model. *** IP64 rating pending. Device should be completely dry before use. © 2021 DataLocker Inc. All rights reserved. -
Page 6: Getting Started
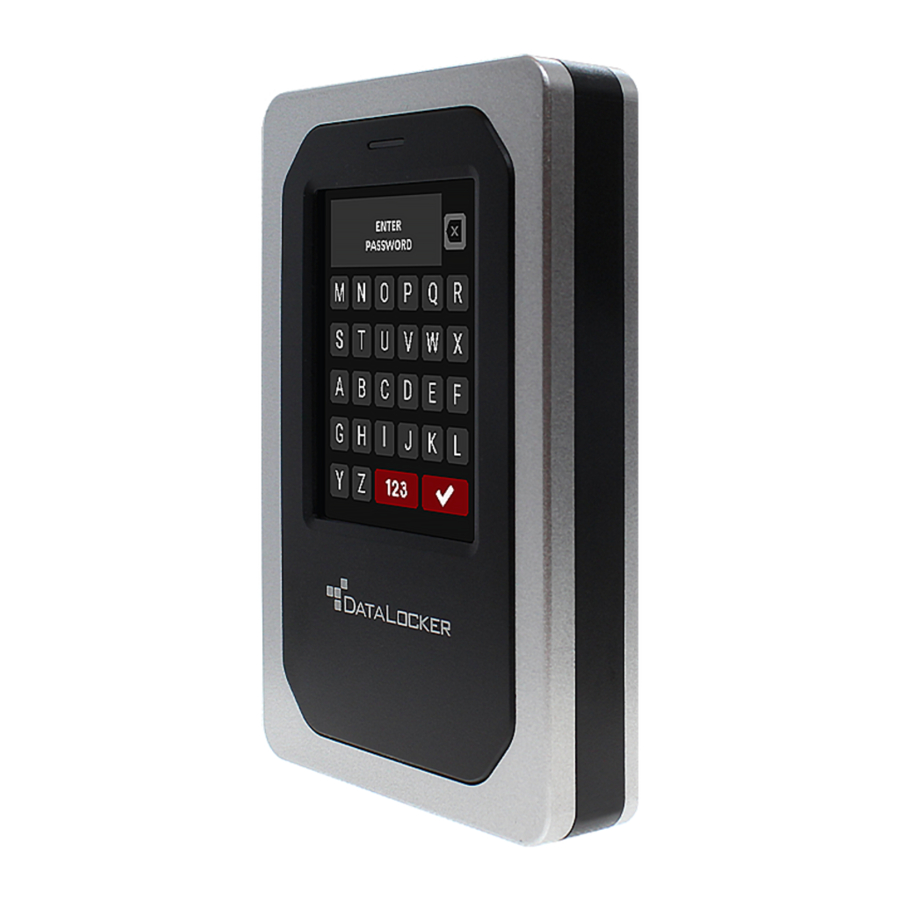
1. Connect the DL4 to your computer with the included USB cable. 2. The device will display “PERFORMING SELF TEST” and then will display a DataLocker loading screen. 3. You will then be prompted to create a password. Tap OK to continue. - Page 7 Using the Administrator Menu for more information. 7. After the device successfully connects, the DL4 screen will show the DataLocker Logo with a Disconnect option available. A volume labeled “DataLocker” will be mounted to the computer and be available for use.
-
Page 8: Disconnecting Your Dl4 Fe
finished using it. The best practice is to use your operating system’s Safely Remove Hardware or Eject function before you power down or detach the DataLocker DL4 from the host system. This will also help prevent damage to the disk. - Page 9 DL4 FE User Guide a. Click the Eject button that corresponds with the DataLocker DL4 b. Drag the drive to the trashcan in the macOS dock. Note: The trash can will transition to an eject button while dragging the drive.
-
Page 10: Additional Windows Configuration Changes
2. Unlock your DL4 device. If your device is being managed by SafeConsole, launch the client on your computer. See Initializing and connecting your DL4 FE for more information. 3. Right click the Start button, and select “Device Manager”. -
Page 11: Formatting Your Dl4 Fe
Important: Before you reformat the device, back up your drive to a separate location, for example, to cloud storage or your computer. Formatting Your DL4 FE on Windows 1. Connect the DL4 to the computer and log in. See Initializing and Connecting your DL4 FE more information. -
Page 12: Formatting Your Dl4 Fe On Macos
9. You will be warned that all data will be erased and asked if you would like to continue. Click When finished, your DL4 will available under This PC. Formatting Your DL4 FE on macOS 1. Go to Applications under your Finder. - Page 13 3. Select the unformatted DL4 disk. 4. Click the Erase tab at the top of the screen. 5. Rename the disk label to “DataLocker” and choose a file system. 6. Click Erase. The drive will begin formatting. © 2021 DataLocker Inc. All rights reserved.
-
Page 14: Linux Compatibility And Configuration
Follow the instructions in fdisk to create a new partition. Finally, use the mkfs command to format the disk for Linux. Here, we use ext4. # mkfs.ext4 /dev/sdb1 If you want to rename the drive, use the e2label command: # e2label /dev/sdb1 /DataLocker © 2021 DataLocker Inc. All rights reserved. -
Page 15: Features
Only available to administrator. Required Password Set the acceptable minimum password length. Length Only available to administrator. Auto-lock Time Modify length of time before your device automatically locks. Menu sounds Enable or disable menu sounds. © 2021 DataLocker Inc. All rights reserved. -
Page 16: User Menu
3. Tap the Gear icon to enter the Onboard Menu. NOTE: After entering the password the connect screen is briefly shown for 10 seconds. To enter the onboard administrator menu, you will need to tap the Gear icon quickly. © 2021 DataLocker Inc. All rights reserved. -
Page 17: Using The Administrator Menu
The DL4 user has a limited feature set compared to the administrator. For detailed information, see Using the User Menu. To create a User profile for your DL4, follow the below steps. © 2021 DataLocker Inc. All rights reserved. - Page 18 The User login will have its own User menu. For detailed information, see Using the User Menu. Step by step process for USER configuration 1. Plug your device into the computer. 2. Tap User when prompted to select login mode. © 2021 DataLocker Inc. All rights reserved.
-
Page 19: Safeconsole
2. Tap Enable. 3. Tap Back from the upper left menu to save and exit to the administrator menu. 4. See Registering your DL4 FE to SafeConsole to complete registration. Zeroize Drive This feature allows the administrator to zeroize the drive. Performing this action deletes all the data, removes the user and administrator passwords, and deletes the SilentKill Code. - Page 20 3. When your device asks for “Delete ALL drive data?”, tap Yes. Selecting No will cancel the Zeroize process. 4. When your DL4 shows the “Confirm Delete all drive data?” prompt, tap Continue. Selecting Cancel will cancel the Zeroize process. © 2021 DataLocker Inc. All rights reserved.
-
Page 21: Self Destruct
Device CANNOT be initialized again. B. Destroy Data - Your device is wiped completely and all device data, encryption keys, passwords are destroyed and cannot be recovered. Devices need to go through the initialization process again. © 2021 DataLocker Inc. All rights reserved. -
Page 22: Strong Password
4. Tap Back from the upper left to save and exit to the administrator menu. Menu Sounds The DL4 menu sounds are enabled by default. To disable these sounds, follow these steps: 1. Tap the Menu Sounds feature from the administrator menu. 2. Tap the Disable button. © 2021 DataLocker Inc. All rights reserved. -
Page 23: Brightness
NOTE: The administrator and User both can select their own preferred language from their respective menus. Touch Calibration Your DL4’s touchscreen interface can be manually calibrated when needed. To calibrate the interface follow the below steps. 1. Tap the Touch Calibration option from the administrator menu. © 2021 DataLocker Inc. All rights reserved. -
Page 24: Using The User Menu
This feature is disabled by default but can be enabled by the DL4 administrator or user. Auto-lock will disconnect the drive once it is idle (i.e. zero activity) for the configured amount of time. The © 2021 DataLocker Inc. All rights reserved. -
Page 25: Menu Sounds
2. Tap your desired language. 3. Tap Back from the upper left to save and exit to the user menu. NOTE: The administrator and user both can select their own preferred language from their respective menus. © 2021 DataLocker Inc. All rights reserved. -
Page 26: Silentkill Code
5. Confirm the code by re-entering the password. 6. The device returns to the administrator menu upon completion. Registering Your DL4 FE to SafeConsole Before registering your drive to SafeConsole, make sure SafeConsole is enabled on your DL4. For more information, see Enabling SafeConsole. -
Page 27: Using A Safeconsole Managed Device
1. Log into your DL4 and tap the Connect button. Your DL4 will show a “Waiting. . . ” prompt. 2. Select the option Unlocker.exe inside of the Unlocker partition that can be found in File Explorer. 3. Click the Unlock button shown on the DataLocker Control Panel. © 2021 DataLocker Inc. All rights reserved. -
Page 28: Locking Your Managed Dl4 Fe
file to close. Manually Locking your DL4 FE 1. Click Lock in the bottom left-hand corner of the DataLocker Control Panel to safely lock your device. You can also use the keyboard shortcut: CTRL + L (Windows only), or right click the DataLocker Icon in the system tray and click Lock Device. -
Page 29: Standalone Logins
2. Select the option Unlocker.exe inside of the Unlocker partition that can be found in File Explorer. 3. Click the Unlock button shown on the DataLocker Control Panel. 4. On the DL4 Control Panel, click the Gear Icon to open up settings. -
Page 30: Password Reset
On the next unlock of your DL4, you can select Standalone after you input your password to unlock in Standalone mode. When in Standalone mode, the Unlocker partition will not be mounted to the host computer and the DataLocker Control Panel will not need to be executed. 1. Connect you DL4 and log in. -
Page 31: Unlocking In Read-Only Mode
1. Plug in and log into your DL4. Tap Connect. Run the Unlocker.exe. 2. Check the Read-Only Checkbox below the Unlock button. 3. Click Unlock. The DataLocker Control Panel will appear with the text Read-Only Mode at the bottom. To unlock the device in Read-Only Mode from the device: 1. -
Page 32: Scanning Your Device For Malware
1. Unlock your device. The DataLocker Control Panel will appear with the Applications List selected by default. 2. If the DataLocker Control Panel is already open, click Applications on the menu bar to view the Applications List. Do one of the following: •... -
Page 33: Using Zonebuilder
Important: Before you reformat the device, back up your files to a separate location. To reformat a device: 1. Unlock your device and click Settings on the menu bar of the DataLocker Control Panel. 2. Click Tools on the left sidebar. -
Page 34: Sanitize
More information can be obtained after logging into the device and launching the unlocker.exe application. Use the Capacity Meter, located at the bottom right of the DataLocker Control Panel, to see how much storage space is still available on your device. The green bar graph represents how full the device is. -
Page 35: Getting Help
• Operating System and System administrative Privileges • Management Console NOTE: You can click one of the information buttons on the Device Info page to visit the DataLocker website or access more information about legal notices or certifications for DataLocker products. - Page 36 The information provided herein is subject to change without notice. The information contained in this document represents the current view of DataLocker on the issue discussed as of the date of publication. DataLocker cannot guarantee the accuracy of any information presented after the date of publication.
Need help?
Do you have a question about the DL4 FE and is the answer not in the manual?
Questions and answers