
Related Manuals for DataLocker Sentry K350


Summary of Contents for DataLocker Sentry K350
- Page 1 Sentry K350 hardware encrypted USB flash drive - User Guide User Guide Sentry K350 FIPS 140-2 level 3 Common Critera Certified Encrypted USB Flash Drive © 2021 DataLocker Inc. All rights reserved.
-
Page 2: Table Of Contents
Sentry K350 hardware encrypted USB flash drive - User Guide Contents At A Glance Introduction .......... - Page 3 Using ZoneBuilder ..........Reformat Using DataLocker Control Panel ......
-
Page 4: At A Glance
Meet the strictest requirements and work with ease anywhere there is USB mass storage. The K350 is the slim and strong addition to DataLocker’s complete portfolio of securely managed solutions, plus it’s backed by a limited 3-year warranty. -
Page 5: Getting Started
Sentry K350 hardware encrypted USB flash drive - User Guide Getting Started 1. Press the power button for 3 seconds 2. Create and confirm your password, follow the screen instructions Press quickly on the number button to navigate all characters available on the button. Pick a proper password. -
Page 6: Connect And Start Working
Sentry K350 hardware encrypted USB flash drive - User Guide 3. Connect and start working • Select MENU to access all settings, such as enabling a user login. A white background with black text on a selection denotes the current selection. -
Page 7: K350 Features And Configurations
Sentry K350 hardware encrypted USB flash drive - User Guide K350 features and configurations Connect Selection Menu After unlock the Connect Selection Menu is displayed. Connect Selection Menu Overview • CONNECT - Connect to the host computer (selected in the above example) •... -
Page 8: Accessing The Configuration Menu
Sentry K350 hardware encrypted USB flash drive - User Guide Accessing the Configuration Menu In the Connect Selection you will select and confirm MENU to get to the Configuration Menu. Login Mode Selection The contents of the Configuration Menu will depend on the login mode of the current login, the following login modes may be available: •... -
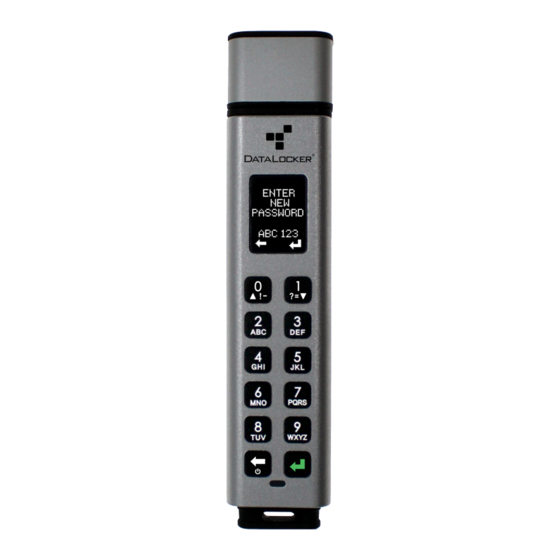
Page 9: Change Password
Sentry K350 hardware encrypted USB flash drive - User Guide Change Password Available for Login USER/ADMIN This menu option changes the current password. 1. From the Configuration Menu, select and confirm Change Password. 2. Enter the new password and confirm with the Enter-button. -
Page 10: Safeconsole
Sentry K350 hardware encrypted USB flash drive - User Guide 3. Press Enter-button to proceed from the “Please create your password” screen. 4. Enter the new password and confirm with the Enter-button. 5. Re-enter the password to confirm with the Enter-button. -
Page 11: Self Destruct
Sentry K350 hardware encrypted USB flash drive - User Guide Self Destruct Available for ADMIN The self destruct action helps prevent brute force attacks by triggering when an individual inputs an incorrect password too many times. This feature allows the administrator to set a threshold of incorrect password attempts for the K350 before the self destruct occurs. -
Page 12: Zeroize Drive
Sentry K350 hardware encrypted USB flash drive - User Guide you must now follow the getting started process as shown in the Getting Started and the formatting your K350 section of this manual. Zeroize Drive Available for ADMIN This feature allows the administrator to zeroize the drive. Performing this action deletes all the data, removes the user and administrator passwords. -
Page 13: Auto-Lock Time
Sentry K350 hardware encrypted USB flash drive - User Guide Auto-Lock Time Available for ADMIN/USER This feature is disabled by default but can be enabled by the administrator and the user. Auto-lock will disconnect the drive once it is idle (i.e. zero activity) for the configured amount of time. The amount of idle time required to time out the device is configurable from 10 to 720 minutes. -
Page 14: Registering Your K350 To Safeconsole
Sentry K350 hardware encrypted USB flash drive - User Guide Registering Your K350 to SafeConsole Before registering your drive to SafeConsole, make sure SafeConsole is enabled on your K350. For more information, see Enabling SafeConsole. The registration process will begin by allowing the device to communicate with the SafeConsole server. -
Page 15: Using A Safeconsole Managed Device
Sentry K350 hardware encrypted USB flash drive - User Guide • Confirm Ownership of the device: Enter the Windows username and password that is associ- ated with the login credentials of the computer the device is plugged into. • Custom Device Information: Required information about you or your device. The required fields will vary. -
Page 16: Locking Your Managed K350
Manually Locking your K350 1. Click Lock in the bottom left-hand corner of the DataLocker Control Panel to safely lock your device. You can also use the keyboard shortcut: CTRL + L (Windows only), or right click the DataLocker Icon in the system tray and click Lock Device. -
Page 17: Standalone Logins
Sentry K350 hardware encrypted USB flash drive - User Guide 1. Click Preferences in the left sidebar. 2. Click the Checkbox for auto-locking the device and set the time-out to one of the following time intervals: 5, 15, 30, 60, 120, or 180 minutes. -
Page 18: Password Reset
On the next unlock of your K350, you can select Standalone after you input your password to un- lock in Standalone mode. When in Standalone mode, the Unlocker partition will not be mounted to the host computer and the DataLocker Control Panel will not need to be executed. 1. Power on. -
Page 19: Unlocking In Read-Only Mode
1. Unlock K350 and select Connect, confirm with Enter-button. Run the Unlocker.exe. 2. Check the Read-Only Checkbox below the Unlock button. 3. Click Unlock. The DataLocker Control Panel will appear with the text Read-Only Mode at the bottom. To unlock the device in Read-Only Mode from the device: 1. -
Page 20: Scanning Your Device For Malware
To view quarantined files: 1. Unlock your device and click Settings in the DataLocker Control Panel. 2. Click Quarantine on the left sidebar. Selecting a file from the list will display additional details including, Threat Name, Threat Type, anti- malware definition version, and the date of quarantine. -
Page 21: Using Zonebuilder
Important: Before you reformat the device, back up your files to a separate location. To reformat a device: 1. Unlock your device and click Settings on the menu bar of the DataLocker Control Panel. 2. Click Tools on the left sidebar. -
Page 22: Device Information
More information can be obtained after logging into the device and launching the Unlocker.exe application. Use the Capacity Meter, located at the bottom right of the DataLocker Control Panel, to see how much storage space is still available on your device. The green bar graph represents how full the device is. -
Page 23: Formatting Your K350
• Operating System and System administrative Privileges • Management Console NOTE: You can click one of the information buttons on the Device Info page to visit the DataLocker website or access more information about legal notices or certifications for DataLocker products. - Page 24 Sentry K350 hardware encrypted USB flash drive - User Guide 6. Right click on the drive letter that corresponds to your K350. This example shows (E:). If the drive is not showing up you may need to right click and initialize the drive first.
-
Page 25: Formatting Your K350 On Macos
Sentry K350 hardware encrypted USB flash drive - User Guide 9. You will be warned that all data will be erased and asked if you would like to continue. Click When finished, your K350 will be available under This PC. -
Page 26: Linux Compatibility And Configuration
Sentry K350 hardware encrypted USB flash drive - User Guide 5. Rename the disk label to “DataLocker” and choose a file system. 6. Click Erase. The drive will begin formatting. 7. When it is finished formatting, you may get a popup message asking if you would like to backup your drive with Time Machine. - Page 27 Sentry K350 hardware encrypted USB flash drive - User Guide Although older versions should work, they might run in USB 2.0 mode, which can be significantly slower. You can check your kernel version by typing the following command in the terminal: # uname -r In most newer distributions the drive should automatically mount.
-
Page 28: Product Specifications
Sentry K350 hardware encrypted USB flash drive - User Guide Product Specifications Specification Details Capacity* 32GB, 128GB, 256GB Speed** USB 3.2: - 150MB/S Read, 100MB/s Write USB 2.0: - 40MB/s read, 20MB/s write Dimensions 100mm(L) x 20mm(W) x 11mm(D) Weight Approximately 1.24 oz / 35 Gram... -
Page 29: Document Version
Sentry K350 hardware encrypted USB flash drive - User Guide Document Version Created to support firmware version 1.51 and device software version 6.5. The latest version of this document resides at https://media.datalocker.com/manuals/k350/DataLocker_K350_User_Guide.pdf This document was compiled on 29 Jul, 2021 14:35:57 UTC (GMT+0000) -
Page 30: Notices
The information contained in this document represents the current view of DataLocker on the issue discussed as of the date of pub- lication. DataLocker cannot guarantee the accuracy of any information presented after the date of publication.
Need help?
Do you have a question about the Sentry K350 and is the answer not in the manual?
Questions and answers