DataLocker Sentry K300 User Manual
Hide thumbs
Also See for Sentry K300:
- User manual (19 pages) ,
- Deployment manual (10 pages) ,
- Reviewer's manual (10 pages)
Table of Contents
Advertisement
Quick Links
Advertisement
Table of Contents

Related Manuals for DataLocker Sentry K300


Summary of Contents for DataLocker Sentry K300
- Page 1 Sentry K300 User Guide version 1.07 DataLocker Inc. July, 2018 Sentry K300...
-
Page 2: Table Of Contents
About the Sentry K300 ........ -
Page 3: At A Glance
Chromebooks, and embedded systems - any system that can utilize USB Mass Storage. Since the Sentry K300 also has its own power supply, the device can be used as a bootable device running Windows to Go, Ubuntu Linux, the local operating system, or other portable operating systems. -
Page 4: Product Specifications
Backwards compatible with USB 2.0 ports (High Speed) * Advertised capacity is approximate. Some space is required for onboard software. ** Speed varies with host hardware, software, and usage. *** Device should be completely dry before use. © 2018 DataLocker Inc. All rights reserved. -
Page 5: Setup
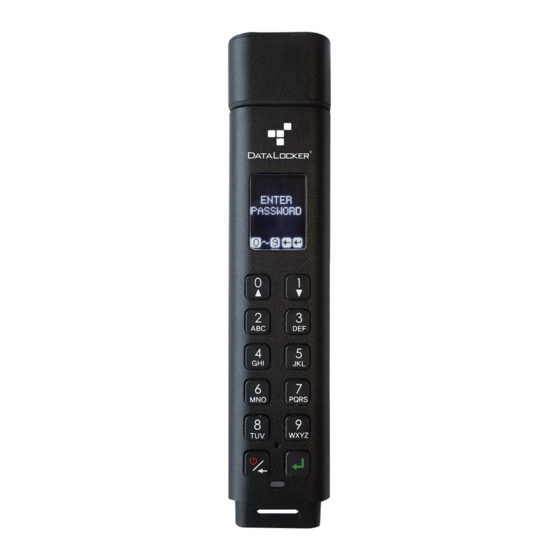
Sentry K300 User Guide Setup This section will guide you through the necessary steps to set up the Sentry K300 drive. It is highly recommended that you set an administrator password using alpha-numeric characters. The default password for the device is set to 1234567. This password allows access to the device 3 times before forcing the user to change it. -
Page 6: Unlocking Your Device
1 second until the desired character is shown in the white circle on the screen. Unlocking Your Device 1. Press and hold the Power button on your Sentry K300 device until the OLED screen illuminates. 2. Enter the device password when prompted, then press Enter. For more information on button... -
Page 7: Setting An Administrator Password
Setting A User Password The Sentry K300 supports the creation of a user password. The user will have access to all data on the drive, however, the user will not be able to access certain administrative options and controls. - Page 8 2. Locate the Menu screen by pressing the Up or Down key. Press Enter to select. 3. Press the Up or Down key to locate the User Password option. Press Enter to select. 4. Press Disable. 5. The user password has now been disabled. © 2018 DataLocker Inc. All rights reserved.
-
Page 9: Accessing The Sentry K300
By default, Windows 10 attempts to shut off USB devices after a set period of inactivity. If the Sentry K300 is put into this low power state, the drive will automatically lock the drive and require reauthentication. To disable this feature of Windows, follow the steps below. -
Page 10: Accessing On Macos
To ensure the security of your data, please safely eject your Sentry K300 device. To safely eject, click and drag the Sentry K300 drive icon on your desktop to the trash can. If you do not see the icon on your desktop, open Finder and click the Eject button next to the Sentry K300 drive. -
Page 11: Accessing On Linux
Most recent distributions of Linux operating systems will mount a flash drive automatically when plugged in. You should see the device in your file manager as Sentry K300. If you are unable to view the Sentry K300, you can mount the device manually using the following commands. -
Page 12: Features
After authentication, selecting Boot Mode from the Selection Screen allows you to boot an op- erating system, such as Windows To Go, from the Sentry K300. In this mode, the device can lose momentary connection with the computer and remain unlocked. Only select Boot Mode when planning to run an operating system from the Sentry K300. -
Page 13: Self Destruct
Sentry K300 User Guide 5. Plug in your device and power on the computer. You will need to select the Sentry K300 as the boot device, which may require changes to your computer’s BIOS settings. Note: Special precautions should be taken to ensure the Sentry K300 does not get disconnected from the host system. -
Page 14: Screensaver Mode
8. The device will power off and back on automatically. The password entry screen will be displayed when it is finished restarting. Enter the default password of 1234567. 9. Format the Sentry K300 on your system and it will then be ready for use. See Formatting The Sentry K300 for more information. -
Page 15: User Menu Screen Options
User Menu Screen Options • Change Password: Change the user password. • Auto Lock: Set the amount of inactivity time (in minutes) before the device automatically locks. © 2018 DataLocker Inc. All rights reserved. -
Page 16: Formatting The Sentry K300
Your device is formatted as NTFS from the factory. The Sentry K300 can be reformatted to any file system of your choosing to accommodate a different operating system or to remove file size restrictions. Not all file systems are available on all operating systems. - Page 17 Feel free to close any popups from Windows that say the drive needs to be formatted. 8. When finished, the formatting tool should display the message “The formatting has successfully finished!” © 2018 DataLocker Inc. All rights reserved.
-
Page 18: Formatting On Macos
Sentry K300 User Guide Your Sentry K300 will now appear under This PC. Formatting On macOS 1. Unlock your device using the administrator password. For more information, see Unlocking Your Device. 2. Connect the device to your macOS computer. 3. Go to Applications under Finder. - Page 19 5. Select the Sentry K300 disk. 6. Click the Erase tab. 7. Choose the new file system from the dropdown and rename your disk label. 8. Click Erase. Your Sentry K300 will now appear under Devices. © 2018 DataLocker Inc. All rights reserved.
-
Page 20: Formatting On Linux
Sentry K300 User Guide Formatting On Linux The Sentry K300 is platform independent, capable of being run with 100% compatibility on most systems. For optimal Linux or Unix based system compatibility, we recommend using at least the Linux 2.6.31 Kernel (released 9 September 2009), which implemented the xHCI specification for USB 3.0. - Page 21 The information provided herein is subject to change without notice. The information contained in this document represents the current view of DataLocker on the issue discussed as of the date of publication. DataLocker cannot guarantee the accuracy of any information presented after the date of publication.
Need help?
Do you have a question about the Sentry K300 and is the answer not in the manual?
Questions and answers