Table of Contents
Advertisement
Quick Links
Advertisement
Table of Contents

Related Manuals for Fantini Cosmi Intellicomfort+ CH180RF


Summary of Contents for Fantini Cosmi Intellicomfort+ CH180RF
- Page 1 Intellicomfort WIRELESS TOUCH-SCREEN WEEKLY PROGRAMMABLE THERMOSTAT...
- Page 2 Fantini Cosmi website: pdf.fantinicosmi.it For a quick guide to the basic operation of this system, Fantini Cosmi video tutorials are avail- able in the dedicated section.
-
Page 3: Table Of Contents
INDEX The multi-zone system ....................page 5 Installation ........................page 6 Description of keys/display and operating instructions ............ page 9 Menu language selection ....................page 11 Date and time setting ..................... page 12 General or single zone operation .................. page 14 Setting the operating mode ................... - Page 4 HOLIDAY daily mode ..................... page 26 HOLIDAY profi le customisation ................page 26 Temperature customisation (TCOM , TECO) ............page 29 OFF shutdown ....................... page 30 Key lock and unlock with password ................page 31 Use statistics ......................... page 33 Signal quality .........................
-
Page 5: The Multi-Zone System
THE MULTI-ZONE SYSTEM The multi-zone system enables different temperature levels to be controlled within the same home. The temperature of each zone is set on a main device and controlled by one or several devices installed within the rooms. Communication between all devices takes place through radio waves. Zone 2 Zone 1 CH120RF... -
Page 6: Installation
INSTALLATION The programmable thermostat comes with a cover plate suitable for mounting on recessed or wall mounted boxes. - Page 8 Installation must be carried out by qualifi ed personnel, in compliance with the requirements concerning installation of electrical devices. Make sure that the power supply is disconnected before making any connections or working on the device. Make the electrical connections as shown in the connection diagrams.
-
Page 9: Description Of Keys/Display And Operating Instructions
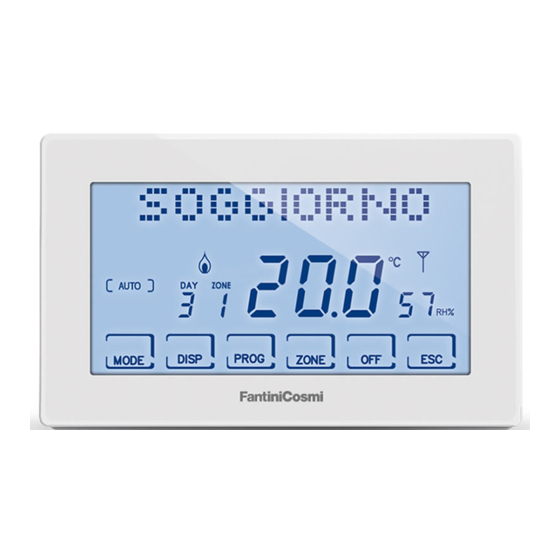
DESCRIPTION OF KEYS/DISPLAY AND OPERATING INSTRUCTIONS The CH180RF programmable thermostat has 6 multi-function keys through which the entire system can be controlled. Activation status: heating, cooling or dehumidifi cation Bar graph for viewing messages and daily programming Battery status Operating mode Measured temperature Measured humidity Multi-function key touch... - Page 10 When not in use, the programmable thermostat switches off the backlight and the messages on the keys and goes into Stand-by mode (battery saving). To exit this mode, press and hold one of the 6 keys until the backlight turns on. The back- light duration and its intensity can be changed in the PROG.ADV.
-
Page 11: Menu Language Selection
MENU LANGUAGE SELECTION LANGUAGE (Default = Italian) It is used to select one of the following languages: Italian, English, Russian, French, Spanish, German. Press PROG for at least 3 seconds to access the PROG.ADV. advanced programming menu. Use the ◄► keys to select the item correspond- ing to the language set, use the ▲▼... -
Page 12: Date And Time Setting
DATE AND TIME SETTING Press PROG briefl y to access the PROG.USER user programming menu. Use the ◄► keys to select the year, month, day, hour, minutes; set the correct value with the ▲▼ keys and press the ESC key to confi rm and exit. PROG.USER ZONE ZONE... - Page 13 MONTH YEAR ZONE ZONE COPY COPY MODE DISP PROG ZONE MODE DISP PROG ZONE HOUR ZONE ZONE COPY COPY MODE DISP PROG ZONE MODE DISP PROG ZONE...
-
Page 14: General Or Single Zone Operation
GENERAL OR SINGLE ZONE OPERATION On the CH180RF you can activate and display the main operating modes for the whole system or for a single zone. To select a zone, exit the STAND-BY mode and press ZONE until the selected zone number is displayed. To assign a name to the zone, see page 45. -
Page 15: Setting The Operating Mode
SETTING THE OPERATING MODE By pressing MODE, you can select, in cyclic sequence, the different operating modes: AUTO -> MAN -> HOLIDAY -> JOLLY. If MODE is pressed from the main screen, all zones will be in the mode selected ZONE ZONE COPY... - Page 16 Press ZONE and then press MODE to set the operating mode for every single associated zone. The name of the operating mode is displayed in square brackets (e.g. [AUTO]). ZONE ZONE COPY COPY MODE DISP PROG ZONE MODE DISP PROG ZONE...
-
Page 17: Auto Automatic Mode
AUTOMATIC MODE For each day of the week, one of the programmable temperatures TCOMF (comfort), TECO (saving) and TA (OFF) can be associated to each half hour. Weekly profi le customisation A different weekly temperature profi le can be set for each zone. From AUTO mode, select the zone you want to edit with ZONE;... - Page 18 Use the ◄► keys to scroll through the time histogram and use the ▲▼ keys to set the temperature TCOMF , TECO , OFF ZONE ZONE COPY COPY MODE DISP PROG ZONE MODE DISP PROG ZONE WINTER = antifreeze temperature (TA) SUMMER = system off (OFF)
- Page 19 Press OK to go to the next day (DAY 1 => 2 => 3 => 4 => 5 => 6 => 7). Press COPY to copy the temperature profi le of the displayed day to the next day. ZONE ZONE COPY COPY MODE...
- Page 20 When you reach day 7 you can exit programming by pressing ESC. While by pressing OK, you can copy the newly set profi le to the other zones (if added). ZONE ZONE COPY COPY MODE DISP PROG ZONE MODE DISP PROG ZONE COPY...
-
Page 21: Temperature Customisation (Tcom, Teco)
Temperature customisation (TCOM, TECO) After selecting the AUTO mode, press DISP to set the desired temperature. ZONE ZONE COPY COPY MODE DISP PROG ZONE MODE DISP PROG ZONE ZONE COPY MODE DISP PROG ZONE... -
Page 22: Man Manual Mode
MANUAL MODE In this mode, the programmable thermostat maintains the fi xed set temperature TMAN, which can be changed with the ▲▼ keys, until another operating mode is selected. Temperature customisation (TMAN) After selecting the MAN mode, press DISP to set the desired temperature. ZONE ZONE COPY... -
Page 23: Jolly Temporary Mode
TEMPORARY MODE It maintains the set temperature up to the time and date selected. When the set time and date is reached, the programma- ble thermostat returns to the previously active program. General JOLLY From the main screen, press MODE until JOLLY appears. The JOLLY TOT screen is displayed. Press OK and using the ◄►... -
Page 24: Zone Jolly
Zone JOLLY Press ZONE to select the desired zone and then press MODE until JOLLY appears. The JOLLY screen is displayed. Press OK and using the ◄► and ▲▼ arrows, set the time (with 30 min. resolution) and the day until which you want to maintain the set temperature. -
Page 25: Editing The Set Parameters
Editing the set parameters After selecting the JOLLY mode, press DISP, set the desired temperature, or update the set parameters. ZONE ZONE COPY COPY MODE DISP PROG ZONE MODE DISP PROG ZONE... -
Page 26: Holiday Daily Mode
DAILY MODE This mode is used for daily programming, regardless of the days of the week set previously. As in the AUTO program, a time profi le can be confi gured by associating one of the programmable temperatures TCOMF (comfort), TECO (saving) and TA (OFF) to each half hour. - Page 27 Use the ◄► keys to scroll through the time histogram and use the ▲▼ keys to set the temperature: TCOMF or TECO , OFF ZONE ZONE COPY COPY MODE DISP PROG ZONE MODE DISP PROG ZONE WINTER = antifreeze temperature (TA) SUMMER = system off (OFF)
- Page 28 You can exit programming by pressing ESC. While by pressing OK, you can copy the newly set profi le to the other zones. ZONE ZONE COPY COPY MODE DISP PROG ZONE MODE DISP PROG ZONE COPY ZONE H DAY H DAY ZONE COPY MODE...
-
Page 29: Temperature Customisation (Tcom, Teco)
Temperature customisation (TCOM, TECO) After selecting the HOLIDAY mode, press DISP to set the desired temperature. ZONE ZONE COPY COPY MODE DISP PROG ZONE MODE DISP PROG ZONE ZONE COPY MODE DISP PROG ZONE... -
Page 30: Off Shutdown
SHUTDOWN It is activated by pressing OFF. With OFF, the selected system or zone is switched off. During WINTER mode, it maintains the set antifreeze temperature TA (default is 5°C). Alternatively, TA can be changed in the PROG.ADV. menu (see page 43). -
Page 31: Key Lock And Unlock With Password
KEY LOCK AND UNLOCK WITH PASSWORD It enables you to lock the CH180RF keyboard, and any CH120RF inserted in the network, with a 3-digit numeric code. It only works once and then must be re-enabled. To activate the function, briefl y press the PROG key and access the PROG.USER user programming menu. Use the ◄►... - Page 32 To unlock the display enter the code using the◄►▲▼ keys and press OK ZONE ZONE COPY COPY MODE DISP PROG ZONE MODE DISP PROG ZONE ZONE ZONE COPY COPY MODE DISP PROG ZONE MODE DISP PROG ZONE NOTE: with the KEY LOCK WITH PASSWORD function, the CH120RF keys connected to the MASTER CH180RF are also locked.
-
Page 33: Use Statistics
USE STATISTICS For statistical purposes, the programmable thermostat records the total consumption of the heating and cooling hours. To display, select DISP and use the ◄► keys to reach the UTILIZATION menu and press OK. The following are the statistics available and can be displayed with the ◄► keys: Previous day: total operating hours on the previous day. - Page 34 EV. DAY PREV. DAY USE PREV. MONTH USE CURR. YEAR USE ZONE T.MAX DISP PROG ZONE T.MIN COPY MODE DISP PROG ZONE RESET ZONE ZONE ZONE COPY COPY COPY MODE DISP PROG ZONE MODE DISP PROG ZONE MODE DISP PROG ZONE...
-
Page 35: Signal Quality
SIGNAL QUALITY The message RSSI appears on the device. It indicates the quality of the signal received from devices connected directly to the CH180RF. THERMOSTAT Type of associated device: THERMOSTAT = CH120RF ZONE = O60RF, CH175 and identifi cation num. in the zone COPY = no device MODE... -
Page 36: Faults
FAULTS The presence of one or several faults of the various devices that make up the multi-zone system is indicated with the mes- sage FAULT fl ashing on the display. To display the fault code, press DISP. Using the ◄► keys select the FAULT menu and press OK. Use the ◄► keys to scroll through the list of faults and identify, in the table below, the problem and the action to be taken. - Page 37 FAULT NO FAULT ZONE ZONE COPY COPY MODE DISP PROG ZONE MODE DISP PROG ZONE ERROR DEVICE FAULT ACTION Make sure that the head is mounted properly on O60RF Incorrect assembly the valve, if the problem persists contact technical support 010/ 021 / 030 O60RF Mechanical / electronic error...
-
Page 38: Lock For Screen Cleaning
LOCK FOR SCREEN CLEANING Press ESC for 5 seconds. The message “LOCKED” will appear on the display for 30 seconds. -- LOCKED -- ZONE COPY COPY MODE DISP PROG ZONE MODE DISP DISP PROG ZONE... -
Page 39: Battery Replacement
BATTERY REPLACEMENT When the batteries are fl at, the display shows the fl ashing symbol STAGE 1 STAGE 2 REPLACE BATTERIES COPY MODE DISP PROG ZONE COPY MODE DISP PROG ZONE STAGE 3 REPLACE BATTERIES The entire system turns OFF ZONE COPY MODE... - Page 40 NOTE: • to prevent losing the programming time settings it is recommended to replace the batteries during STAGE 1 or 2, by performing the operation within 60 seconds of removing the batteries. • If the batteries are replaced during STAGE 3, after removing them, make sure the display turns off completely before inserting new batteries.
-
Page 41: Advanced Programming (Parameter Settings)
ADVANCED PROGRAMMING (PARAMETER SETTINGS) The confi guration menu contains the parameters that defi ne the operation of the programmable thermostat according to how the system was implemented. To access, from the MAIN SCREEN, press PROG for 3 seconds. Use the ◄► keys to display the various options, the ▲▼ keys to change the settings and ESC to exit. Confi... - Page 42 Backlight Press PROG for at least 3 sec. and use the ◄► keys to reach LIGHT ON the desired page. This enables the display backlight time to be adjusted from 5 to 30 seconds (Default = 5) ZONE COPY MODE DISP PROG ZONE...
- Page 43 Daylight saving time (Default = Yes) Press PROG for at least 3 sec. and use the ◄► keys to reach SAVTIME YES the desired page. It selects the daylight saving time automatically. ZONE COPY MODE DISP PROG ZONE Winter/summer (Default = Winter) Press PROG for at least 3 sec.
- Page 44 Antifreeze temperature (Default = 5°C) Press PROG for at least 3 sec. and use the ◄► keys to reach the desired page. The antifreeze temperature can be set from an OFF value (boiler always off) to a range between 2.0 and 7.0 °C. ZONE PLEASE NOTE in SUMMER the function cannot be activated.
- Page 45 Relay function (Default = OFF) Press PROG for at least 3 sec. and use the ◄► keys to reach the desired page. The programmable thermostat is equipped with a relay that can be used for different system configurations; the relay operating modes are listed below: OFF: always off because unused;...
- Page 46 Zone Names Press PROG for at least 3 sec. and use the ◄► keys to reach the desired page. ZONE NAME It is used to assign a name to each area of the system. After pressing OK, use the ◄► arrows to display the zones, use the ▲▼...
- Page 47 OFFSET (Default = 0.0°C) Press PROG for at least 3 sec. and use the ◄► keys to reach the desired page. Corrects the measured temperature for the selected zone by +/- 5.0°C. This setting can be useful when unit installation is not optimal. ZONE Use the ◄►...
- Page 48 Unit of measure (Default = Celsius) Press PROG for at least 3 sec. and use the ◄► keys to reach the desired page. Use the ▲▼ arrows to set the unit of measure for the entire system, either degrees Celsius or degrees Fahrenheit. ZONE COPY MODE...
- Page 49 External probe (EXT IN) (Default = no function) Press PROG for at least 3 sec. and use the ◄► keys to reach the desired page. By connecting an EC18 - EC19 - EC20 temperature probe, you can use the following functions: VIS: Display of temperature detected by the external probe.
- Page 50 Cool OFF Press PROG for at least 3 sec. and use the ◄► keys to reach the desired page. Floor system condensate formation control in summer without having a fl oor probe. ZONE Control of cooling system shutdown at the same time as dehu- midifi...
- Page 51 FW VERSION Press PROG for at least 3 sec. and use the ◄► keys to reach the desired page. Displays the software version of the CH180RF programmable thermostat. ZONE COPY MODE DISP PROG ZONE Reset - confi guration reset Press PROG for at least 3 sec. and use the ◄► keys to reach the desired page.
-
Page 52: Technical Features
Technical features -Temperature adjustment scale 2÷40 °C, increase 0.1°C -Measurement scale/room T display: -50 ÷ +50 °C -Thermal differential for regulation 0.3 ÷ 5.0 K -Relative humidity adjustment scale: 30 ÷ 70%, increase 1% -Measurement scale/room relative humidity display: 0 ÷ 100% -Power supply: 2AA 1.5V alkaline batteries -Transmission and reception frequency 868 MHz -Maximum radio frequency power transmitted <... - Page 53 Waste disposal The symbol of the crossed-out wheeled bin indicates that the products must be collected and disposed of separately from household waste. The batteries and integrated accumulators may be disposed of together with the product. They will be separated at the recycling facilities. A black bar indicates that the product was placed on the market after August 13th, 2005.
- Page 54 FANTINI COSMI S.p.A. Via dell’Osio, 6 20090 Caleppio di Settala, Milano - ITALY Tel. +39 02 956821 Fax +39 02 95307006 | info@fantinicosmi.it EXPORT DEPARTMENT Ph +39 02 95682229 export@fantinicosmi.it www.fantinicosmi.com...
Need help?
Do you have a question about the Intellicomfort+ CH180RF and is the answer not in the manual?
Questions and answers