Table of Contents
Advertisement
Quick Links
Advertisement
Table of Contents

Summary of Contents for FLIR Screen-EST Kiosk
- Page 1 User’s manual FLIR Screen-EST Kiosk...
-
Page 2: Table Of Contents
Copyright ................1 Safety information ................2 Disposal of electronic waste ............3 Getting started ..................4 Install the FLIR Screen-EST Kiosk ..........4 Set up the screening station ............4 Operate the screening station ............4 Customer support ..............5 Online documentation..............5 About FLIR Screen-EST Kiosk .............6... - Page 3 Normal operation ..............26 8.3.1 Start a new screening session......... 26 8.3.2 Screening procedure ............ 27 8.3.3 Turn on/off the FLIR Screen-EST Kiosk ......29 Problems — What shall I do?............. 30 8.4.1 Connect the camera ............. 30 8.4.2 Restart the system............30 8.4.3...
- Page 4 Table of contents 12.2.1 About calibration ............49 12.2.2 Verify calibration ............49 Update — FLIR Screen-EST and Camera firmware ....... 50 13.1 FLIR Screen-EST software update..........50 13.1.1 Offline update.............. 50 13.2 Camera firmware update ............50 Privacy notice — FLIR EST Thermal cameras ........51...
-
Page 5: Disclaimers
1.7 Copyright © 2020 FLIR Systems, Inc. All rights reserved worldwide. No parts of the software in- cluding source code may be reproduced, transmitted, transcribed or translated into any language or computer language in any form or by any means, electronic, magnetic, opti- cal, manual or otherwise, without the prior written permission of FLIR Systems. -
Page 6: Safety Information
WARNING Applicability: Digital devices subject to 15.21. NOTICE: Changes or modifications made to this equipment not expressly approved by FLIR Systems may void the FCC authorization to operate this equipment. WARNING Applicability: Digital devices subject to 2.1091/2.1093/KDB 447498/RSS-102. -
Page 7: Disposal Of Electronic Waste
Safety information CAUTION Do not use too much force when you clean the infrared lens. Damage to the infrared lens or to the anti- reflective coating of the lens can occur. For cleaning, refer to 12.1 Cleaning. CAUTION Applicability: Cameras where you can remove the lens and expose the infrared detector. Do not use compressed air of lower quality than “Process air”... -
Page 8: Getting Started
Getting started The FLIR Screen-EST Kiosk is used to screen persons for elevated skin temperatures. For accurate and efficient screening, it is recommended to install, set up, and operate the FLIR Screen-EST Kiosk screening station as described in this manual. -
Page 9: Customer Support
For customer help, go to http://support.flir.com. 3.5 Online documentation The FLIR EST Thermal Screening documentation is continuously updated and published online. To access the latest user manuals, product information, and other FLIR EST Thermal Screening resources, go to: http://support.flir.com/resources/est. #T810570; r. AA/72255/72255; en-US... -
Page 10: About Flir Screen-Est Kiosk
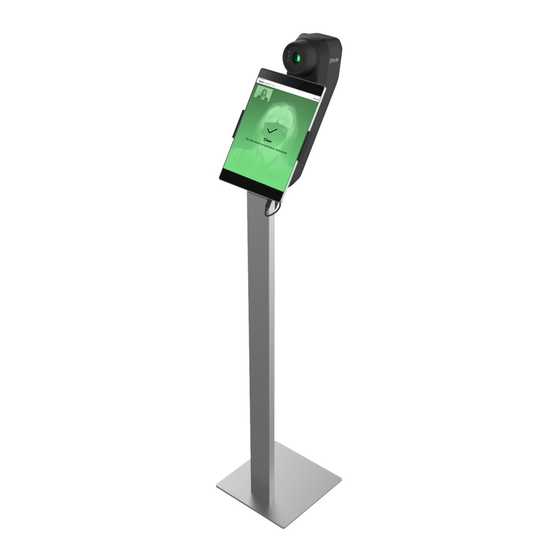
About FLIR Screen-EST Kiosk The FLIR Screen-EST Kiosk offers a quick and easy way to screen passengers, custom- ers, or employees for signs of elevated skin temperature. This is a turnkey solution that combines the temperature measurement capabilities of a FLIR EST Thermal camera and the FLIR Screen-EST software with a tablet and floor stand. -
Page 11: Installation - Flir Screen-Est Kiosk
Installation — FLIR Screen-EST Kiosk This chapter describes how to install the FLIR Screen-EST Kiosk. The installation includes the following main steps: 1. Mount the stand, tablet, and camera unit. 2. Connect the tablet to a Wi-Fi network (recommended). 3. Activate the FLIR Screen-EST application. -
Page 12: Mount The Stand, Tablet, And Camera Unit
Installation — FLIR Screen-EST Kiosk 5.2 Mount the stand, tablet, and camera unit Note While you mount the equipment, be careful and hold all parts firmly to prevent the stand from tipping over. 1. Open the stand box and find the stand, foot, 2 screws, and Allen key. The other parts are not needed for this installation. - Page 13 Installation — FLIR Screen-EST Kiosk 5. Rotate the tablet to portrait mode. Make 6. Slide the camera unit onto the stand. sure the USB connector is at the bottom. 7. Tilt the assembly backwards until it stops. 8. Lock the camera unit in place.
-
Page 14: Connect To Wi-Fi
12. Turn on the tablet. 5.3 Connect to Wi-Fi To take advantage of our latest software, it is important that you keep your FLIR Screen- EST Kiosk updated. When the FLIR Screen-EST Kiosk is connected to the internet, auto- matic checks for updates and installation of new software versions is possible. For more information, see section 13.1 FLIR Screen-EST software update. - Page 15 Installation — FLIR Screen-EST Kiosk To activate the FLIR Screen-EST, do the following: 1. Make sure you have the FLIR Screen-EST license card. This is a printed card in- cluded in the FLIR Screen-EST Kiosk package. 2. Start the FLIR Screen-EST application from the Start menu or by double-tapping the desktop icon.
-
Page 16: Offline Activation
6. Click the link of your preferred language. 7. Enter your contact details in the Name and E-mail text boxes. 8. In the Serial number text box, enter the license key available on the FLIR Screen-EST license card. 9. In the Machine code text box, enter the Machine identifier from step 3 above. -
Page 17: Setup - Screening Station
90 cm (36 in.) wide. To make sure people do not cut the cor- ner and end up too close to the FLIR Screen-EST Kiosk, about 45 cm (18 in.) should be added to the barrier leading in to the screening station. -
Page 18: Equipment, Materials, Tools
6.2 Equipment, materials, tools For the screening station, you need the following equipment: • FLIR Screen-EST Kiosk, installed as described in chapter 5 Installation — FLIR Screen-EST Kiosk. • Screening position floor sticker (included in the FLIR Screen-EST Kiosk package). -
Page 19: Plan And Prepare The Screening Station
2. Connect the power cable to a power outlet. 6.3.3 Define the screening position 1. Make a straight line from the foot of the FLIR Screen-EST Kiosk stand towards the screening position - use a masking tape. 2. Make a mark on the tape at 120 cm (47 in.) from the foot of the stand, indicating the screening position. -
Page 20: Make Sure The Camera Focus Is Correct
Optional: Backdrop. 1. Place the backdrop behind the screening position. 2. Look at the live image in FLIR Screen-EST and make sure the camera only sees the backdrop. Optional: Information materials. -
Page 21: Clearly Mark The Screening Position
• Tall persons may have to bend their knees. • Short persons may need e.g. a high chair to sit on. Note Do not move the FLIR Screen-EST Kiosk or the screening position. Changing the distance between the FLIR Screen-EST Kiosk and the screening position will af- fect the accuracy of the screening result. -
Page 22: Mark The Positions Of All Equipment
1. Attach the supplied screening position floor sticker to the floor. The distance from the foot of the FLIR Screen-EST Kiosk stand to the center of the floor sticker shall be 120 cm (47 in.). -
Page 23: Sound Alarm
When all settings are completed, tap Close at the bottom right of the page. This closes the Settings page. 6.5 Trouble shooting Note At FLIR Support Center, you can search our knowledge base to find answers to frequently asked questions. Go to http://support.flir.com. 6.5.1 Must enter license key every time If you must enter the license key every time you start FLIR Screen-EST, the application has not been successfully activated. -
Page 24: False Triggering
• Tall persons may have to bend their knees. • Short persons may need e.g. a high chair to sit on. The screening works best when the FLIR Screen-EST is configured for portrait mode. On the Settings page, select the Face detection tab and ensure the following settings: •... -
Page 25: Description - Screening Station
This chapter describes the FLIR Screen-EST Kiosk screening station. 7.1 Overview The screening station consists of the FLIR Screen-EST Kiosk, a clearly defined screen- ing position, and a queueing system. The FLIR Screen-EST Kiosk measures the temperature around the tear duct of the screened person, analyzes the measured temperature, and displays a screening result. -
Page 26: Screening Station Considerations
90 cm (36 in.) wide. To make sure people do not cut the cor- ner and end up too close to the FLIR Screen-EST Kiosk, about 45 cm (18 in.) should be added to the barrier leading in to the screening station. -
Page 27: Company Policies
Plan for any alternative routes, e.g. after an alarm, for any questions, for persons in a wheelchair or with other special requirements. • Consider personal integrity matters; e.g. if the FLIR Screen-EST Kiosk should be hid- den from others than the screened person. See also section 7.4 Company policies. -
Page 28: Operation - Operator Instructions
The FLIR Screen-EST Kiosk is used to screen persons for elevated skin temperatures. The FLIR Screen-EST Kiosk measures the temperature of the skin around the tear duct. For that reason, it is important that the eyes of the screened person are not covered by eyeglasses, hair, or other items. -
Page 29: Quick Guide To Flir Screen-Est
The operator window has two tabs. You will only use the Live tab. This image shows what the user interface looks like when a camera is connected. 1. This is where you connect the camera. Find the FLIR camera and use the button to the right to connect. -
Page 30: Normal Operation
To prepare the system for a new screening session, do the following: 1. Make sure the screening station is in order: • The FLIR Screen-EST Kiosk is placed at the correct position in front of the screen- ing position. • The screening position is clearly marked. -
Page 31: Screening Procedure
4. When the Status indicator is green (OK), the system is ready for screening. 8.3.2 Screening procedure Once the screening station is up and running, the FLIR Screen-EST Kiosk normally does not require any action from you. Depending on your workflow, you may need to be avail- able for guidance and alarms. - Page 32 Operation — Operator instructions 4. The system displays a screening result. • No elevated temperature detected The visitor exits the screening station. • Elevated temperature detected You and the visitor follow the process for screening alarms that your company has established.
-
Page 33: Turn On/Off The Flir Screen-Est Kiosk
To save the battery, you should also turn off the tablet. • When you turn on the FLIR Screen-EST Kiosk again after power off, you must prepare the system before the screening can start, see section 8.3.1 Start a new screening session. -
Page 34: Problems - What Shall I Do
To connect the camera to the FLIR Screen-EST application, do the following: 1. In the FLIR Screen-EST operator window, find the FLIR camera in the Discovery list and tap the connect button. This connects the camera and displays live video. -
Page 35: All Visitors Get Screening Alarms
If the FLIR Screen-EST Kiosk or the screening position floor sticker has been moved, do one of the following: • If the position of the FLIR Screen-EST Kiosk is marked, e.g. by tape on the floor, make sure to put the FLIR Screen-EST Kiosk back in the correct position. - Page 36 Operation — Operator instructions Do you save any information about me? The answer depends on your company policies and how the system has been configured. • No, nothing is saved. • If an elevated temperature is detected, an image and/or the measured temperature is saved.
-
Page 37: Visitor - Screening Procedure
Visitor — Screening procedure This chapter focuses on the visitor and describes the screening procedure. 1. The system is in idle mode. Go to the screening position, which is marked on the floor. Make sure your eyes are not covered by your hair or any other items. Note Removing eyeglasses is crucial for a correct screening result. -
Page 38: Too Many People
Visitor — Screening procedure 3. The screening is completed and your result is displayed. No elevated temperature detected. Elevated temperature detected. Follow the in- structions from the staff. The measured temperature is too low/high to be evaluated by the system. Wait one minute and then try again. - Page 39 Visitor — Screening procedure #T810570; r. AA/72255/72255; en-US...
-
Page 40: Description - Flir Screen-Est
For configuration of FLIR Screen-EST, see section 6.4 Optional: Customize FLIR Screen-EST. 10.1 Start application You start the FLIR Screen-EST application from the Start menu or by double-tapping the desktop icon. 10.2 Operator window The operator window has one main page with two tabs, Library and Live, and a Settings page. -
Page 41: Live Tab
The image below shows what the user interface looks like when a camera is connected. 1. Discovery pane This pane displays the available cameras. Find the FLIR camera and use the button to the right to connect. When the Auto-reconnect check box is selected, the camera connects automatically next time FLIR Screen-EST starts. -
Page 42: Settings Page
You access the Settings page via the toolbar on the Library and Live tabs in the operator window. To exit the Settings page, click Close at the bottom right of the page. Note For most settings in FLIR Screen-EST, it is recommended to use the default settings. 10.3.1 Face detection tab Moving average •... -
Page 43: User Screen Tab
10.3.3 Output tab FLIR Screen-EST can be configured to save images and data when an elevated skin temperature is detected. It is the responsibility of your company to handle any saved im- ages and data in accordance with applicable local data protection laws. -
Page 44: Webhooks Tab
• Select the Run on application start check box to activate webhooks automatically when the FLIR Screen-EST starts. • Use the Computer port field to specify the path port on which FLIR Screen-EST shall listen to incoming POST requests. • Use the URL fields to specify the URL for the callbacks. -
Page 45: Updates Tab
Change the file path to the folder where your custom palettes are located. 10.3.10 Regional settings tab Select the language and units to be used in the user interface. FLIR Screen-EST will re- start to apply the new settings. 10.4 Integration with external systems There are two ways to integrate FLIR Screen-EST with an external system: •... - Page 46 • workstationAddress can be the local IP (localhost) or an external IP address. • The path port must be the same as the computer port specified in the FLIR Screen- EST settings, see section 10.3.4 Webhooks tab. 10.4.2.2 Callbacks from FLIR Screen-EST After receiving a Start/Sleep POST request, FLIR Screen-EST will make a callback on the address defined in the POST request body.
- Page 47 For webhooks settings, see section 10.3.4 Webhooks tab. 10.4.2.6 Configurations for external system outside localhost For FLIR Screen-EST to receive incoming POST requests and return callbacks from out- side the localhost, you may need to configure the firewall and port settings of the com- puter where FLIR Screen-EST is installed.
-
Page 48: Description - Flir Screen-Est Kiosk
1. Go to https://flir.custhelp.com/. 2. In the search field, enter “FLIR IP Config” and then click the Search button. In the search results, click the Download FLIR IP Config link. 3. Download the latest version of FLIR IP Config (zip file). -
Page 49: Firewall Configuration
2. The FLIR IP Config automatically scans for cameras. When a camera is detected, FLIR IP Config displays the IP address of the camera. 3. Double-tap the camera in FLIR IP Config. This opens the camera login page in a web browser. -
Page 50: Camera Connectors And Buttons
8. MAC address label. 11.3.1 Factory reset button Note • Do not hold down the factory reset button when connecting the FLIR Screen-EST Ki- osk to power. • After a factory reset, the firewall configuration required for connection to FLIR Screen- EST is deleted. -
Page 51: Power/Error Indicator Led And Power Modes
No light (i.e., it is switched off). The camera is not connected to any network. 11.3.4 Digital I/O For information about the Digital I/O connector, refer to the FLIR A500/A700–EST User’s manual (available online at http://support.flir.com/resources/ds6g). #T810570; r. AA/72255/72255; en-US... -
Page 52: Maintenance - Cleaning And Calibration
Maintenance — Cleaning and Calibration 12.1 Cleaning 12.1.1 Camera unit housing, cables, and other items 12.1.1.1 Liquids Use one of these liquids: • Warm water • A weak detergent solution 12.1.1.2 Equipment A soft cloth 12.1.1.3 Procedure Follow this procedure: 1. -
Page 53: Calibration
12.2.2 Verify calibration FLIR Systems recommends that you verify the camera calibration yearly. You can verify the calibration yourself or with the help of a FLIR Systems Partner. If preferred, FLIR Sys- tems offers a calibration, adjustment, and general maintenance service. -
Page 54: Update - Flir Screen-Est And Camera Firmware
To update the camera, you need an update package with the firmware update file(s). To update the camera firmware, do the following: 1. Make sure the power cable is connected to the FLIR Screen-EST Kiosk and to a power outlet. This powers the camera. -
Page 55: Privacy Notice - Flir Est Thermal Cameras
As a manufacturer of thermal cameras which potentially allow for the processing of personal data, FLIR has embedded (or is planning to embed in the near future) the fol- lowing Privacy by Design and Data Security features in its cameras (which at the... - Page 56 FLIR’s EST screening mode helps work around those challenges to get the best measurements of EST. FLIR’s cameras with EST screening mode have a built in screening alarm setting. A delta temperature defines the alarm threshold.
- Page 57 (This obligation applies to the amount of data collected, the extent of the processing, the period of storage and accessibility). Hence it is incumbent upon Users to ensure that their use of FLIR’s thermal EST cameras complies with applicable privacy requirements (including as relates to timely information to data subjects, data breach notification, prior impact assessment of high risk process- ing operations, appointment of a Data Privacy Officer etc.) and any other applicable local...
- Page 58 Disclaimer Specifications subject to change without further notice. Models and accessories subject to regional market considerations. License procedures may apply. Products described herein may be subject to US Export Regulations. Please refer to exportquestions@flir.com with any questions. Publ. No.: T810570...
Need help?
Do you have a question about the Screen-EST Kiosk and is the answer not in the manual?
Questions and answers