Table of Contents
Advertisement
Advertisement
Table of Contents

Related Manuals for thomann Roadworx Multi Electric Stand


Summary of Contents for thomann Roadworx Multi Electric Stand
- Page 1 Multi Electric Stand electric height-adjustable stand user manual...
- Page 2 Musikhaus Thomann Thomann GmbH Hans-Thomann-Straße 1 96138 Burgebrach Germany Telephone: +49 (0) 9546 9223-0 E-mail: info@thomann.de Internet: www.thomann.de 22.06.2020, ID: 491963...
-
Page 3: Table Of Contents
Table of contents Table of contents General information......................4 1.1 Further information......................4 1.2 Notational conventions....................4 1.3 Symbols and signal words................... 5 Safety instructions......................... 6 Features............................9 Assembly..........................10 Operating elements......................18 Operating..........................19 Technical specifications....................20 Protecting the environment................... 21 Multi Electric Stand... -
Page 4: General Information
1.1 Further information On our website (www.thomann.de) you will find lots of further information and details on the following points: Download This manual is also available as PDF file for you to download. -
Page 5: Symbols And Signal Words
General information Instructions The individual steps of an instruction are numbered consecutively. The result of a step is indented and highlighted by an arrow. Example: Switch on the device. Press [Auto]. ð Automatic operation is started. Switch off the device. 1.3 Symbols and signal words In this section you will find an overview of the meaning of symbols and signal words that are used in this manual. -
Page 6: Safety Instructions
Safety instructions Safety instructions Intended use This device is intended for use as multifunctional base for stable fixing and height- adjustable installation of keyboards, synthesizers, stage pianos, etc. Use the product only as described in this user manual. Any other use or use under other operating conditions is considered to be improper and may result in personal injury or property damage. - Page 7 Safety instructions Safety DANGER! Danger for children Ensure that plastic bags, packaging, etc. are disposed of properly and are not within reach of babies and young children. Choking hazard! Ensure that children do not detach any small parts (e.g. knobs or the like) from the unit.
- Page 8 Safety instructions NOTICE! Operating conditions This device has been designed for indoor use only. To prevent damage, never expose the device to any liquid or moisture. Avoid direct sunlight, heavy dirt, and strong vibrations. Only operate the device within the ambient conditions specified in the chapter ‘Technical specifications’...
-
Page 9: Features
Features Features Special characteristics: Electric height-adjustable stand for keyboards, synthesizers, stage pianos, mixers, studio equipment, etc. Steplessly height-adjustable from 61 cm up to 126 cm Four heights freely storable Adjustable feet to compensate for floor unevenness Many adding-on accessories (available separately) Maximum load capacity: 150 kg Multi Electric Stand... -
Page 10: Assembly
Assembly Assembly When assembling the stand, use felt-pad floor protectors or a carpet in order not to damage the coating of your parquet, linoleum, laminate or PVC floor. Open the package and make sure before assembling that the entire scope of delivery is present, as posted here. - Page 11 Assembly First attach the control panel (1) to the control panel holder (2). Use the four supplied slide screws (3) and the four round nuts (4) and hand-tighten them. Place the tubes (6) and standing columns (7) as illustrated. Attach the mounted control panel holder with two Allen screws (2) to the tube (6) and to the standing column (7) using the Allen key (18).
- Page 12 Assembly Attach the motor holder (8) with four Allen screws (5) to both tubes (6) using the Allen key (18). Attach two adhesive cable ties (9) in the illustrated position to properly install the cable of the control panel. electric height-adjustable stand...
- Page 13 Assembly Slide the motor (10) in the holder (8) and connect the cables of the standing columns (11) and the cable of the control panel (12) to the motor. Attach the feet (13) with four Allen screws each (5) to the standing columns (11).
- Page 14 Assembly Attach two adhesive cable ties (9) in the illustrated position to properly install the power cable (14). Connect the power cable (14) to the motor (10). Ensure that the power cable is not installed too tight in the cable ties. The cable should be able to move while adjusting the height.
- Page 15 Assembly Turn the stand over and put it onto the feet. Attach the crossbars (15) at the desired position to both tubes (6) with two Allen screws each (5) using the Allen key (18). Attach two adhesive foam pads (16) to each crossbar (15) at the desired posi‐ tions.
- Page 16 Assembly Attach the angle pieces (17) if desired with one Allen screw each (5) to the crossbars (15). Alternatively, you can attach the devices to be mounted on the stand with a 3/8” cylinder head screw each (18, not included in the scope of delivery) using the Allen key (18).
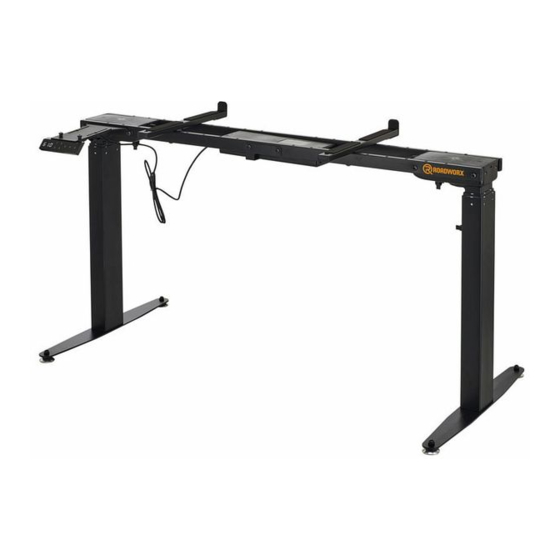
- Page 17 Assembly Align the adjustable feet to compensate for the floor unevenness. The assembled stand should now look like the following illustration: Multi Electric Stand...
-
Page 18: Operating Elements
Operating elements Operating elements Control panel 1 Display 2 [1] | [2] | [3] | [4] Number buttons for storing and selecting a set height 3 [S] Buttons for storing a set height Buttons for setting the height electric height-adjustable stand... -
Page 19: Operating
Operating Operating Unpack and check carefully there is no transportation damage before using the unit. Keep the equipment packaging. To fully protect the product against vibration, dust and moisture during transportation or storage use the original packaging or your own packaging material suitable for transport or storage, respectively. Height setting and storing Hold down to set a desired height from 61 cm up to 126 cm. -
Page 20: Technical Specifications
Technical specifications Technical specifications Adjustable height, min. 61 cm Adjustable height, max. 126 cm Operational speed 3 cm/s (22 s for the whole adjusting range) Length crossbar 35 cm Adjustable distances crossbar 16 cm, 26 cm, 36 cm, 46 cm, 56 cm, 66 cm, 76 cm, 86 cm, 96 cm Feet length 55 cm Load capacity... -
Page 21: Protecting The Environment
Protecting the environment Protecting the environment Disposal of the packaging material For the transport and protective packaging, environmentally friendly materials have been chosen that can be supplied to normal recycling. Ensure that plastic bags, packaging, etc. are properly disposed of. Do not just dispose of these materials with your normal household waste, but make sure that they are collected for recycling. - Page 22 Notes electric height-adjustable stand...
- Page 24 Musikhaus Thomann · Hans-Thomann-Straße 1 · 96138 Burgebrach · Germany · www.thomann.de...
Need help?
Do you have a question about the Roadworx Multi Electric Stand and is the answer not in the manual?
Questions and answers