Table of Contents
Advertisement
Available languages
Available languages
Quick Links
To view the TE Energy website:
Tyco Electronics Raychem GmbH
a TE Connectivity Ltd. Company
Finsinger Feld 1
85521 Ottobrunn/Munich, Germany
Tel:
+49-89-6089-0
Fax:
+49-89-6096-345
TE.com/energy
TE´s Raychem
Cable Accessories
Installation Instructions
EN
EPP-2844-INT-9/16
Raychem Low voltage
Straight Joints 1 kV
four-core and five-core
polymeric insulated cables
without armour
Joint types: LJSU/(M)-4X/ ...
EN
Installation instructions
DE
Montageanleitung
FR
Instruction de montage
NL
Installatie-instructie
LJSU/(M)-5X/ ...
2
6
11
16
Advertisement
Table of Contents

Related Manuals for TE Connectivity LJSU-4X Series


Summary of Contents for TE Connectivity LJSU-4X Series
- Page 1 TE´s Raychem Cable Accessories To view the TE Energy website: Installation Instructions Tyco Electronics Raychem GmbH a TE Connectivity Ltd. Company EPP-2844-INT-9/16 Finsinger Feld 1 85521 Ottobrunn/Munich, Germany Tel: +49-89-6089-0 Raychem Low voltage Fax: +49-89-6096-345 TE.com/energy Straight Joints 1 kV...
-
Page 2: Before Starting
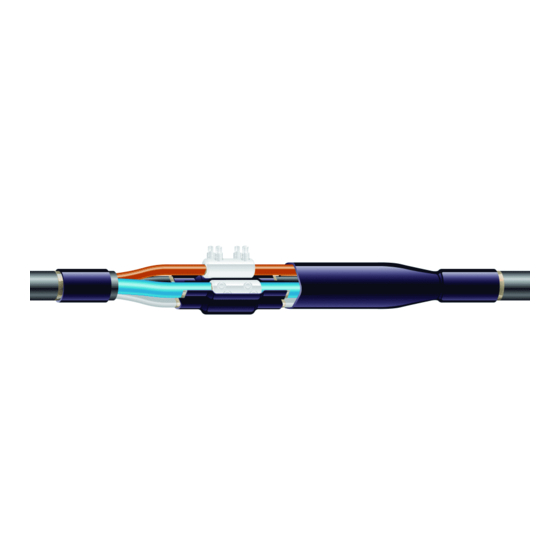
TE Connectivity’s only obligations are those in TE Connectivity’s standard Conditions of Sale for this product and in no case will TE Connectivity be liable for any other incidental, indirect or consequential damages arising from the use or misuse of the products. - Page 3 Cable preparation Reference line Overlap the cable ends as shown in the drawing. Mark the reference line in the middle of the overlap. Remove the cable oversheath according to the dimensions in Table 1. Bend and position the cores as shown in drawing A. If required, cross the cores on the longer cable side. Cut the cores at the reference line.
- Page 4 Completion of the joint Inner insulation tubes Position the outer sealing sleeve over one of the cleaned cable ends. Position the inner insulation tubes over the long core ends. Outer sealing sleeve Wire brush the aluminium conductors. Fit the conductors into the connector.
- Page 5 OPTION S: Installation using Outer Seeling Sleeve Clean the cable jackets on both cable ends and abrade them for a distance of at least 150 mm. Position the outer sealing sleeve centrally over the joint area. Control the equal overlap on both cable jackets. Shrink down the outer sealing sleeve, starting over the connector area (outside the center), working towards the ends.
- Page 6 TE Raychem Kabelgarnituren To view the TE Energy website: Montageanleitung Tyco Electronics Raychem GmbH ein Unternehmen der TE Connectivity Gruppe EPP-2844-INT-9/16 Finsinger Feld 1 85521 Ottobrunn/München Telefon: 089-6089-0 Raychem Verbindungsmuffen Telefax: 089-6096-345 TE.com/energy für vieradrige und fünfadrige kunststoffisolierte Kabel 1 kV ohne Bewehrung Typen: LJSU/(M)-4X/ ...
-
Page 7: Allgemeine Richtlinien
Sämtliche Angaben in dieser Montageanleitung richten sich ausschließlich an ausgebildetes Starkstrom-Montagepersonal und haben den Zweck, die ordnungsgemäße Installationsmethode dieses Produktes zu beschreiben. TE Connectivity hat jedoch keinerlei Einfluss auf die Rahmenbedingungen, welche die Installation des Produktes beeinflussen. Es liegt in der Verantwortlichkeit des Kunden, die Eignung der Installationsmethode für seine Rahmenbedingungen sicherzustellen. - Page 8 Allgemeine Hinweise: Bezugslinie Vorbereitung des Kabels Kabelenden gemäß Zeichnung überlappen lassen. Bezugslinie in der Mitte der Überlappung kennzeichnen. Kabelmäntel entsprechend den Abmessungen der Tabelle 1 entfernen und verbleibenden Kabelmantel auf beiden Seiten auf einer Länge von 600 mm reinigen und entfetten. Adern entsprechend der Zeichnung ausbiegen, falls erforderlich auf der länger abgesetzten Kabelseite kreuzen.
- Page 9 Fertigstellung der Verbindungsmuffe Innenschläuche Außenschlauch über eines der gereinigten Kabelenden schieben. Innenschläuche über die längeren Kabeladern schieben. Außenschlauch Leiter mit einer Stahlbürste bürsten. Verbinder auf den abgesetzten Leitern parken. 1 2 4 3 Leiter mit Hilfe der Press- oder Schraubtechnik verbinden. Scharfe Kanten entfernen, Leiterverbindung und angrenzende Aderisolierung reinigen und entfetten.
- Page 10 OPTION S: Installation mit Außenschlauch Die Enden der beiden Kabelmäntel auf einer Länge von 150 mm reinigen, entfetten und aufrauhen. Außenschlauch mittig überschieben und von der Mitte der Verbinder ausgehend gleichmäßig aufschrumpfen. Fertig installierte Übergangsmuffe. Übergangsmuffe vor mechanischer Belastung auf Umgebungstemperatur abkühlen lassen.
- Page 11 Accessoires de câble TE Raychem To view the TE Energy website: Instruction de montage Tyco Electronics SIMEL Une société de TE Connectivity Ltd. EPP-2844-INT-9/16 1, rue Paul Martin 21220 Gevrey Chambertin France Jonction basse tension Télephone +33 3 80 58 32 00 Télecopieur...
-
Page 12: Opérations Préliminaires
à ses conditions de terrain spécifiques. Les seuls engagements de TE Connectivity sont ceux définis dans le document des Conditions générales de vente pour ce produit et TE Connectivity ne pourra en aucun cas être tenu pour responsable en cas de dommages accidentels, indirects ou consécutifs, survenant par suite de l’utilisation ou d’une mauvaise... - Page 13 Préparation du câble ligne de référence Recouvrir les câbles comme illustré à côté. Marquer la ligne de référence au milieu du recouvrement. Enlever les gaines extérieures selon les dimensions dans le tableau A. Plier les âmes en position de raccordement comme indiqué dans l‘illustration A. Croiser les âmes du côté long si nécessaire. Couper les âmes sur la ligne de référence et enlever l‘isolant sur la moitié...
- Page 14 Montage de la jonction gaines d‘isolation Glisser la grosse gaine d‘étanchéité sur un des bouts de câbles nettoyés. Néttoyer et dégraisser l‘isolant des âmes et glisser une gaine d‘isolation sur chaque âme longue. gaine d‘étanchéité Brosser les conducteurs en Al avec une brosse en acier afin d‘enlever la couche d‘oxide.
- Page 15 OPTION S: Installation using Outer Seeling Sleeve Nettoyer, dégraisser et abraser les gaines extérieures sur 150 mm. Glisser la gaine d‘étanchéité sur la jonction et la positionner de façon à ce qu‘elle recouvre les 2 gaines extérieures de part égale. Rétreindre la gaine en commençant la ou se trouvent les raccords à...
- Page 16 TE´s Raychem Cable Accessories To view the TE Energy website: Installatie-instructie TE Connectivity Nederland B.V. TE Energy EPP-2844-INT-9/16 Rietveldweg 32 Postbus 288 5201 AG ‘s-Hertogenbosch Installatie-instructie tel +31 73 6246246 fax +31 73 6246935 Raychem laagspannings- TE.com/energy verbindingmof voor 4- en...
-
Page 17: Algemene Richtlijnen
TE Connectivity heeft geen controle over de praktische condities ter plaatse die de installatie van dit product beïnvloeden. Het is de verantwoordelijkheid van de gebruiker te beslissen of de installatie methode geschikt is voor zijn condities ter plaatse. - Page 18 Kabel voorbereiding Referentielijn Overlap beide kabeluiteinden zoals geïllustreerd hiernaast. Markeer een referentielijn in het midden van de overlapping. Verwijder de buitenmantels volgens de maten opgegeven in Tabel 1. Buig de aders in aansluitpositie volgens illustratie A. Indien de aders dienen gekruist te worden gebeurt dit aan de zijde van de lange aders.
- Page 19 Afwerking van de verbindingsmof Isolatiekous Glijd de grote afdichtingskous over één van de gereinigde kabeluiteinden. Reinig en ontvet de aders en glijd een isolatiekous over iedere lange ader. Afdichtingskous Verwijder de axydelaag op Al geleiders met een staalborstel. Plaats de geleiders in de verbinders. 1 2 4 3 Verbind de geleiders met pers- of schroefverbinders.
- Page 20 OPTION S: Installation using Wraparound Joint Sleeve Reinig, ontvet en ruw de uiteinden van de buitenmantels over 150 mm. Glijd de afdichtingskous over de mof en positioneer deze zodat beide buitenmantels evenredig overlapt worden. Krimp de afdichtingskous te beginnen bij de zone van de verbinders naar de beide uitenden toe.