Advertisement
Quick Links
EN
Thank you for buying smarTrike,
If you have any assembly issues or are missing a
part, please call us for assistance. Our smarTrike®
assembly experts will assist you.
DO NOT RETURN TO THE STORE
If you are experiencing problems with this
product, please call our HELP LINE.
www.SmartTrike.com
USA : 1-855-SMTRIKE
(1-855-768-7453)
www.youtube.com/user/SmartTrikeO cial
6 1
SP
in
Gracias por comprar smarTrike,
en
Si tiene algún problema de montaje o
le falta una pieza, llámenos para asistencia.
10m-36m
Nuestros expertos en
ensamblaje smarTrike® lo ayudarán.
NO REGRESES A LA TIENDA
Si tiene problemas con este producto,
502
llame a nuestra LÍNEA DE AYUDA.
para asistencia y consejo.
Estados Unidos :
1-855-SMTRIKE (1-855-768-7453)
50202A
-1-
Advertisement

Subscribe to Our Youtube Channel
Related Manuals for SmarTrike 502


Summary of Contents for SmarTrike 502
- Page 1 Thank you for buying smarTrike, If you have any assembly issues or are missing a part, please call us for assistance. Our smarTrike® assembly experts will assist you. DO NOT RETURN TO THE STORE If you are experiencing problems with this product, please call our HELP LINE.
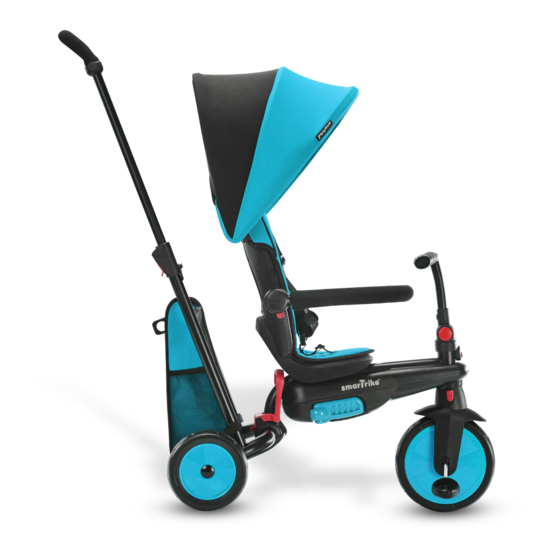
- Page 2 Parts included / Piezas para el montaje L502100 L300120 L505131 L502120 12629996 L505171 L550360...
- Page 3 Take the wheels out and place them next to the trike. Saque las ruedas y colóquelas al lado. Rotate the parent handle in the direction of Release the latch on the side of the the arrow until it clicks into place. frame.
- Page 4 Click the wheels onto the frame. Coloque las ruedas, deberá escuchar un clic. Push the buttons on the side of the handlebar together to lift the handlebar up. Coloque el manillar en su lugar apretando al mismo tiempo los dos botones que se encuen- tran en los laterales.
- Page 5 1.Release the red levers on either side of the parent handle. 2. Pull the handle all the way up until you hear a click. 3.Lock the levers and you are ready to ride. 1. Suelte las palancas rojas a cada lado del manillar principal .
- Page 6 (A) Pull the brake upwards to ride. (A) Para usarlo, empuje el freno hacia arriba. (B) To stop, push the brake downwards. (B) Para frenar y detenerse, presione el freno hacia abajo. Adjust the harness / Ajuste la altura adecuada de las cintas de seguridad WARNING! Use this harness at all times .
- Page 7 Usage / Uso 10M+...
- Page 8 Usage / Uso 18M+...
- Page 9 Usage / Uso 24M+...
- Page 10 Practice pedaling: Attach the pedals with one click. Para practicar el modo pedaleo sin pedalear, coloque los pedales en la primera posicion , escucahndo un solo click Independent pedaling: Attach the pedal and turn until you hear a second click. Para que el niño pedalee por sí...
- Page 11 Usage / Uso 30M+ -11-...
- Page 12 Lift up the safety bar Levante hacia arriba la barra de seguridad. -12-...
- Page 13 Folding instructions Instrucciones para el plegado 1. Fold in the child handlebar. 1. Pliegue el manillar del niño. 3. Fold down the seat. 3. Doble el respaldo del asiento hacia Adelante. To remove the front wheel, Press the red button under the Child handlebar and pull the Wheel o .
- Page 14 1. Pull out the pin. 1. Tire del pasador. 2. Pull the lever on the back of the frame and turn the parent Handle in the direction of the Arrow. 2. Tire de la palanca del asiento trasero y gire el manillar parental en la dirección que indica la flecha. -14-...
- Page 15 -15-...
- Page 16 WARNING! To avoid injury, ensure that your child is kept away when unfolding and folding this product ¡ADVERTENCIA! Para evitar riesgo de lesiones, asegúrese de que el niño se mantiene a cierta distancia cuando monte y pliegue este producto abajo For your safety carry the folded product with 2 hands.
- Page 17 -17-...
- Page 18 10m-36m -18-...
- Page 19 -16- -19-...
- Page 20 50228057603 -20-...
Need help?
Do you have a question about the 502 and is the answer not in the manual?
Questions and answers