Advertisement
Quick Links
www.smarTrike.com
607/609
LOOK US UP ON YOUTUBE:
www.youtube.com/user/SmartTrikeO cial
1
20010001607
20010006607
2
20010012607
X4
K
20010002607
A
20010007607
E
20010010607
20010013607
X2
L
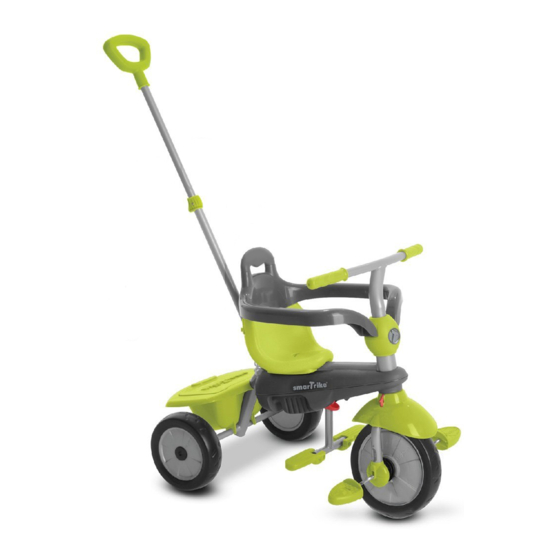
Thank you for buying smarTrike,
If you have any assembly issues or are missing
a part, please call us for assistance. Our
smarTrike® assembly experts will assist you.
DO NOT RETURN TO THE STORE
If you are experiencing problems with this
product, please call our HELP LINE.
9:30am – 5:00pm Monday to Friday
Not Bank Holidays or weekends.
You can also email us: help@mookie.co.uk
for assistance and advice.
USA: 1-855-SMTRKUS
20010017607
X2
B
20010008607
F
I
20010014607
M
-1-
UK: 0845 5046410
(1-855-768-7587)
20010018607
C
20010009607
G
20010011607
20010015607
N
D
H
J
20010016607
O
Advertisement

Related Manuals for SmarTrike 607


Summary of Contents for SmarTrike 607
- Page 1 Thank you for buying smarTrike, If you have any assembly issues or are missing a part, please call us for assistance. Our smarTrike® assembly experts will assist you. DO NOT RETURN TO THE STORE If you are experiencing problems with this product, please call our HELP LINE.
- Page 2 Step 1 Parts needed to complete this section Place the washer (K) on the back axle. Connect each back wheel (B) to back axle Place the washer (K) on the back axle.
- Page 3 Step 2 Parts needed to complete this section Firmly insert black plug (L) into axle opening, as shown. Align spring lock with dropout hole in axle and push firmly into position, until piece "clicks" into place. By using the Phillips screwdriver (M), screw the hole (as shown) into part B.
- Page 4 Step 3 Parts needed to complete this section Insert part D into the body all the way through the hole (as shown) Insert part D into part C all the way, until the spring meets the retaining head (as shown)
- Page 5 Step 4 Push down on the handlebar. There should be Push the red button and simultaneously no space between the wheel unit and the body turn the wheel 180º until you hear a 'click'. of the trike. The screw should not be visible. Push the apple firmly down to insert, slightly turn until you hear a "click".
- Page 6 Step 5 Parts needed to complete this section Take the seat (E), push the screw through the By using the "Allen" key (M), remove seat hole. Screw into the most rear facing screw by turning counter clockwise. hole and firmly tighten with Allen key (M).
- Page 7 Step 6 Parts needed to complete this section With little force, push part F into the apple's holes until you hear a "click". Place safety bar (F) holes into protrusions located at the back of the seat.
- Page 8 Step 7 Parts needed to complete this section Insert part G into the safety bar, until you hear a "click".
- Page 9 Step 8 Parts needed to complete this section By using the Phillips screwdriver Push basket (H) firmly onto (M), remove screw by turning rear axle until it "clicks" into counter clockwise. position (see 1 & 2). Attach basket firmly to vertical frame, use removed screw and turn clockwise until secured.
- Page 10 Step 9 Parts needed to complete this section WARNING: Nut must be inserted correctly and secured. Keep the nut in place, remove the screw from part I by turning counter clockwise. Insert part J into part I. Align the hole of part I with the correct hole in part J.
- Page 11 Step 10 Parts needed to complete this section WARNING: This product should be used on safe ground, it should not be used near steps, slopes, roadways, public highways or wet areas. Insert the assembled parent Remove the securing pin with handle (I+J) into the retaining securing lock.
- Page 12 Step 11 For the 10+ month stage, open Pull down both sides of the the footrests by pulling it down. footrest. -12-...
-
Page 13: Parent Control
Parent Control 10M+ When the clutch is pulled away from the wheel there is no pedal control and the wheel is in a free-wheel position -13-... - Page 14 Child Control For the 24+ months stage, Push release button to place it back into frame (as shown). fold up left and right footrest. -14-...
- Page 15 When the clutch is pushed closed and aligned with the front wheel, child has pedal control. -14-...
- Page 16 10M+ 24M+ 30-36M www.smarTrike.com www.youtube.com/user/SmartTrikeO cial 60727974603 -16-...
Need help?
Do you have a question about the 607 and is the answer not in the manual?
Questions and answers