
Related Manuals for natus Madsen AccuScreen


Summary of Contents for natus Madsen AccuScreen
- Page 1 Madsen® AccuScreen OAE & ABR Screener User Manual Doc. No. 7-50-0920-GB/13 Part No. 7-50-09200-GB...
- Page 2 Copyright notice © 2010, 2020 Natus. All rights reserved. ® Natus, the Natus Icon, Aurical, Madsen, HI-PRO 2, Otoscan, ICS and HORTMANN are registered trademarks of Natus in the U.S.A. and/or other countries. Version release date 2020-09-23 (218514) Technical support Please contact your supplier.
-
Page 3: Table Of Contents
1.8.1 Navigating this manual Unpacking and Installation Unpacking Overview of AccuScreen 2.2.1 Front and rear of AccuScreen 2.2.2 Top and bottom of MADSEN AccuScreen 2.2.3 The docking station 2.2.4 Display 2.2.5 Ear probe 2.2.6 Electrode cable (ABR only) 2.2.7 Ear coupler cable... - Page 4 Printing from AccuScreen Printouts from label printer Quality Tests Performing Quality Tests Probe test 8.2.1 Performing the probe test 8.2.2 From the Quality Tests menu Electrode cable test Ear coupler cable test Combined (Electrode Cable - Ear Coupler Cable) MADSEN AccuScreen...
- Page 5 App. 1.7 Repair, after-sales service and regular checks App. 1.7.1 Declaration App. 1.8 Manufacturer App. 1.8.1 Responsibility of the manufacturer App. 2 Status and Error Messages App. 2.1 Device related messages App. 2.2 Usage and test related messages App. 3 Technical Specifications App. 3.1 Accessories MADSEN AccuScreen...
- Page 6 App. 3.4 Power supply and battery App. 3.5 1077 docking station App. 3.6 OAE probe App. 3.7 ABR electrode cable App. 3.8 ABR ear coupler cable (optional) App. 3.9 Device class App. 3.10 Notes on EMC (Electromagnetic Compatibility) Index MADSEN AccuScreen...
-
Page 7: Introduction
From AccuLink you can configure AccuScreen to suit your purposes. This includes defining mandatory fields in patient hand- ling, defining which screens are to be shown in AccuScreen, and uploading and downloading data. AccuScreen is operated independently of AccuLink, although additional features and configuration values are provided by AccuLink’s user interface. MADSEN AccuScreen... -
Page 8: Printing
The device is intended for use by audiologists, ENTs and other healthcare professionals. Important Natus does not guarantee the accuracy of the test results or the tests themselves, if accessories other than • those supplied by Natus are used for this device (i.e. eartips, electrodes, ear couplers, etc.). -
Page 9: About This Manual
It is recommended that you read this manual before you start operating AccuScreen so that you become familiar with the device before testing on a patient. To obtain a free printed copy of the user documentation, contact Natus (www.natus.com). Maintenance and cleaning... -
Page 10: Navigating This Manual
1 Introduction 1.8.1 Navigating this manual Menus, icons and functions to select are shown in bold type, as for instance in: • Press the button. MADSEN AccuScreen... -
Page 11: Unpacking And Installation
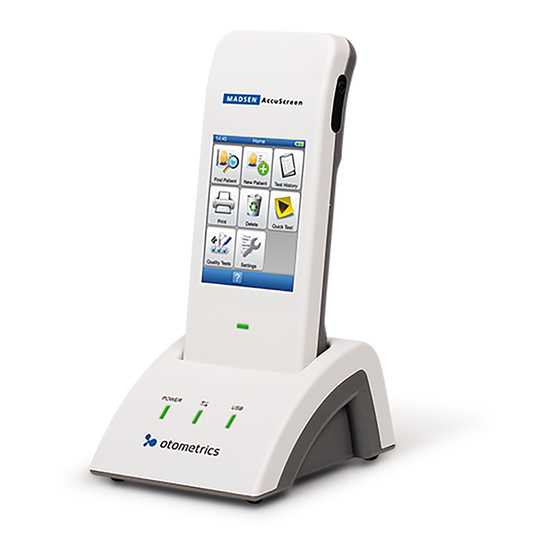
Overview of AccuScreen 2.2.1 Front and rear of AccuScreen A. On/Off switch D. Test cavity B. Touch screen display Button for opening battery compartment C. Power and charging status light indicator Cover on battery compartment with serial number label MADSEN AccuScreen... -
Page 12: Top And Bottom Of Madsen Accuscreen
2 Unpacking and Installation 2.2.2 Top and bottom of MADSEN AccuScreen Bottom A. Electrode cable socket C. Docking Station connectors B. Probe socket & ear coupler cable socket 2.2.3 The docking station Front indicators POWER Lit when power is supplied to the docking station. - Page 13 2 Unpacking and Installation Rear sockets PC/USB Socket for USB connection to the PC Printer/Modem Socket for printer/modem connection Socket for power adapter MADSEN AccuScreen...
-
Page 14: Display
Never use any type of sharp instrument on the display. If you do, reliable operation of AccuScreen can no • longer be guaranteed. 2.2.5 Ear probe Probe cable plug A. Probe tip B. Probe body C. Probe cable MADSEN AccuScreen... -
Page 15: Electrode Cable (Abr Only)
A. Electrode cable plug B. Electrode clips C. Electrode cable 2.2.7 Ear coupler cable Ear couplers A. Cable connector C. Blue ear coupler adapter for left ear B. Ear coupler cable D. Red ear coupler adapter for right ear MADSEN AccuScreen... -
Page 16: Storage
If the battery is to be stored for a long time, it is recommended that it is stored with approximately 50% remaining battery capacity and in a dry and cool place. Storing the battery in a refrigerator can be recommended. MADSEN AccuScreen... -
Page 17: Inserting The Battery In Accuscreen
3. Place a new, charged battery in the compartment. – Hold the battery so that the arrow with the text “Insert this direction” points downwards towards the bottom of the compartment. 4. Close the compartment. 2.5.3 Battery status MADSEN AccuScreen... -
Page 18: Powering The Docking Station
Electrical equipment must be positioned so that there is easy access to disconnect the power supply from the mains. Disconnecting from the mains supply To disconnect AccuScreen docking station from the mains supply, simply remove the adapter plug from the mains outlet. MADSEN AccuScreen... -
Page 19: Charging The Battery From The Docking Station
2.5.6 Charging the battery with the external charger Caution Use only the charger supplied by Natus. • The battery for AccuScreen can be charged by an external charger (optional accessory). See the charger manufacturer's documentation for specifications and instructions for use. -
Page 20: Getting Started With Accuscreen
This is configurable; see the AccuLink User Manual. • Main instructions for data entry screens are described in – Entering data in AccuScreen ► • Buttons are described in – Function buttons ► – General buttons ► MADSEN AccuScreen... -
Page 21: Selecting The User
D. The footer with available buttons for main functions such as – returning to the previous screen, – accessing help, Home – returning to the screen. 3.1.3 Selecting the user User List 1. Select a user from the User List is configurable (see the AccuLink User Manual). MADSEN AccuScreen... -
Page 22: Entering Password
The following screens are optional, and not part of the default AccuScreen configuration. Location list is configurable (see the AccuLink User Manual). Facility List is configurable (see the AccuLink User Manual). 3.1.7 The Home menu The Home menu Home From the menu, you can select all main functions in AccuScreen. MADSEN AccuScreen... -
Page 23: Patient Handling In Accuscreen
, adding or finding a patient is not necessary. • You can download patient data in advance from AccuLink (see the AccuLink User Manual for instructions). 3.2.1 Adding a new patient New Patient Home 1. To add a new patient, press the button on the menu. MADSEN AccuScreen... - Page 24 If you pass the end or the beginning of a month in the day (DD) column, the value is stepped up or down accordingly. YYYY • If you step up the value to 01, (i.e. to a new year) the value is stepped up accordingly. MADSEN AccuScreen...
- Page 25 The risk factors are by default set to (Unknown). Risk Factors screen is configurable (see the AccuLink User Manual). MADSEN AccuScreen...
-
Page 26: Finding A Patient
3. Enter the patient’s data (for example, last name or record number) according to the search criteria you have chosen. If needed, see Using the keypad ► 4. Press the button to start the search. The search will produce a list of patients matching the search criteria. MADSEN AccuScreen... -
Page 27: Editing Patient Data
2. In the screen press the field you wish to edit. 3. Edit the field. 4. When you have edited data in a field, press the button to save. 5. If needed, select the next field you wish to edit. MADSEN AccuScreen... -
Page 28: Preparing For Testing
2. Align the ridges on the plug with the notches in the blue-bordered socket on the top end of AccuScreen. 3. Gently insert the probe plug into the probe socket. The plug does not require force to be inserted properly. MADSEN AccuScreen... -
Page 29: Connecting The Electrode Cable For Abr Testing
2. Align the ridge on the electrode cable plug with the notch in the green-bordered socket on the top end of AccuScreen. 3. Gently insert the electrode cable plug into the electrode cable socket. The plug does not require force to be inserted properly. MADSEN AccuScreen... -
Page 30: Connecting The Ear Coupler Cable For Abr Testing
The main advantage of the ear coupler cable is that you can test both ears at the same time or in sequence after starting the test. 1. Place AccuScreen face down. The sleeve on the plug of the ear coupler cable and the colouring around the ear coupler socket are blue. MADSEN AccuScreen... -
Page 31: Preparing The Test Environment
Newborn hearing screening with OAE and ABR is best performed when the baby is sleeping. The ideal time is after the baby has been fed and changed. It is recommended that newborn babies be swaddled tightly for ABR testing. Swaddling has a very calming effect. MADSEN AccuScreen... -
Page 32: Preparing The Patient For Insertion Of The Ear Probe
The eartip can be used for both ears. If you suspect infection in one ear, change the eartip and clean the probe • tip, or replace it with a spare, before you continue testing on the other ear. Warning Using a probe with an unsuitably sized eartip or applying excessive force may irritate the ear canal. • MADSEN AccuScreen... -
Page 33: Inserting The Probe With Eartip In The Patient's Ear Canal
Do not use alcohol pads or other cleaning agents that contain alcohol to prepare the skin as they may cause • the skin to dry out, leading to a higher skin impedance. 1. Place the electrodes on the patient as follows: MADSEN AccuScreen... -
Page 34: Fitting The Ear Couplers
Never place the red and blue ear coupler adapters directly in the ear canal. Use them only with the ear • couplers fitted. Note Use the ear couplers only with the ear coupler cable - not with the ear probe. • MADSEN AccuScreen... - Page 35 4. Place the ear coupler with the red adapter over the right ear of the baby, and the ear coupler with the blue adapter over the left ear of the baby. The ear couplers can be placed with the cables pointing either upwards or downwards, depending on which direction fits best. MADSEN AccuScreen...
- Page 36 4 Preparing for testing Caution To remove the ear coupler cables, do not pull them by the cable. Instead, hold them by the ear coupler • adapter. MADSEN AccuScreen...
-
Page 37: Testing With Accuscreen
Regular testing 1. Find a patient (see Finding a patient ► 26) or add a new patient (see Adding a ► new patient 23). 2. Press the button in the New Patient screen or the Patient Details screen. MADSEN AccuScreen... -
Page 38: The Teoae Test
1. To start the test, press the Start button that is next to TEOAE , and that cor- responds to the ear in which you placed the probe. Calibration is performed before the actual test starts. The test starts automatically when calibration is completed. MADSEN AccuScreen... -
Page 39: The Teoae Test
The longer the bar, the better the probe fit. The indicator bar is green when the probe fit is good; if the bar is grey, adjust the probe to improve the fit. (The Probe Fit Assistant is disabled by default. It can be enabled or disabled in AccuLink.) MADSEN AccuScreen... -
Page 40: Teoae Test Results
• Pass/Clear Response is determined by a statistical algorithm, based on weighted averaging, which ensures detection with proven high specificity and sens- Pass/Clear Response itivity. No further interpretation of a result is needed. MADSEN AccuScreen... - Page 41 (stimulus stability) is less than 80%, the probe may have shifted or may not be in a position to record the response. Try to reposition the probe and repeat the test. Note • Retro-cochlear hearing loss cannot be detected by TEOAE testing. MADSEN AccuScreen...
-
Page 42: The Dpoae Test
The L1/L2 pair is 59/50 dB SPL. Only is shown. 5.3.2 Starting the test 1. To start the test, press the Start button that is next to DPOAE , and that cor- responds to the ear in which you placed the probe. MADSEN AccuScreen... -
Page 43: The Dpoae Test
Press the button to restart the test. 5.3.3 The DPOAE test The test as it progresses is shown on the display. The test ear and the frequency cur- rently being tested is shown at the top of the screen. MADSEN AccuScreen... - Page 44 5 kHz is tested first. Pass/Clear Response Refer/No Clear Response The default criterion is 3/4. The test stops automatically if 3 fre- quencies reach a Pass/Clear Response result or 2 frequencies receive a Refer/No Clear Response result. MADSEN AccuScreen...
-
Page 45: Dpoae Test Results
The complete test is terminated successfully with a Pass/Clear Response if DPOAEs could be registered for at least 3 out of 4 frequencies. Note Retro-cochlear hearing loss cannot be detected by DPOAE testing. • MADSEN AccuScreen... -
Page 46: The Abr Test
(See Placing the electrodes for ABR testing ► 33.) 2. Connect the electrode cable. 3. Fit the probe or the ear couplers with the ear coupler cable. The ABR display changes automatically. MADSEN AccuScreen... -
Page 47: Impedance Testing And Calibration
The acoustical stimulus is being calibrated. Impedance Balance Start If the values are (green), press the button to start the test. (Depending on how your device is configured, the test may start automatically if the indicators are green or yellow.) MADSEN AccuScreen... - Page 48 4. If needed, attach new electrodes to see whether they will reduce the impedance values. Start 1. Press the button to start the test. (Depending on how your device is con- figured, the test may start automatically if the indicators are green or yellow.) MADSEN AccuScreen...
-
Page 49: The Abr Test
Stopping a test Stop • If needed, press the button to stop the test. The test will be saved as an incomplete test. Test details Shows which ear is being tested. Single ear testing MADSEN AccuScreen... -
Page 50: Abr Test Results
5.4.4 ABR test results When the test is completed, the test data is saved and the result is shown on the screen. ► 1. See Options in the test result screens for a description of the buttons available. MADSEN AccuScreen... - Page 51 It may be worthwhile to relocate to another room for testing. • Is there much acoustic noise in the environment? A high level of noise might mask the stimulus. MADSEN AccuScreen...
-
Page 52: Options In The Test Result Screens
The buttons show the best, most recent test. Press the specific button to view the result. Pass/Clear Response – Refer/No Clear Response – Incomplete – Binaural test 2. The button for ABR testing, if shown, does not change. Pressing it will start a new binaural test. MADSEN AccuScreen... -
Page 53: Adding Comments To A Test
This will take you to the screen. 2. Enter one or several comments by using the data entry functions described below. See also Using the keypad ► 3. When you have entered a comment in the field, press the button to save. MADSEN AccuScreen... -
Page 54: Viewing Comments
From the Home screen Home Test View 1. On the screen, press the button. This will take you to a patient list for selecting a patient. Test View 2. Select a patient. This will take you to the patient’s screen. MADSEN AccuScreen... -
Page 55: The Test View Screen
For a description of the individual test result types, see: – TEOAE test results ► – DPOAE test results ► – ABR test results ► 3. If you wish to view comments to a test result, press the Comments button in the specific test results screen. MADSEN AccuScreen... -
Page 56: Quick Test
For descriptions of the individual tests, see: – The TEOAE test ► ► – The DPOAE test – The ABR test ► Note These test results are not stored and cannot be printed. • MADSEN AccuScreen... -
Page 57: Printing
2. Connect the label printer cable to the AccuScreen docking station and place AccuScreen in the docking station. 3. Switch on the printer. Before attaching the AccuScreen docking station to a PC, make sure you disconnect the label printer from the docking sta- tion. MADSEN AccuScreen... - Page 58 Finding a patient This will take you to the Test View screen. Printing Test View Print 1. To print the entire list from the screen, press the button on this screen. Patient specific comments will be printed automatically. MADSEN AccuScreen...
-
Page 59: Printouts From Label Printer
The patient’s first and last name • Patient ID • Date of testing • Examiner's name • Test type • Left and/or right ear result, date and time • General comments relating to the patient are listed at the bottom of the printout MADSEN AccuScreen... - Page 60 TEOAE results • DPOAE results • ABR results If there are no results for a specific type of test, the test type is not listed. Single results The most recent result is printed. Pass/Clear Response Refer/No Clear Response MADSEN AccuScreen...
- Page 61 7 Printing Legend Legend • Left ear • Right ear • There are comments relating to a specific test. To view these comments a print of the single result is needed. MADSEN AccuScreen...
-
Page 62: Quality Tests
Cleaning and disinfecting the built-in test cavity ► You can start the probe test in two ways: ► • Performing the probe test 63, simply by inserting the probe in the test cavity of AccuScreen. • From the Quality Tests menu ► MADSEN AccuScreen... -
Page 63: Performing The Probe Test
If the probe functions correctly, the message appears. Probe failed If the probe does not function correctly, the message appears. You will also see a list of possible errors. 2. Press the button to confirm the test result. If needed, repeat the test. MADSEN AccuScreen... -
Page 64: From The Quality Tests Menu
Every day before you start testing on patients, you should test the electrode cable to make sure that it functions correctly. 1. Clip the electrode clips onto the metal bars of the ABR Tester. 2. Press the Electrode cable button on the Quality Tests screen. Electrode cable OK If the electrode cables function correctly, the message appears. MADSEN AccuScreen... -
Page 65: Ear Coupler Cable Test
2. A manual listening test to make sure the ear coupler adapters are not clogged. Automatic test 1. Insert the ear coupler adapters into the sockets at each end of the ABR Tester. 2. Press the Ear coupler cable button on the Quality Tests screen. MADSEN AccuScreen... - Page 66 Do not insert the ear coupler adapter into the ear canal! • Note Your AccuScreen may indicate that the test has failed. This is normal, • since the test is performed in free air and not in the ABR Tester. MADSEN AccuScreen...
-
Page 67: Combined (Electrode Cable - Ear Coupler Cable)
2. Insert the ear coupler adapters into the sockets at each end of the ABR Tester. Combined Quality Tests 3. Press the button on the screen. If the message All tests OK appears, the electrode cables and ear coupler cables function correctly. MADSEN AccuScreen... - Page 68 If you can hear the ABR stimulus sound from both ear coupler adapters, they are functioning correctly. If you are unable to hear the sound from one or both ear coupler adapters, the ear coupler adapters may be clogged or broken. Do not use these ear coupler adapters for screening. MADSEN AccuScreen...
- Page 69 The automatic tests should always be performed with the ear coupler adapters attached to the ABR Tester. If • an automatic test is performed without connecting the ear coupler adapters to the ABR tester, the test might fail even though the cable is fully functioning. MADSEN AccuScreen...
-
Page 70: Accuscreen Settings
AccuScreen, and see information about AccuScreen and the AccuLinkinstalled. Settings Home 1. Press the button on the screen. Settings From the menu you can access the settings available in AccuScreen. MADSEN AccuScreen... -
Page 71: Time And Date Setting
Date format – Select from the list how the date setting is to be shown on the screen. Time format – Select from the list how the time setting is to be shown on the screen. MADSEN AccuScreen... -
Page 72: Language Setting
Sound on Key click – Pressing a button will produce a sound (a click) Result sound – Pass/Clear Response Refer/No Clear Response sound is heard at the end of the test. Sound off Shows that the sound is disabled. MADSEN AccuScreen... -
Page 73: Display Brightness
1. Press the button on the screen to view information regard- ing: – Firmware release – HW version and Serial number – Next AccuScreen service date – Connected probe – Next service date for the connected probe – Memory usage MADSEN AccuScreen... -
Page 74: Handling Data In Accuscreen
Select to insert a space. • Press to move the cursor left or right within the field. • When you have entered the data, press the button to confirm. This will take you to the next mandatory field. MADSEN AccuScreen... -
Page 75: Function Buttons
Press the button. If needed, do so repeatedly until the list is sorted according to the category that you wish to use. • Scroll to see more/next page/next patients in list • Test view – Press the button to see the patient’s test list. MADSEN AccuScreen... -
Page 76: General Buttons
If needed, the system administrator can set up AccuScreen to automatically delete data after data transfer to AccuLink. See the AccuLink User Manual. 10.4.1 Deleting one patient Delete Home 1. To delete one single patient, press the button on the screen. MADSEN AccuScreen... -
Page 77: Deleting By Date
All test results relating to this patient will be deleted. Home Home 4. Press the button to go to the screen. 10.4.2 Deleting by date Delete Home 1. To delete a group of patients by date, press the button on the screen. MADSEN AccuScreen... -
Page 78: Deleting All Patients
All test results relating to the selected group of patients will be deleted. 5. Press the Home button to go to the Home screen. 10.4.3 Deleting all patients Delete Home 1. To delete all patients, press the button on the screen. MADSEN AccuScreen... -
Page 79: Memory Full
10 oldest patient records, or to keep the data, e.g. if you wish to delete patients manu- ally or send data to AccuLink before deleting. New measurements will not be possible until you have deleted some patient data from AccuScreen. MADSEN AccuScreen... -
Page 80: Maintenance And Cleaning
Please remove the ear probe from the patient’s ear and separate the probe tip from the disposable eartip before cleaning. Caution • You should always comply with local hygiene standards. Hygienic precautions ► The probe tip – Remove the probe tip from the probe. MADSEN AccuScreen... -
Page 81: Cleaning The Probe Body
Even the slightest amount of moisture may dissolve any residual cerumen and contaminate the sensitive • parts in the body of the probe. – Use a moist tissue with alcohol for regular surface cleaning. Caution No part of the ear probe should be subjected to ultrasonic cleaning solutions or machines. • MADSEN AccuScreen... -
Page 82: Probe Calibration
A sterile alcohol wipe typically contains isopropyl alcohol 70%. It is important to have the disinfectant in contact with the surface for the time period specified by the disinfectant manufacturer to ensure its effectiveness. 11.3.2 Ear coupler cable calibration The MADSEN AccuScreen ear coupler cable is calibrated at the factory prior to delivery. MADSEN AccuScreen... -
Page 83: Cleaning Accuscreen
Cleaning and disinfecting the built-in test cavity If needed, use a tissue moistened with any of the recommended disinfectant agents described in section 11.4 to clean the entry surface of the test cavity. Caution Make sure that no liquid enters the test cavity. • MADSEN AccuScreen... -
Page 84: Battery Safety And Maintenance
The battery capacity will gradually degrade by many charging/discharging cycles and by ageing. We recommend that you replace the battery approximately every 12 to 18 months. The need for renewing the battery depends on the usage pattern and the battery capacity needed. MADSEN AccuScreen... -
Page 85: Disposal Of Old Batteries
Do not disassemble and do not dispose of in fire. Environmental protection • When the Li-Ion rechargeable battery loses its capacity to be charged, make sure that it is disposed of in accordance with local environmental regulations, or return it to your dealer. MADSEN AccuScreen... -
Page 86: App. 1 Standards And Safety
This requirement applies in the European Union. Do not dispose of these products as unsorted municipal waste. You can return your device and accessories to Natus, or to any Natus supplier. You can also contact your local authorities for advice on disposal. -
Page 87: App. 1.2 Accessory Symbols
This requirement applies in the European Union. Do not dispose of these products as unsorted municipal waste. You can return your device and accessories to Natus, or to any Natus supplier. You can also contact your local authorities for advice on disposal. - Page 88 • In the United States of America, Federal law restricts this device to sale by or on the order of a licensed physician. MADSEN AccuScreen...
-
Page 89: App. 1.5 Warning Notes - Docking Station
Following repair, a qualified electronics engineer should verify the safety of all equipment. Calibration should be performed annually by suitably qualified personnel using the appropriate equipment. App. 1.7.1 Declaration All devices of the type AccuScreen should be checked and calibrated annually through a service centre authorised by the manufacturer. MADSEN AccuScreen... -
Page 90: App. 1.8 Manufacturer
The electrical installation to which the equipment is connected complies with EN/IEC requirements. • The equipment is used in accordance with the instructions for use. The manufacturer reserves the right to disclaim all responsibility for the operating safety, reliability and performance of equipment serviced or repaired by other parties. MADSEN AccuScreen... -
Page 91: App. 2 Status And Error Messages
24 hours. device via the AccuLink software. The maximum number of • There is no memory space available • Delete patients and tests. patients is reached. Cannot for adding more patients or tests. generate new patient. MADSEN AccuScreen... - Page 92 AccuLink. Paper feed error • The labels are not adjusted correctly • Re-adjust the labels and remove in the label printer or there is a paper possible blocking of paper feed. jam. MADSEN AccuScreen...
-
Page 93: App. 3 Technical Specifications
Noise-weighted averaging, counting of significant signal peaks Stimulus: Non-linear click sequence Stimulus level: 75 dB(A) ± 5 dB in 2 cc coupler, self-calibration depending on ear canal volume Click rate: 67-76 clicks per second (randomised) Input filter: 1 to 4 kHz MADSEN AccuScreen... - Page 94 Pass/Clear Response Statistical graph, impedances, EEG-level and overall Refer/No Clear Response Electrodes: Disposable hydrogel electrodes App. 3.3 Device MADSEN AccuScreen is type 1077 from Natus. Dimensions Approx. 200 x 73 x 34 mm (7.9 x 2.9 x 1.3 inches) MADSEN AccuScreen...
- Page 95 IR data transmission to docking station - USB interface from docking station to Label printer: IR data transmission to docking station - RS232 interface from docking station to label printer Modem: IR data transmission to docking station - RS232 interface from docking station to modem MADSEN AccuScreen...
- Page 96 Warm-up time should be extended if MADSEN AccuScreen has been stored in a cold environment. Disposal MADSEN AccuScreen can be disposed of as normal electronic waste, according to WEEE and local regulations. Essential performance MADSEN AccuScreen has no essential performance.
- Page 97 Battery Caution • Use only rechargeable battery supplied by Natus, Part no. 8-73-02400. Use of any other battery may present a risk of fire or explosion. Battery type: Rechargeable Li-ion 3.7 V/1,800 mAh (6.7 Wh), fully charged App. 3.5...
- Page 98 4 sizes (3.7 - 5 mm) Silicone tree tip: 1 size (4 - 7 mm) Foam tip: 1 size (7 - 13 mm) App. 3.7 ABR electrode cable Type: AECS-01 from PATH Medical Gmbh Flexible, insulated cable. Approx. length: 140 cm/55 inches MADSEN AccuScreen...
- Page 99 App. 3 Technical Specifications App. 3.8 ABR ear coupler cable (optional) Type: BAST-01 from PATH Medical Gmbh Flexible, insulated cable. Approx. length: 145 cm/57 inches App. 3.9 Device class II a (according to Council Directive 93/42/EEC Appendix IX) MADSEN AccuScreen...
- Page 100 IEC 60601-1-2:2014 and EN 60601-1-2:2015 Guidance and manufacturer's declaration - electromagnetic emissions for all equipment and systems MADSEN AccuScreen is intended for use in the electromagnetic environment specified below. The user of MADSEN AccuScreen should ensure that it is used in such an environment.
- Page 101 Guidance and manufacturer's declaration - electromagnetic immunity - for equipment and systems within Professional Healthcare use environment MADSEN AccuScreen is intended for use in the electromagnetic environment specified below. The user of MADSEN AccuScreen should ensure that it is used in such an environment.
- Page 102 IEC 60601-1-2:2007 and EN 60601-1-2:2007 Guidance and manufacturer's declaration - electromagnetic emissions for all equipment and systems MADSEN AccuScreen is intended for use in the electromagnetic environment specified below. The user of MADSEN AccuScreen should ensure that it is used in such an environment.
- Page 103 Guidance and manufacturer's declaration - electromagnetic immunity - for equipment and systems that are NOT life-supporting MADSEN AccuScreen is intended for use in the electromagnetic environment specified below. The user of MADSEN AccuScreen should ensure that it is used in such an environment.
- Page 104 Recommended separation distances between portable and mobile RF communications equipment and MADSEN AccuScreen The MADSEN AccuScreen is intended for use in an electromagnetic environment in which radiated RF disturbances are controlled. The customer or the user of the MADSEN AccuScreen can help prevent electromagnetic interference by maintaining a minimum distance between portable and mobile RF communications equipment (transmitters) and the MADSEN AccuScreen as recommended below, according to the maximum output power of the communications equipment.
- Page 105 Battery rear view changing technical specifications charging from docking station top view disposal Display extending life error messages maintenance Display brightness operating time Disposal recharging device status eartips status symbols old battery MADSEN AccuScreen...
- Page 106 Electrodes probe calibration placing on patient probe tip Entering data Manufacturer Entering password Memory full Environment Messages on display preparing test Equipment preparation Error message New comment device related adding usage and test related MADSEN AccuScreen...
- Page 107 Safety symbols from Alpha OAE Screens from Alpha OAE+ Home menu types of printout Selecting user Probe Service life body increasing cable Settings cleaning tip brightness connecting to AccuScreen language connecting to Alpha OAE+ performing probe test fitting eartip MADSEN AccuScreen...
- Page 108 ABR procedure adding comments DPOAE procedure options in screens prepare probe for quick quick test ready to TEOAE procedure TEOAE results test view Test cavity cleaning Test environment Test result DPOAE TEOAE Test View screen Testing preparing for MADSEN AccuScreen...
Need help?
Do you have a question about the Madsen AccuScreen and is the answer not in the manual?
Questions and answers