
Subscribe to Our Youtube Channel
Related Manuals for natus Otometrics Madsen Alpha OAE+


Summary of Contents for natus Otometrics Madsen Alpha OAE+
- Page 1 MADSEN Alpha OAE+ Screener User Manual Doc. No. 7-50-1360-US/06 Part No. 7-50-13600-US...
- Page 2 Copyright notice © 2014, 2018 Natus Medical Denmark ApS. All rights reserved. ® Otometrics, the Otometrics Icon, AURICAL, MADSEN, Otoscan, ICS and HORTMANN are registered trademarks of Natus Medical Denmark ApS in the U.S.A. and/or other countries. Version release date 12-06-2018 (204006) Technical support Please contact your supplier.
-
Page 3: Table Of Contents
Table of Contents Introduction Brief description The docking station Printing Intended Use Physical operating principle About this manual Typographical conventions 1.7.1 Navigating this manual Unpacking and Installation Unpacking Overview of Alpha OAE+ 2.2.1 Front and rear of Alpha OAE+ 2.2.2 Top and bottom of MADSEN Alpha OAE+ 2.2.3 The docking station 2.2.4 Display 2.2.5 Ear probe... - Page 4 Testing with Alpha OAE+ Selecting Child Mode Ready to test The DPOAE test 5.3.1 DPOAE test protocols 5.3.2 Starting the test 5.3.3 The DPOAE test 5.3.4 DPOAE test results The TEOAE test 5.4.1 TEOAE test protocol 5.4.2 Starting the test 5.4.3 The TEOAE test 5.4.4 TEOAE test results Options in the test result screens...
- Page 5 10 Maintenance and Cleaning 10.1 The probe tip and probe body 10.1.1 Cleaning and disinfecting the probe tip 10.1.2 Cleaning the probe body 10.1.3 Probe calibration 10.2 Eartips 10.3 Cleaning Alpha OAE+ 10.3.1 Cleaning and disinfecting the built-in test cavity 10.4 Battery safety and maintenance 10.4.1 Safety information 10.4.2 Increasing service life...
-
Page 6: Introduction
1 Introduction Introduction Brief description Note This manual is your guide to the use and maintenance of Alpha OAE+. We strongly • recommend that you read it carefully before using Alpha OAE+ for the first time. We also recommend that you take particular note of the cleaning and maintenance instructions. Failure to use and maintain Alpha OAE+ correctly may void your warranty. -
Page 7: Physical Operating Principle
OAE configuration. Important • Natus Medical Denmark ApS does not guarantee the accuracy of the test results or the tests themselves, if accessories other than those supplied by Natus Medical Denmark ApS are used for this device (i.e. eartips). Physical operating principle Alpha OAE+ uses DPOAE (Distortion Product Otoacoustic Emissions) and TEOAE (Transiently Evoked Otoacoustic Emis- sions) technologies. -
Page 8: Typographical Conventions
1 Introduction Training It is recommended that you read this manual before you start operating Alpha OAE+ so that you become familiar with the device before testing on a client. To obtain a free printed copy of the user documentation, contact Otometrics (www.otometrics.com). Maintenance and cleaning For instructions on how and when to clean Alpha OAE+ and accessories, please see Maintenance and Cleaning... -
Page 9: Unpacking And Installation
2 Unpacking and Installation Unpacking and Installation Unpacking 1. Unpack the device carefully. When you unpack the device and accessories, it is a good idea to keep the packing material in which they were delivered. If you need to send the device in for service, the original packing material will protect against damage dur- ing transport, etc. -
Page 10: Top And Bottom Of Madsen Alpha Oae
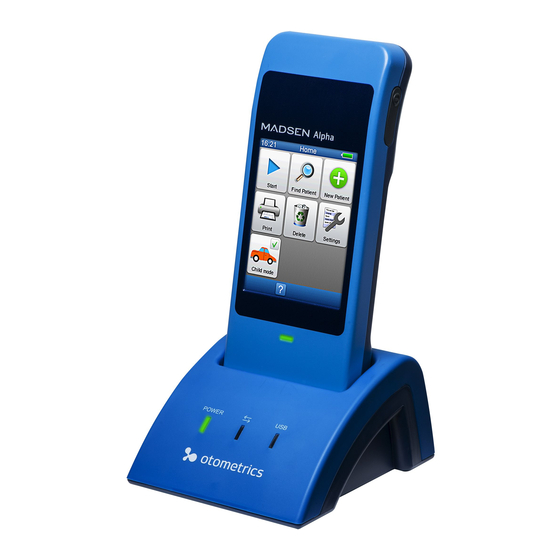
2 Unpacking and Installation 2.2.2 Top and bottom of MADSEN Alpha OAE+ Bottom A. Probe socket B. Docking Station connectors 2.2.3 The docking station Front indicators POWER Lit when power is supplied to the docking station. Lit when data is being transferred as follows: •... - Page 11 2 Unpacking and Installation Rear sockets PC/USB Socket for USB connection to the PC Printer/Modem Socket for printer/modem connection Socket for power adapter Otometrics - MADSEN Alpha OAE+...
-
Page 12: Display
2 Unpacking and Installation 2.2.4 Display The display is a touch-screen display, where the icons and fields shown serve as buttons. • Touch the buttons to activate a function. Caution Never use any type of sharp instrument on the display. If you do, reliable operation of Alpha OAE+ can no •... -
Page 13: Powering
2 Unpacking and Installation We recommend placing Alpha OAE+ in the docking station and charging the battery fully before use. See Charging the battery from the docking station ► 2. Turn on Alpha OAE+. See Switch on Alpha OAE+ ► ►... -
Page 14: Battery Status
2 Unpacking and Installation 2. If needed, remove the battery. 3. Place a new, charged battery in the compartment. – Hold the battery so that the arrow with the text “Insert this direction” points downwards towards the bottom of the compartment. 4. -
Page 15: Powering The Docking Station
2 Unpacking and Installation If the necessary minimum voltage should drop, Alpha OAE+ switches off automatically. Recharge or change the battery as soon as possible. 2.5.4 Powering the docking station The Alpha OAE+ docking station is powered through an adapter from the mains outlet. Warning In order to comply with the safety requirements for a medical device system, connection to the docking sta- •... -
Page 16: Charging The Battery With The External Charger
Charging the battery with the external charger Caution • Use only the charger supplied by Natus Medical Denmark ApS. The battery for Alpha OAE+ can be charged by an external charger (optional accessory). See the charger manufacturer’s documentation for specifications and instructions for use. -
Page 17: Getting Started With Alpha Oae
3 Getting Started with Alpha OAE+ Getting Started with Alpha OAE+ In the following, you will find quick instructions for how to use Alpha OAE+: • Switching on Alpha OAE+ • Adding new patients • Finding patients • Editing patient data You will find detailed instructions for preparing and testing in: ►... -
Page 18: The Home Menu
3 Getting Started with Alpha OAE+ Navigating the screens in Alpha OAE+ The screens in Alpha OAE+ are usually divided into 3 or 4 main areas: A. The title bar, showing – the time – the screen title – the battery status B. -
Page 19: Patient Handling In Alpha Oae
3 Getting Started with Alpha OAE+ ► • Printing ► • Deleting data • Alpha OAE+ settings ► • Selecting Child Mode ► Patient handling in Alpha OAE+ Note Quick Start By using the button, you can perform a test without adding or finding a patient first. •... -
Page 20: Finding A Patient
3 Getting Started with Alpha OAE+ Regular data entry screens In most of the screens, simply use the keypad to enter data. For more information, see Using the keypad ► • screen First Name • screen • Last Name screen Special data entry screens Screens with special data entry features are described in the following. -
Page 21: Editing Patient Data
3 Getting Started with Alpha OAE+ 4. Press the button to start the search. The search will produce a list of patients matching the search criteria. 5. Press the button showing the name of the patient you wish to select. Patient Details screen is shown. -
Page 22: Preparing For Testing
4 Preparing for testing Preparing for testing Preparing Alpha OAE+ • Follow the instructions in Getting Started with Alpha OAE+ ► • Testing with Alpha OAE+ ► on how to proceed with the specific tests. Preparing the equipment Every day before you start testing on patients, you should test the probe to make sure that it functions correctly. See ►... -
Page 23: Preparing The Test Environment
4 Preparing for testing When disconnecting the plug, do not twist it. Instead, hold the sleeve of the plug and release it by pulling it straight out of the socket. The probe will not be released if you pull anywhere else than on the sleeve of the plug. Preparing the test environment Physical environment •... -
Page 24: Fitting The Eartip On The Probe
4 Preparing for testing 4.4.1 Fitting the eartip on the probe 1. Select an eartip that fits the patient's ear canal. You may have to try out a number of sizes in order to select the appro- priate size. 2. Gently push the eartip onto the probe tip until it rests firmly against the base of the probe. It is much easier to attach and remove the eartip if you turn it gently. - Page 25 4 Preparing for testing Note Make sure that the cable is not in contact with any vibrating surfaces during testing. • Warning In case of ear or ear canal trauma, don’t start any measurements. • Otometrics - MADSEN Alpha OAE+...
-
Page 26: Testing With Alpha Oae
5 Testing with Alpha OAE+ Testing with Alpha OAE+ Before you begin to test: 1. Decide on which ear you wish to perform the test. 2. Do as described in Preparing for testing ► Selecting Child Mode On the Home screen, you can select Child Mode to display a child-friendly screen dur- ing testing. -
Page 27: The Dpoae Test
5 Testing with Alpha OAE+ Starting a test without selecting a patient first Quick Start Home 1. Press the button on the screen. Test Menu 2. The screen is displayed. 3. See the test descriptions in The TEOAE test ► The DPOAE test ►... - Page 28 5 Testing with Alpha OAE+ Protocol 1 and Protocol 2 6 kHz 5 kHz 4 kHz 3.5 kHz 3 kHz 2.5 kHz Minimum DP amplitude equals -5 dB. Pass/Clear Response PASS result requires that 4 of the 6 frequencies receive a result.
-
Page 29: Starting The Test
5 Testing with Alpha OAE+ Protocol 7 5 kHz 4 kHz 3 kHz 2 kHz Minimum DP amplitude equals -10 dB. Pass/Clear Response Pass/Clear Response Protocol 7: a result requires that 3 of the 4 frequencies receive a result. The test stops automatically if 3 frequencies reach a Pass/Clear Response result or 2 frequencies receive a... -
Page 30: The Dpoae Test
5 Testing with Alpha OAE+ Speaker test The calibration is followed by a speaker test to make sure that the two speakers func- tion correctly. The test starts automatically when calibration is completed. “Incomplete” message Incomplete If the message appears: •... -
Page 31: Dpoae Test Results
5 Testing with Alpha OAE+ Child Mode Test details is not activated, a bar chart is displayed. See the table below for a description of the bar chart and other data displayed. Stop • If needed, press the button to stop the test. The test will be saved as an incomplete test. - Page 32 5 Testing with Alpha OAE+ Test result If Child Mode is not activated, the screen is displayed immediately after the test is completed. ► Options in the test result screens for a description of the buttons available. Pass/Clear Response Pass/Clear Response A single frequency is determined by a statistical algorithm based on weighted averaging, which ensures high-sensitivity detection.
- Page 33 5 Testing with Alpha OAE+ Inconclusive test If it is not possible to achieve a Pass result and: Manual 1. the patient has a large ear canal volume and the test was started with the Start (double-arrow) button after a failed calibration, 2.
-
Page 34: The Teoae Test
5 Testing with Alpha OAE+ The TEOAE test 5.4.1 TEOAE test protocol Protocol 8 measures non-linear TEOAE. The frequency range for the test signal is approximately 1 kHz to 4 kHz. Pass/Clear Response result requires detection of 8 peaks in the range 6 ms to 12 ms of the response. 5.4.2 Starting the test 1. -
Page 35: The Teoae Test
5 Testing with Alpha OAE+ 5.4.3 The TEOAE test Child Mode is activated, an animated car is displayed on the screen during testing. (See Selecting Child Mode ► 26.) The progress bar under the animated picture is green if the test conditions are good and it is red if there is too much noise. -
Page 36: Teoae Test Results
5 Testing with Alpha OAE+ Test details Peak counter The test must register a total of at least 8 valid peaks in alternating directions (counted both above and below the median line) in order to lead to a Pass/Clear Response Noise Noise Noise... - Page 37 5 Testing with Alpha OAE+ Pass/Clear Response If the result is a Pass/Clear Response , just the graph is shown. • Pass/Clear Response result indicates that the patient has normal outer hair cell function in the area corresponding to the test signal. •...
-
Page 38: Options In The Test Result Screens
5 Testing with Alpha OAE+ Note Retro-cochlear hearing loss cannot be detected by TEOAE testing. • Inconclusive test If it is not possible to achieve a Pass result and: 1. the patient has a large ear canal volume and the test was started with the Manual Start (double-arrow) button after a failed calibration,... -
Page 39: Adding Comments To A Test
5 Testing with Alpha OAE+ Test result options Start If you wish to repeat the test, press the Start button. Test Menu Press to return to the , so that you can test the other ear or continue with another type of test. 1. -
Page 40: Continuing Testing On The Other Ear
5 Testing with Alpha OAE+ 1. To view a comment, press the View Comments button. Comment This will take you to the screen. If comments have already been added to a test, they are listed here. Continuing testing on the other ear 1. -
Page 41: Viewing A Patients Test Record
5 Testing with Alpha OAE+ Print Results To print results: Print 1. Press the button. You can choose to print the best result for each test, or to print selected tests. You can also choose whether to print the report with a PC that has the MADSEN Alpha OAE+ printing tool installed, or with a label printer. -
Page 42: The Test View Screen
5 Testing with Alpha OAE+ 5.11 The Test View screen Test View screen shows the tests that have been made on a particular patient. The tests are listed according to date, with the most recent tests at the top of the list. 1. -
Page 43: Quick Start Tests
6 Quick Start tests Quick Start tests Quick Start You can press the button to start a test without selecting a patient beforehand. You can print or save the res- ults after performing the test, or just delete the test. Performing a Quick Start test ►... - Page 44 6 Quick Start tests You can now choose to save, print or delete the results. Save Results To assign results to an existing patient: Find Patient 1. Click the button, and then select the relevant patient from the Patient List. 2.
- Page 45 6 Quick Start tests Delete Results If you do not want to save the results of a Quick Start test to a patient, you must delete the results. Delete • Press the button to delete the results. Otometrics - MADSEN Alpha OAE+...
-
Page 46: Printing
7 Printing Printing Depending on your configuration, you can print complete results from Alpha OAE+ using a docking station connected to a PC with a printer, or using a label printer connected to the docking station. Printing from Alpha OAE+ Warning Before you make any printouts, make sure that the patient is not in contact with Alpha OAE+ by removing •... - Page 47 7 Printing Selecting the patient Print Home 1. Switch on Alpha OAE+ and press the button on the screen. Print This will take you to the list. 2. Press the button showing the name of the patient you wish to select. If needed, Finding a patient ►...
-
Page 48: Printouts From Label Printer
7 Printing Printing selected tests If you press the button or the Print button under Print selected tests , the Test View screen appears. Print 1. Press the button next to each test that you want to select 2. When you have selected all of the tests that you want to print, press the but- ton. - Page 49 7 Printing Pass/Clear Response Refer/No Clear Response Legend Legend • Left ear • Right ear • Pass • Refer • Inconclusive due to Noise Otometrics - MADSEN Alpha OAE+...
-
Page 50: Alpha Oae+ Settings
8 Alpha OAE+ settings Alpha OAE+ settings Settings You can configure your Alpha OAE+ from the Alpha OAE+ menu. Alpha OAE+ From the Alpha OAE+ Settings menu you can: • test the probe • select which protocols to include in the test menu •... -
Page 51: Performing The Probe Test
8 Alpha OAE+ settings 8.2.1 Performing the probe test 1. Insert the probe tip without eartip in the test cavity. The test starts automatically. Note The probe test does not start automatically e.g. when a patient is being • created. Probe OK If the probe functions correctly, the message appears. -
Page 52: From The Settings Menu
8 Alpha OAE+ settings 8.2.2 From the Settings menu 1. Insert the probe tip without eartip in the test cavity on the device, or in an external test cavity. Probe Test Settings 2. Press the button on the screen. ► 3. -
Page 53: Time And Date Setting
8 Alpha OAE+ settings Delete old tests option determines what happens after 500 tests have been stored and the memory on Alpha OAE+ is full. Delete old tests If you select the check box, then the oldest test will automatically be deleted to make room for the newest test. -
Page 54: Language Setting
8 Alpha OAE+ settings Date format – Select from the list how the date setting is to be shown on the screen. Time format – Select from the list how the time setting is to be shown on the screen. Language setting 1. -
Page 55: Sound Setting
8 Alpha OAE+ settings Sound setting Sound Settings 1. Press the button on the screen. You can switch sounds on/off for button strokes and test results by pressing the rel- evant button. Sound on Key click – Pressing a button will produce a sound (a click) Result sound –... -
Page 56: System Info
8 Alpha OAE+ settings System Info System Info Settings 1. Press the button on the screen to view information regard- ing: – Firmware release – HW version and Serial number – Next Alpha OAE+ service date – Connected probe – Next service date for the connected probe –... -
Page 57: Handling Data In Alpha Oae
9 Handling Data in Alpha OAE+ Handling Data in Alpha OAE+ Entering data in Alpha OAE+ 9.1.1 Using the keypad To enter or edit data, select the characters and/or digits from the keypad. Data entry functions • To enter an upper case character, press the Shift arrow. -
Page 58: Function Buttons
9 Handling Data in Alpha OAE+ Function buttons In Alpha OAE+ you can perform a number of functions, such as finding patients, view- ing patients’ test histories, scrolling in lists, etc. Available functions are shown in the function bar of the Alpha OAE+ screens. These functions vary from screen to screen. -
Page 59: General Buttons
9 Handling Data in Alpha OAE+ General buttons Available main functions are shown in the footer bar of the Alpha OAE+ screens. • To perform these functions, simply press the relevant button. General buttons • Return to previous screen • Help •... -
Page 60: Deleting One Test
9 Handling Data in Alpha OAE+ Delete This takes you to the menu. Single Patient 2. Press the button. Delete Patient This takes you to the screen to select the name of the patient you wish to delete from the list. 3. -
Page 61: Deleting All Patients
9 Handling Data in Alpha OAE+ Home 5. When you have deleted all the tests you wish to delete, press the button Home to go to the screen. 9.4.3 Deleting all patients Delete Home 1. To delete all patients, press the button on the screen. -
Page 62: Maintenance And Cleaning
10 Maintenance and Cleaning Maintenance and Cleaning 10.1 The probe tip and probe body Be sure to follow any established infection control procedures for the setting in which you are working. Warning Never place the probe tip in the ear canal without using a clean eartip. •... -
Page 63: Cleaning The Probe Body
10 Maintenance and Cleaning – Use the cleaning wire to clean the sound channels of the probe tip from the rear. Note Remember to clean the cleaning wire when it protrudes from the probe • tip. When you have finished using the cleaning wire, then remember to disinfect the clean- ing wire in accordance with local procedures. -
Page 64: Probe Calibration
10 Maintenance and Cleaning 10.1.3 Probe calibration The Alpha OAE+ probe is calibrated at the factory prior to delivery. This is why there may not be a full year to the next cal- ibration date stated on the calibration certificate when you receive Alpha OAE+. The first time you connect the probe to Alpha OAE+ and perform a test, the calibration date will be set so that there is one year to the next calibration. -
Page 65: Cleaning And Disinfecting The Built-In Test Cavity
10 Maintenance and Cleaning Caution Never immerse Alpha OAE+ into water or other cleaning solutions. • Caution Use of cleaning agents other than those recommended in the user manual can cause damage to the device • (for example, stress cracks in molded plastic). 10.3.1 Cleaning and disinfecting the built-in test cavity If needed, use a tissue moistened with any of the recommended disinfectant agents described in section 10.3 to clean the... -
Page 66: Increasing Service Life
10 Maintenance and Cleaning 10.4.2 Increasing service life ► • Use only the battery type, docking station and charger stated in Power supply and battery 1077 docking station ► • Charge the battery at room temperature whenever possible. • Do not drop the battery or expose it to sharp impact. •... -
Page 67: App. 1 Standards And Safety
App. 1 Standards and Safety App. 1 Standards and Safety This manual contains information and warnings that must be followed to ensure safe performance of Alpha OAE+. Local government rules and regulations, if applicable, should be followed at all times. App. -
Page 68: App. 1.3 Docking Station Symbols
App. 1 Standards and Safety App. 1.3 Docking station symbols Symbol Definition Follow instructions for use. Suitable for direct current only. Complies with Medical Devices Directive 93/42/EEC and RoHS Directive (2011/65/EC). Electronic equipment covered by the Directive 2002/96/EC on waste electrical and electronic equipment (WEEE). -
Page 69: App. 1.5 Warning Notes - Docking Station
App. 1 Standards and Safety • We recommend that the device should not be stacked with other equipment or placed in a poorly ventilated space as this may affect the performance of the device. If it is stacked or placed adjacent to other equipment, make sure that the operation of the device is not affected. -
Page 70: App. 1.7.1 Declaration
Declaration All devices of the type Alpha OAE+ should be checked and calibrated annually through a service center authorized by the manufacturer. App. 1.8 Manufacturer Natus Medical Denmark ApS Hoerskaetten 9, 2630 Taastrup Denmark +45 45 75 55 55 www.otometrics.com App. 1.8.1... -
Page 71: App. 2 Status And Error Messages
App. 2 Status and Error Messages App. 2 Status and Error Messages App. 2.1 Device related messages Error message Cause Solution • The battery charge is low. • Recharge Alpha OAE+ or replace the battery with a spare. Low battery voltage Set- The real time clock data is invalid. - Page 72 App. 2 Status and Error Messages Error message Cause Solution Stimulus high • The probe has a poor fit in the • Try to refit the probe. ear canal. • The probe is not in the ear canal. Stimulus low •...
-
Page 73: App. 3 Technical Specifications
App. 3 Technical Specifications App. 3 Technical Specifications App. 3.1 Accessories Standard accessories and optional accessories may vary from country to country - please consult your local distributor. Standard accessories Carrying case Docking station, including power adapter and USB cable Starter kit (includes ear tips, probe tips, and probe tip cleaning tool) Probe (Cable Approx. -
Page 74: App. 3.3 Device
SNR: 6 - 8 dB Minimum Amplitude: - 5 dB App. 3.3 Device MADSEN Alpha OAE+ is type 1077 from Natus Medical Denmark ApS. Dimensions Approx. 200 x 73 x 34 mm (7.9 x 2.9 x 1.3 inches) Weight Approx. 240 g (8.5 oz) excluding battery 280 g (9.9 oz) including battery... - Page 75 App. 3 Technical Specifications Real time clock Integrated real time clock for time-stamping of measurements. The clock is automatically synchronized with PC clock when docked. Accuracy: Max. deviation 12 minutes/year Backup: Min. 7 days, when battery is removed from unit Data interfaces IR data transmission to docking station - USB interface from docking station to Label printer:...
-
Page 76: App. 3.4 Power Supply And Battery
80% charged: 4½ hours tion: Battery Caution Use only rechargeable battery supplied by Natus Medical Denmark ApS, Part no. 8-73-02400. Use of any • other battery may present a risk of fire or explosion. Battery type: Rechargeable Li-ion 3.7 V/1800 mAh (6.7 Wh), fully charged App. -
Page 77: App. 3.6 Oae Probe
App. 3 Technical Specifications Printer/modem interface Interface type: RS232 Connector type: 6-pol Mini Din DC power input Input voltage: 5 V DC ±5% Max. power consumption when Alpha 5 VA (5 V, 1.0 A) OAE+ is docked: Max. power consumption when Alpha 0.25 VA (5 V, 50 mA) OAE+ is not docked: Power adapter... -
Page 78: App. 3.7 Device Class
App. 3 Technical Specifications Foam tip: Small, 11 mm, Orange Medium, 12 mm, Orange Large, 14 mm. Orange App. 3.7 Device class II a (according to Council Directive 93/42/EEC Appendix IX) Otometrics - MADSEN Alpha OAE+... -
Page 79: App. 3.8 Notes On Emc (Electromagnetic Compatibility)
App. 3 Technical Specifications App. 3.8 Notes on EMC (Electromagnetic Compatibility) • MADSEN Alpha OAE+ is part of a medical electrical system and is thus subject to special safety precautions. For this reason, the installation and operating instructions provided in this document should be followed closely. •... - Page 80 App. 3 Technical Specifications Voltage dips, short inter- 0 % U ; 0.5 cycle 0 % U ; 0.5 cycle Mains power quality should be that of a typical com- ruptions and voltage vari- At 0°, 45°, 90°, 135°, 180°, 225°, 270° At 0°, 45°, 90°, 135°, 180°, 225°, 270°...
- Page 81 App. 3 Technical Specifications IEC 60601-1-2:2007 and EN 60601-1-2:2007 Guidance and manufacturer's declaration - electromagnetic emissions for all equipment and systems MADSEN Alpha OAE+ is intended for use in the electromagnetic environment specified below. The user of MADSEN Alpha OAE+ should ensure that it is used in such an environment.
- Page 82 App. 3 Technical Specifications Guidance and manufacturer's declaration - electromagnetic immunity - for equipment and systems that are NOT life-supporting MADSEN Alpha OAE+ is intended for use in the electromagnetic environment specified below. The user of MADSEN Alpha OAE+ should ensure that it is used in such an environment.
- Page 83 App. 3 Technical Specifications Recommended separation distances between portable and mobile RF communications equipment and MADSEN Alpha OAE+ The MADSEN Alpha OAE+ is intended for use in an electromagnetic environment in which radiated RF disturbances are controlled. The customer or the user of the MADSEN Alpha OAE+ can help prevent electromagnetic interference by maintaining a minimum distance between portable and mobile RF communications equipment (transmitters) and the MADSEN Alpha OAE+ as recommended below, according to the maximum output power of the communications equipment.
-
Page 84: Index
Index Index Data deleting patient data Accessory symbols Data entry with the keypad Adding new patient Delete a test After-sales service Delete all patients Alpha OAE+ Deleting a patient printing Device starting bottom view AlphaOAE+ cleaning switch on front view Assembling the device preparing for testing Automatic power off... - Page 85 Index Editing patient data Entering data Patient Environment preparing preparing test Patient data Equipment preparation deleting Error message editing device related Patient handling usage and test related adding new patient editing patient data finding a patient Finding a patient Pinna Function buttons Power power off automatic...
- Page 86 Index Remove prepare probe for battery ready to patient TEOAE procedure test TEOAE results Repair test view Results without patient selected test view Test cavity cleaning Test environment Safety information Test result Safety symbols DPOAE Screens TEOAE Home menu Test View Service life screen increasing...
Need help?
Do you have a question about the Otometrics Madsen Alpha OAE+ and is the answer not in the manual?
Questions and answers