Table of Contents
Advertisement
Quick Links
Advertisement
Table of Contents

Related Manuals for THORLABS EDU-OT2


Summary of Contents for THORLABS EDU-OT2
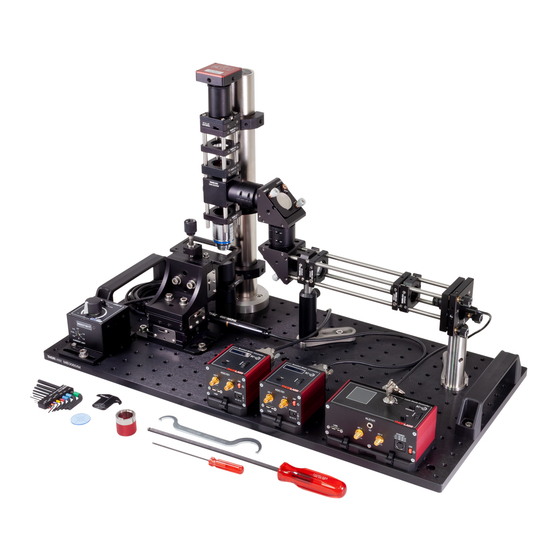
- Page 1 EDU-OT2 EDU-OT2/M Portable Optical Tweezers User Guide...
-
Page 2: Table Of Contents
Portable Optical Tweezers Kit Table of Contents Chapter 1 Warning Symbol Definitions ............1 Chapter 2 Safety .................... 2 Chapter 3 Product Description ..............3 Chapter 4 Principles of Optical Tweezers ........... 5 4.1. Dipole Approach in the Rayleigh Scattering Regime R << .. - Page 3 Brownian Motion ..................69 7.5.2. The Maximum Holding Force ..............71 Chapter 8 Teaching Tips ................73 Chapter 9 Control via Game Controller ............ 81 Chapter 10 Troubleshooting ................ 84 Chapter 11 Regulatory .................. 86 Chapter 12 Thorlabs Worldwide Contacts ..........87...
-
Page 4: Chapter 1 Warning Symbol Definitions
Portable Optical Tweezers Kit Chapter 1: Warning Symbol Definitions Chapter 1 Warning Symbol Definitions Below is a list of warning symbols you may encounter in this manual or on your device. Symbol Description Direct Current Alternating Current Both Direct and Alternating Current Earth Ground Terminal Protective Conductor Terminal Frame or Chassis Terminal... -
Page 5: Chapter 2 Safety
Portable Optical Tweezers Kit Chapter 2: Safety Chapter 2 Safety Warning The class 3B laser diode used in this kit can emit more than 50 mW of optical power, which can cause damage to the eyes if viewed directly. The laser driver is equipped with a key switch and safety interlock, which should be used appropriately to avoid injury. -
Page 6: Chapter 3 Product Description
Portable Optical Tweezers Kit Chapter 3: Product Description Chapter 3 Product Description For many people, moving and controlling objects with a beam of light sounds more like the “tractor beams” of science fiction than reality. However, optical tweezers are devices that allow precisely that kind of manipulation. - Page 7 Portable Optical Tweezers Kit Chapter 3: Product Description Camera Microscope Beam Path Laser Beam Path Laser Sample Position The light path through the optical tweezers experiment. Page 4 MTN012639-D02...
-
Page 8: Chapter 4 Principles Of Optical Tweezers
Portable Optical Tweezers Kit Chapter 4: Principles of Optical Tweezers Chapter 4 Principles of Optical Tweezers To describe the function of optical tweezers, we will examine the force that a focused laser beam with a Gaussian intensity profile (the TEM mode) exerts on an object, which is near or in the focus. - Page 9 Portable Optical Tweezers Kit Chapter 4: Principles of Optical Tweezers �� ⃗ ⃗ ∑ �� = �� ⋅ �� ⋅ �� = �� ⋅ �� ⋅ �� �� �� �� where �� is the electrical susceptibility, �� is the electrical constant, and �� is the volume of the bead.
-
Page 10: Geometrical Optics Approach In The Mie Regime R
Portable Optical Tweezers Kit Chapter 4: Principles of Optical Tweezers Here, �� is the speed of light in vacuum and �� is the incident intensity and �� is the scattering cross-section of the incident light. It is important to note that the scattering force is proportional to the intensity and points in the beam direction. - Page 11 Portable Optical Tweezers Kit Chapter 4: Principles of Optical Tweezers Reflection and Transmission of an Incident Partial Beam on the Inside and Outside Surfaces of a Sample Bead with a Refractive Index Higher than the Immersion Medium Inside the sphere, the beam is reflected and transmitted numerous times. Part of the beam is repeatedly reflected on the sphere's internal wall and remains in the sphere, while the rest exits the sphere again through transmission.
- Page 12 Portable Optical Tweezers Kit Chapter 4: Principles of Optical Tweezers �� 2�� − 2�� + �� 2�� �� (16) �� = �� 2�� − �� �� 1 + �� + 2�� 2�� �� �� Here, �� is the angle at which the first transmitted beam is refracted toward the normal (see Figure 2).
- Page 13 Portable Optical Tweezers Kit Chapter 4: Principles of Optical Tweezers Figure 3 shows the values of the two �� −factors, depending upon the angle of incidence �� when the focus is located slightly above the surface of the sphere. One can see here �� ��...
- Page 14 Portable Optical Tweezers Kit Chapter 4: Principles of Optical Tweezers So far, the force was given as a function of �� which now has to be expressed in terms of �� and ��. Figure 5 shows a partial beam incident on the sphere with angle �� from the side. The following statements hold true: (19) ��...
- Page 15 Portable Optical Tweezers Kit Chapter 4: Principles of Optical Tweezers Next, the forces need to be summed. For that, we start by observing Figure 6. A partial beam with distance �� to the symmetry axis of the whole beam falls on the sphere under an angle ��.
- Page 16 Portable Optical Tweezers Kit Chapter 4: Principles of Optical Tweezers The total force �� is the sum of the total scattering force �� and the total gradient force ������ ��,������ �� , where ��,������ �� 2�� ������ �� = ∫ ∫ �� ∙...
- Page 17 Portable Optical Tweezers Kit Chapter 4: Principles of Optical Tweezers When the focus is below the sphere’s center, i.e. ��/�� ≤ 0, scattering and gradient force act in the same direction. When the focus is above the sphere’s center, i.e. ��/�� ≥ 0, both forces point in opposite directions. We also note that the absolute value of the gradient force is always higher than the absolute value of the scattering force.
- Page 18 Portable Optical Tweezers Kit Chapter 4: Principles of Optical Tweezers Influence of the Numerical Aperture As we have seen above, the angle of incidence of the partial rays plays a crucial role in optical tweezing. The angle is defined by the numerical aperture of the objective: the numerical aperture (����) describes the acceptance cone of an objective and is given by ����...
- Page 19 Portable Optical Tweezers Kit Chapter 4: Principles of Optical Tweezers Influence of the Laser Power While the numerical aperture affects the ratio of gradient and scattering force, the laser power directly influences the individual forces. In Equations (13) �� �������� ��...
-
Page 20: Chapter 5 Kit Components
Portable Optical Tweezers Kit Chapter 5: Kit Components Chapter 5 Kit Components In cases where the metric and imperial kits contain parts with different item numbers, metric part numbers and measurements are indicated by parentheses unless otherwise noted. 5.1. Trapping Laser Source 1 x SR9A-DB9 1 x LTN330-A ESD Protection and Strain... -
Page 21: Beam Expander
Portable Optical Tweezers Kit Chapter 5: Kit Components 5.2. Beam Expander 2 x ER1 2 x ER3 2 x ER10 Ø6 mm Cage Assembly Ø6 mm Cage Assembly Ø6 mm Cage Assembly Rod, 1" Long Rod, 3" Long Rod, 10" Long 2 x ER6 Ø6 mm Cage Assembly 4 x CP09(/M) -
Page 22: Right-Angle Mirrors
Portable Optical Tweezers Kit Chapter 5: Kit Components 5.3. Right-Angle Mirrors 2 x SM1L05 2 x PF10-03-P01 2 x KCB1(/M) Ø1" Lens Tube, 0.5" Ø1" Protected Silver Right-Angle Kinematic Long Mirror Mirror Mount, 30 mm Cage Compatible 2 x SM1L10 2 x SM1CPL10 Ø1"... -
Page 23: Sample Positioning System
Portable Optical Tweezers Kit Chapter 5: Kit Components 5.4. Sample Positioning System 2 x MT1(/M)-Z8 1 x MT1B(/M) Motorized Translation Manual Translation Stage, 2 x KDC101 Stage, 1/2" (12 mm) 1/2" (13 mm) Travel K-Cube DC Servo Motor Travel Module 1 x MT401(/M) Mounting Base for 1 x MT402... -
Page 24: Microscope
Portable Optical Tweezers Kit Chapter 5: Kit Components 5.5. Microscope 1 x SM1L15 1 x DCC1645C Ø1" Lens Tube, 1.5" Long 2 x SM1T2 High-Resolution CMOS Ø1" Lens Tube Coupler Camera 2 x FGB37 Ø25 mm BG40 Colored Glass Bandpass Filter, 1 x SPT1(/M) 4 x CP02(/M) 335 –... - Page 25 Portable Optical Tweezers Kit Chapter 5: Kit Components 1 x SM1A17 1 x SM1CP2 1 x Zeiss Microscope Adapter with External SM1 End Cap Objective SM1 Threads and Internal 63X, 0.8 NA M27 x 0.75 Threads 4 x ER05 4 x ER1.5 4 x ER3 Ø6 mm Cage Assembly Ø6 mm Cage Assembly...
-
Page 26: Additional Components
Portable Optical Tweezers Kit Chapter 5: Kit Components 5.6. Additional Components 1 x RDF1 1 x MB1224 (MB3060/M) 1 x CPA1 Rubber Dampening Aluminum Breadboard, 30 mm Cage System Breadboard Feet 12" x 24" x 1/2" Alignment Plate with (300 mm x 600 mm x 12.7 mm) Ø1 mm Aperture 1 x BBH1 Breadboard Handles... -
Page 27: Screws Included
Portable Optical Tweezers Kit Chapter 5: Kit Components 5.7. Screws Included Imperial Kit Type Qty. Type Qty. 1/4"-20 Cap Screw, 0.315" Long 8-32 Cap Screw, 3/8" Long 1/4"-20 Cap Screw, 3/8" Long 8-32 Cap Screw, 1/2" Long 1/4"-20 Cap Screw, 1/2" Long #8 Washer 1/4"-20 Cap Screw, 5/8"... -
Page 28: Chapter 6 Setup And Adjustment
Portable Optical Tweezers Kit Chapter 6: Setup and Adjustment Chapter 6 Setup and Adjustment 6.1. Assembly The tweezers will be set up on an MB1224 (MB3060/M) breadboard. Set everything up on a stable desk or table without any sources of vibration nearby. Further damping, such as using an isolated optical table, is not necessary. -
Page 29: Trapping Laser Source
Portable Optical Tweezers Kit Chapter 6: Setup and Adjustment 6.1.1. Trapping Laser Source Figure 11 shows the components that are necessary for setting up the laser source. Laser Source Components First, screw the 8-32, 1/2" long (M4 x 12 mm) setscrew into the RS3.5P8E (RS3.5P4M). - Page 30 Portable Optical Tweezers Kit Chapter 6: Setup and Adjustment Note: We recommend using a grounding bracelet when handling the laser diode to prevent damage. Take the L658P040 laser diode from its package and place it in the silver retention ring of the LTN330-A, see the image to the right.
-
Page 31: Beam Expander
Portable Optical Tweezers Kit Chapter 6: Setup and Adjustment 6.1.2. Beam Expander In the following, the cage system is set up to house the beam expander. The individual components are assembled first, and then mounted in the cage system. Adjustment Mirror Mount the mirrors (PF10-03-P01) in the right angle mirror mounts (KCB1(/M)) with the reflective surface facing away from the knobs (Figure 12). - Page 32 Portable Optical Tweezers Kit Chapter 6: Setup and Adjustment Lens 2 The components for lens 2 are shown in Figure 15. The lens (LA1509-A) must be attached to the CP09(/M) cage plate using two SM1 retaining rings. Beam Expander Lens 2 Components Cage Assembly The cage assembly features a removable segment that comprises the two lenses for beam expansion.
- Page 33 Portable Optical Tweezers Kit Chapter 6: Setup and Adjustment To assemble the cage segment, first screw an empty CP09(/M) onto the TR3 (TR75/M) in the orientation shown in the image to the right and insert it into the post holder assembled earlier. Next, loosen the locking screws on the two lower holes of the CP09(/M), feed the two ER10 rods through, and screw them into the lower holes of the KCB1(/M).
- Page 34 Portable Optical Tweezers Kit Chapter 6: Setup and Adjustment Fourth CP09(/M) Cage Plate Added Last Finally, attach the kinematic mount with the laser source from Section 6.1.1. To do this, feed the ER10 cage rods through the lower holes of the kinematic mount (you may need to loosen the KC1-T’s rod locking screws first).
- Page 35 Portable Optical Tweezers Kit Chapter 6: Setup and Adjustment Mirror Position The mirrors are connected to each other and to the microscope with the help of a lens tube flexure sleeve coupler, SM1CPL10. This allows for freedom in height and distance adjustment when connecting the laser/cage assembly to the microscope assembly.
-
Page 36: Microscope
Portable Optical Tweezers Kit Chapter 6: Setup and Adjustment 6.1.3. Microscope Attach the damped DP14A(/M) Ø1.5" mounting post to the breadboard using the mounting holes in its base and four 1/4"-20, 3/4" long (M6 x 20 mm) cap screws. Choose the position shown in Figure 10. - Page 37 Portable Optical Tweezers Kit Chapter 6: Setup and Adjustment Objective Figure 20 shows the components of the objective assembly. First, remove the retaining rings from the CP02(/M) cage plate and attach the objective to it using the SM1A17 adapter. Then, mount the cage plate to the C1498(/M) post clamp using an SD1 "...
- Page 38 Portable Optical Tweezers Kit Chapter 6: Setup and Adjustment LED Assembly The components for the LED assembly are shown in Figure 22. First, remove the two retaining rings from the CP02(/M) cage plate and attach the MCWHL5 LED to it using the lens tube coupler (SM1T2).
- Page 39 SPT1(/M) slip plate positioner (with the locking screws facing towards the camera). The SM1T2 coupler allows the user to choose the camera orientation with the Thorlabs logo facing to the right, see Figure 26, so it is parallel to the stage orientation.
- Page 40 Portable Optical Tweezers Kit Chapter 6: Setup and Adjustment Third, connect the CP02(/M) cage plate to the C1498(/M) post clamp using an SD1 counterbore adapter and an 8-32, 1/2" long (M4 x 12 mm) cap screw. Finally, place the SPT1(/M) and CP02(/M) onto each other and slip four ER3 cage rods through them (with the rods’...
- Page 41 Portable Optical Tweezers Kit Chapter 6: Setup and Adjustment Microscope Assembly Attach the LED assembly to the damped post. The LED can be in contact with the breadboard. Try to align the cage plate of the LED assembly parallel to the breadboard hole pattern.
- Page 42 Portable Optical Tweezers Kit Chapter 6: Setup and Adjustment Next, connect the laser assembly and the microscope. For that, screw the remaining SM1L10 into the side of the beamsplitter. Then, adjust the position and height of the KCB1(/M) right-angle kinematic mirror mount by loosening the SM1CLP10 flexure sleeve couplers.
-
Page 43: Sample Positioning System
Portable Optical Tweezers Kit Chapter 6: Setup and Adjustment 6.1.4. Sample Positioning System Like the previous units, the control and positioning unit consists of several individual subassemblies, which are constructed first. First, take the MT401(/M) base plate and add 4 dowel pins. In this setup, we use the MT405 to side- mount the motors to the MT1(/M) stage. - Page 44 Portable Optical Tweezers Kit Chapter 6: Setup and Adjustment Screw the first MT1(/M)-Z8 with side- mounted motor to the base plate in the orientation shown to the right. Use two 1/4"- 20, 3/8" long (M6 x 10 mm) screws. Insert 2 dowel pins into the top of the stage. Screw the second MT1(/M)-Z8 with side-mounted motor onto the first one in the orientation...
- Page 45 Portable Optical Tweezers Kit Chapter 6: Setup and Adjustment Connect the two pieces of the sample holder using two 8-32", 3/8" long (M4 x 10) mm screws with washers. Screw the adapter assembly to the stage using two 1/4"-20, 0.315" long (M6 x 8 mm) cap screws with washers and 4 dowel pins (you may need to use the screws to pull the...
- Page 46 Portable Optical Tweezers Kit Chapter 6: Setup and Adjustment The next step is to install the electronic controls, see Figure 28, onto the breadboard. 2 x KDC101, LEDD1B, and KLD101 Controllers First, connect the LEDD1B LED Driver to the MCWHL5 LED and position it on the breadboard using two 1/4"-20, 1/2"...
-
Page 47: Controller And Software Setup
The software can be installed using the provided CD or downloaded from the Thorlabs website. Connect the laser controller to the PC only after you are asked to during the installation. Afterwards, open the newly installed program. - Page 48 Portable Optical Tweezers Kit Chapter 6: Setup and Adjustment It is possible to monitor the laser diode with the included photodiode, see Figure 31. This is not necessary for this kit and should not be enabled. Once the polarity and the maximum current are set and persisted to the hardware, you can operate the laser driver with the controls on the controller itself (rather than controlling it by software).
- Page 49 Portable Optical Tweezers Kit Chapter 6: Setup and Adjustment More Settings for the Laser Diode Controller Figure 32 shows the Kinesis software with the laser switched on and a current of 95.0 mA. Kinesis Software for Laser Diode Controller with Laser Switched On Page 46 MTN012639-D02...
-
Page 50: Camera
Chapter 6: Setup and Adjustment 6.2.3. Camera To operate the camera download the latest ThorCam Software from the Thorlabs website or use the installation CD included with the camera. Follow the installation guide and select DCU/DCC Series Compact CMOS and CCD Cameras. After finishing the installation reboot and connect the camera to your computer. - Page 51 Portable Optical Tweezers Kit Chapter 6: Setup and Adjustment To see live transmission from the camera, select Start Capture from the command panel. You can change the brightness of the LED to check the signal coming from the camera. A helpful feature is the “Draw Circle” option .You can use it to mark the location of your laser spot.
- Page 52 Portable Optical Tweezers Kit Chapter 6: Setup and Adjustment In the Camera tab you can choose the Pixel Clock, Frame Rate, and Exposure Time. The basic parameter for camera timing is the pixel clock. It determines the speed at which the sensor pixels are read out.
-
Page 53: Sample Positioning Stages
For optical trapping, low driving speeds are necessary. To adjust the velocity of the servo motors you can either use the display of the KDC101 or the configuration software. You can find the software via the Thorlabs product page of either the KDC101 or the EDU-OT2(/M). - Page 54 Portable Optical Tweezers Kit Chapter 6: Setup and Adjustment The two windows, shown in Figure 39, correspond to the two servo motors. To establish which window controls which controller cube, press the “Ident” or “Identify” button in the software, which will flash the display a few times on the corresponding controller. Kinesis Software User Interface Settings: ...
- Page 55 Portable Optical Tweezers Kit Chapter 6: Setup and Adjustment loaded after each restart of the controllers. In the Kinesis Software you can also enter all parameters under the Device Startup Settings tab. By clicking Save, this will store the settings on your computer as well. When the controllers are reconnected to this computer they will download the stored settings immediately.
-
Page 56: Kinesis Settings
6.2.5. Kinesis Settings Thorlabs Kinesis software can be set to grab the current settings from the connected devices on startup. This option can be activated via the dropdown menu File -> Options by checking the box Use device persisted settings (see Figure 42). -
Page 57: Camera Adjustment
Portable Optical Tweezers Kit Chapter 6: Setup and Adjustment 6.3. Camera Adjustment The objective used in this kit is infinity-corrected. That is a great advantage and eases the adjustment significantly. It means that the light from the objective’s focal plane leaves the objective effectively parallel. -
Page 58: Beam Adjustment
Portable Optical Tweezers Kit Chapter 6: Setup and Adjustment 6.4. Beam Adjustment Warning The class 3B laser diode used in this kit can emit more than 50 mW of optical power, which can cause damage to the eyes if viewed directly. The laser driver is equipped with a key switch and safety interlock, which should be used appropriately to avoid injury. - Page 59 Portable Optical Tweezers Kit Chapter 6: Setup and Adjustment Step 3: Laser Installation Place the alignment plate into the cage system right before the 45° mirror, see image to the right. Insert the laser into the mount without securing it with the locking screws yet.
- Page 60 Portable Optical Tweezers Kit Chapter 6: Setup and Adjustment Step 6: Adjustment Mirror Alignment, Part 2 Remove the end cap on the beamsplitter. Turn on the laser. Adjust the upper alignment mirror so that the laser exits the beamsplitter at its center. ...
- Page 61 Portable Optical Tweezers Kit Chapter 6: Setup and Adjustment Step 8: Final Adjustment Increase the diode current to approximately 95 mA. Observe the expanded laser spot on the objective aperture. Adjust the upper alignment mirror to move the laser spot into the center of the objective aperture.
-
Page 62: Trapping, Microscope Focus, And Final Alignment
Portable Optical Tweezers Kit Chapter 6: Setup and Adjustment 6.5. Trapping, Microscope Focus, and Final Alignment The table is now set to trap microscopic particles. Step 1: Preparation Switch on your computer and start the camera software (see Section 6.2.3). ... - Page 63 Portable Optical Tweezers Kit Chapter 6: Setup and Adjustment Focus Level Settings The camera image should look similar to Figure 44. Camera Image when the Sample is Approached (2 µm Beads) Step 4: Camera Position Depending on the angle of the optical elements, the laser spot may not be in the center of the camera image.
- Page 64 Portable Optical Tweezers Kit Chapter 6: Setup and Adjustment Step 5: Trap a Bead Move the stage using the wheels on the controller cubes. Move the sample so that a bead comes to rest under the laser spot, see Figure 45. ...
- Page 65 Portable Optical Tweezers Kit Chapter 6: Setup and Adjustment Laser Focal Plane vs. Microscope Focal Plane The position of the laser focus in the Z direction is defined by the focal length of the objective (red curve in Figure 46). For ideal observation of both the laser focus and the trapped sample beads it is necessary to adjust the microscope (tube) lens (shown in Figure 46) in such a way that the focal plane of the observing camera system (green curve) - consisting of the objective, the tube lens and the CCD camera chip - coincides with the...
-
Page 66: Chapter 7 Experiments
In this chapter, we discuss exercises using glass beads as samples. The material can be found in the OTKBTK preparation kit, which is sold separately on the Thorlabs webpage. However, these experiments can also be conducted with several other materials, including polystyrene beads or lipids in aqueous solution. -
Page 67: Setting The Correct Focus Level
Portable Optical Tweezers Kit Chapter 7: Experiments First, shake the glass bead solution and place one or two droplets (approx. 30-40 µl) in a cutout on the microscope slide using a pipette. Place a cover glass over the sample, starting with the glass tilted at a steep angle and lowering it so that there are no air bubbles between the glass and the sample (see Figure 48). -
Page 68: Arranging The Silica Beads
Portable Optical Tweezers Kit Chapter 7: Experiments Focus Level Settings Set the laser focus so that you see the sample beads clearly and sharply. By moving the laser spot onto a bead using the servomotors and levers on the K-cube controllers, you can trap a bead and move it to another location. -
Page 69: Manipulating A Dairy Cream Particle In A Cream/Water Emulsion
Portable Optical Tweezers Kit Chapter 7: Experiments Beads as Viewed Through the Microscope 7.4. Manipulating a Dairy Cream Particle in a Cream/Water Emulsion Mix a drop of dairy cream with sufficient water so that the solution is still slightly milky. Now, create a finished sample for the optical tweezers as described in Section 7.1, above. - Page 70 Portable Optical Tweezers Kit Chapter 7: Experiments Cream Particles in a Cream / Water Emulsion If a cream particle, which is located in the optical trap, has been brought into focus with the z-axis screw and thus can clearly be seen on the monitor, the laser can be switched off and the particle observed.
- Page 71 Portable Optical Tweezers Kit Chapter 7: Experiments A cream particle is pushed down by the laser focus. Cream particle is trapped at the laser’s focus. Once the laser is switched off, the fat particle moves back to the surface of the water. Page 68 MTN012639-D02...
-
Page 72: The Holding Force Of The Optical Trap
Portable Optical Tweezers Kit Chapter 7: Experiments 7.5. The Holding Force of the Optical Trap 7.5.1. Brownian Motion The proper motion or vibrating motion of particles, also referred to as Brownian motion, can be observed under the optical tweezers. Samples be found at “Microspheres and Particles”. - Page 73 Portable Optical Tweezers Kit Chapter 7: Experiments software, which provides the x and y position of a particle over time. A program that makes evaluation possible offered free “Viana”, available http://www.viananet.de/en. Note: Before taking the video sequence, make sure that the beads do not show a drift in any direction, which can be caused by an air bubble.
-
Page 74: The Maximum Holding Force
Portable Optical Tweezers Kit Chapter 7: Experiments Mean Squared Displacement for Polystyrene Beads of Different Sizes 7.5.2. The Maximum Holding Force In the following, we shall determine how well the optical tweezers can hold a polystyrene bead. The goal is to determine the maximum holding force of the optical trap. If one observes an individual polystyrene bead under the microscope which is moving freely, frictional force acts on the particle. - Page 75 Portable Optical Tweezers Kit Chapter 7: Experiments Here, �� denotes the effective viscosity, �� is the radius of the PS-bead, �� is the ������ temperature of the sample in Kelvin (corresponds to room temperature), and �� is the �� −23 �� Boltzmann constant, which is a natural constant and has a value of 1.38 ⋅...
-
Page 76: Chapter 8 Teaching Tips
Portable Optical Tweezers Kit Chapter 8: Teaching Tips Chapter 8 Teaching Tips In this chapter we present a simplified approach to help students in understanding the basic physical principles of optical tweezers. In the following, we discuss how a particle is trapped in a focused laser beam and how a three-dimensional optical trap works. - Page 77 Portable Optical Tweezers Kit Chapter 8: Teaching Tips edge. Comparing a ray in the middle of the profile to a ray outside, the inner one shows the maximal intensity while the outer one exhibits a lower intensity. This is demonstrated by the thickness of the blue lines in Figure 54.
- Page 78 Portable Optical Tweezers Kit Chapter 8: Teaching Tips arrows in blue and green. The direction of the vector arrow corresponds to the direction of the momentum and its length corresponds to the momentum’s magnitude. Unfocused Laser Beam Momentum For example, the vector labeled with �� ( ��, 1 ) depicts the momentum of the beam �� at position 1.
- Page 79 Portable Optical Tweezers Kit Chapter 8: Teaching Tips To obtain the net momentum change of both partial beams, we add both orange change of momentum vectors in Figure 58. This line of argument can be transferred qualitatively to the entire bundle of partial beams. Unfocused Laser Beam Total Momentum Change In Figure 58 we observe that the total laser beam experiences a momentum change in the opposite direction of its direction of incidence.
- Page 80 Portable Optical Tweezers Kit Chapter 8: Teaching Tips In this case, the two partial beams do not feature the same intensity. Therefore, they do not have the same momentum, as shown in Figure 60. Unfocused Off-Axis Laser Beam Momentum Both partial beams then exhibit the momentum change displayed in Figure 61. Unfocused Off-Axis Laser Beam Momentum Changes As shown, the partial beams exhibit momentum changes that differ in magnitude.
- Page 81 Portable Optical Tweezers Kit Chapter 8: Teaching Tips Unfocused Off-Axis Laser Beam Total Change in Momentum Figure 62 demonstrates that the laser beam experiences a momentum change to the left and upwards. This results in a momentum change of the bead to the right and downwards. Therefore, the bead is drawn to the position with maximum intensity, forming a two- dimensional trap.
- Page 82 Portable Optical Tweezers Kit Chapter 8: Teaching Tips Since the bead is in the geometrical center both partial beams have the same intensity and, therefore, the same momentum amplitude. The direction off the momentum vectors is different since the incident laser beam is focused. Focused Laser Beam Momentum Figure 65 displays the momentum change of both partial beams.
- Page 83 Portable Optical Tweezers Kit Chapter 8: Teaching Tips The net momentum change of the entire beam is depicted in Figure 66. Focused Laser Beam Change in Momentum The laser beam exhibits a momentum change downwards. Hence, the bead’s momentum is changed upwards. The bead moves against the beam’s main propagation direction and into the laser focus.
-
Page 84: Chapter 9 Control Via Game Controller
Chapter 9: Control via Game Controller Chapter 9 Control via Game Controller The Thorlabs Kinesis Software includes the possibility of controlling various components via external input devices. For the Optical Tweezer kit, this allows to drive the KDC101 Servo Motor Controllers and in turn the sample stage movement via a game controller. - Page 85 Portable Optical Tweezers Kit Chapter 9: Control via Game Controller stage will be in one corner of its travel range and should be moved in positive direction for both axes to center the sample under the objective. Input Devices Settings in Kinesis Software Page 82 MTN012639-D02...
- Page 86 Portable Optical Tweezers Kit Chapter 9: Control via Game Controller Recommended Controller Calibration Settings Homing the KDC101 controllers Rev B, July 8, 2019 Page 83...
-
Page 87: Chapter 10 Troubleshooting
Portable Optical Tweezers Kit Chapter 10: Troubleshooting Chapter 10 Troubleshooting When the stage is moved, the sample quickly moves out of focus and loses the bead. We have seen this behavior when the screw on the locking plate is tightened too much. - Page 88 Portable Optical Tweezers Kit Chapter 10: Troubleshooting You can try to vary the distance between the lenses in the beam expander section. 12 cm is the maximum distance (measured from the lens centers); you should not exceed it. You should also not go below 11 cm.
-
Page 89: Chapter 11 Regulatory
Waste Treatment is Your Own Responsibility If you do not return an “end of life” unit to Thorlabs, you must hand it to a company specialized in waste recovery. Do not dispose of the unit in a litter bin or at a public waste disposal site. -
Page 90: Chapter 12 Thorlabs Worldwide Contacts
Portable Optical Tweezers Kit Chapter 12: Thorlabs Worldwide Contacts Chapter 12 Thorlabs Worldwide Contacts For technical support or sales inquiries, please visit us at www.thorlabs.com/contact for our most up-to-date contact information. USA, Canada, and South America UK and Ireland Thorlabs, Inc. Thorlabs Ltd. - Page 92 www.thorlabs.com...
Need help?
Do you have a question about the EDU-OT2 and is the answer not in the manual?
Questions and answers