Table of Contents
Advertisement
Quick Links
1.
Product Appearance of UC100
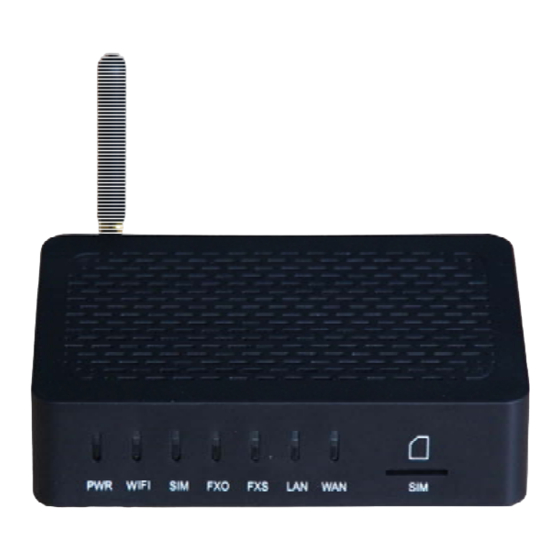
(1)Front View
On the front panel are seven indicators and the SIM card slot which supports hot swap.
(2)Back View
On the rear panel are the power port, WAN port, LAN port, FXS port, FXO port, reset button and external antenna.
Please use a network cable to connect the UC100 with a PC for convenient management.
Note: If the network is working under the route mode,WAN IP address is different from LAN IP address. But when
it is under the bridge mode, WAN IP address is the same as LAN IP address.
2.
Configurations via Telephone
User could conduct some basic configurations on the UC100 by dialing the following keys on the telephone.
Quick Installation Guide
Advertisement
Table of Contents

Subscribe to Our Youtube Channel
Related Manuals for Dinstar UC100


Summary of Contents for Dinstar UC100
- Page 1 Note: If the network is working under the route mode,WAN IP address is different from LAN IP address. But when it is under the bridge mode, WAN IP address is the same as LAN IP address. Configurations via Telephone User could conduct some basic configurations on the UC100 by dialing the following keys on the telephone.
- Page 2 Configurations on Web Interface (1)How to Log on Web Interface Insert a network cable into LAN port, open a web browser on PC and enter the default IP ‘192.168.11.1’. Both the default username and password are admin. (2)How to Modify Network Configuration Click Network ...
- Page 3 Note: Default network model is Route. User could choose to switch to Bridge. (3)Configuration of SIP Trunk Click Trunk SIP, and then click the New button to create a new trunk. Configure IP address and port of the peer device.
- Page 4 (4)Configuration of FXS/FXO Port Take FXS Port for Example Click Extension FXS, and then click . Enter correct extension number and choose whether to enable register or not. Click Save at the last. Note: Auto call can only be enabled for incoming calls of FXO port and GSM port.
- Page 5 Save button. User needs to click Unsaved Changes at the upper right of the web interface after completing the above configuration, and then click Save & Apply. Note: the changes will not take effect until the UC100 is restarted.
- Page 6 Check whether WAN IP is obtained via DHCP and LAN IP is 192.168.11.1 under the default network model ‘route'. c. Check whether the IP address of PC and the IP address of peer device are at the same network segment. d. Check whether the IP address of UC100 has been used by other device.
Need help?
Do you have a question about the UC100 and is the answer not in the manual?
Questions and answers