
Related Manuals for Elma Elmasolvex VA


Summary of Contents for Elma Elmasolvex VA
- Page 1 Operating manual ® Elmasolvex Watches / small parts cleaning machine English doc order no: 105 1412 BA_Elmasolvex_VA_EN_Rev.05.2018 © Elma Schmidbauer GmbH Germany...
-
Page 2: Table Of Contents
Daily cleaning operation ........... 31 Checking filling levels of the media tanks ....31 Loading and inserting basket holder .......32 Selecting and starting cleaning program ....35 6.3.1 Special Programs ..........39 Interrupting / aborting cleaning program ....40 BA_Elmasolvex_VA_EN_Vers.05.2018 © Elma Schmidbauer GmbH... - Page 3 5 years service interval by Service staff ....77 10.1.1 Prescribed parts to be replaced ......78 10.2 Service intervals according to display message ..79 10.2.1 Seal of the basket rotation unit......79 10.2.1.1 Replace seal of the basket rotation unit ..80 © Elma Schmidbauer GmbH BA_Elmasolvex_VA_EN_Vers.05.2018...
- Page 4 Drying parameters recommendations in Expert Mode ................120 16.3.1 Spinning ............120 17 Appendix 4: Expert Mode ........127 17.1 Elmasolvex VA Expert Mode ......... 127 17.2 Creating your own cleaning programs ....128 17.3 Creating a new cleaning program ......129 17.4...
-
Page 5: General
This symbol prohibits the use of any kind of ignition source in this area. This symbol indicates the check of the quick coupling connections (correct seating, shut-off valves). This symbol indicates a risk of property damage. This symbol indicates supplementary information. © Elma Schmidbauer GmbH BA_Elmasolvex_VA_EN_Vers.05.2018... -
Page 6: Signal Words In This Manual
For safety reasons, the cleaning machine must only be connection connected to a grounded socket in accordance with the regulations. The technical details of the rating plate must match the available connection conditions, particularly mains voltage and connected load. BA_Elmasolvex_VA_EN_Vers.05.2018 © Elma Schmidbauer GmbH... - Page 7 (max. approx. 65 °C). Cleaning basket The black Elma basket holder (Art. No. 105 3905) is delivered as standard. It is used for attaching electropolished baskets, baskets made from stainless steel, plastic-coated baskets and plastic baskets.
- Page 8 Fast rotating cleaning basket! Shipment of the Risk of explosion during transport! Strictly empty the media machine container before shipment and also ensure that the cleaning chamber is emptied! Only use the original packaging to prevent transport damage. BA_Elmasolvex_VA_EN_Vers.05.2018 © Elma Schmidbauer GmbH...
-
Page 9: Product Description
There are different previously programmed standard programs and cleaning programs freely programmable by the user available for the microprocessor-controlled cleaning process. Fig. 3.1.1 Schematic diagram of the functional principle © Elma Schmidbauer GmbH BA_Elmasolvex_VA_EN_Vers.05.2018... -
Page 10: Product Features
• Reliable extraction of the solvent vapours via exhaust air connections to the open air or absorption in an optional activated carbon based absorber unit. • Suitable for solvents with flashpoint >= 12 °C. BA_Elmasolvex_VA_EN_Vers.05.2018 © Elma Schmidbauer GmbH... -
Page 11: Scope Of Delivery
4 spare suction filters for media tanks (see Chapter 9.2) • Mains cable • Funnel • USB cable (Software update / Software Elmasolvex VA Tools) • Allen key 1.5 mm for mounting the protective grille • 2 plastic plugs (guiding rail see Chapter 4.2) •... -
Page 12: Ce Conformity
Product description CE conformity This small parts cleaning machine fulfils the CE marking criteria with regard to the Machinery Directive 2006/42/EC, the EMC Directive 2004/108/EC and the ATEX Directive 94/9/EC. BA_Elmasolvex_VA_EN_Vers.05.2018 © Elma Schmidbauer GmbH... -
Page 13: Technical Data
Maximum load, complete cleaning basket 100 or 60 (all individual baskets together) (approx. g) Movement holder maximum movement capacity (pcs.) Activated carbon absorption unit passive measured maximum sound pressure level at 1 m distance © Elma Schmidbauer GmbH BA_Elmasolvex_VA_EN_Vers.05.2018... -
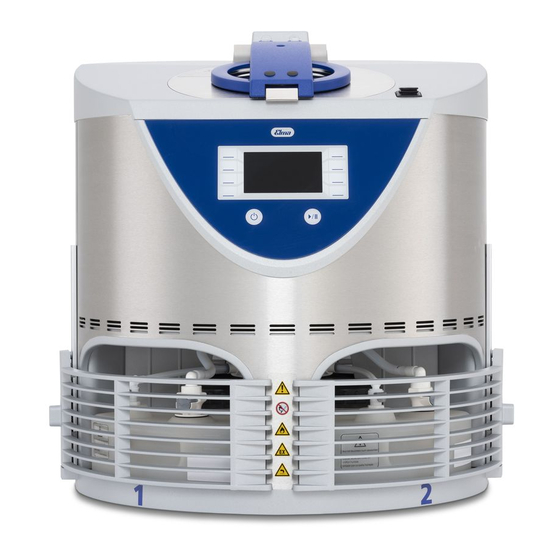
Page 14: Cleaning Machine Front Side Description
2 turns after attaching the protective grilles. Plastic cap must be plugged to the end of the guiding rail Screw for venting the cleaning chamber in the event of a fault (see Chapter 11.3.2) BA_Elmasolvex_VA_EN_Vers.05.2018 © Elma Schmidbauer GmbH... -
Page 15: Cleaning Machine Rear Side Description
Service opening "cleaning machine" Connection for venting the cleaning chamber Instructions for use of the Elma exhaust air tube (included in the scope of delivery) or with the Elma activated carbon unit (optional accessory) (Chapter 4.3 Connecting activated carbon unit or... -
Page 16: Control Panel Description
On / Standby button for switching on the control panel Start / Pause button for starting or interrupting the cleaning process Display shows the setting options and the current status of the cleaning process BA_Elmasolvex_VA_EN_Vers.05.2018 © Elma Schmidbauer GmbH... -
Page 17: Handling Of The Control Panel
(<= 0.5 sec.) for the actuation. Handling instructions Explanation of the handling instructions for operating steps in this manual: The instruction to press an appropriate navigation symbol always refers to the respective assigned operating button. © Elma Schmidbauer GmbH BA_Elmasolvex_VA_EN_Vers.05.2018... -
Page 18: Description Of The Menu Icons
Reduces the value in a selection field Adopts an entry Refers to further information Indicates that the pager (optional accessory) can be initialised Refers to the description of a fault Editing program Reset reminder / Remind again BA_Elmasolvex_VA_EN_Vers.05.2018 © Elma Schmidbauer GmbH... -
Page 19: Cleaning Chamber Description
Never operate cleaning machine without sieve insert. Danger of damage in the cleaning machine! ATTENTION Heating areas / radiating surfaces of the 2 heaters with radiant heat for the drying process. © Elma Schmidbauer GmbH BA_Elmasolvex_VA_EN_Vers.05.2018... -
Page 20: Media Tanks Description
The cleaned soiling thus gets into the canister unhindered and is kept in the media tank during the next filling of the cleaning chamber. Observe the cleaning and replacement intervals (see Chapter 9.2.2). ATTENTION BA_Elmasolvex_VA_EN_Vers.05.2018 © Elma Schmidbauer GmbH... -
Page 21: Before The Initial Commissioning
Operation is only permitted in well-ventilated areas • The surroundings must not have high dust levels • Operation at max. 2300 m above sea level. Operation at above 2300 m can lead to poor drying results. © Elma Schmidbauer GmbH BA_Elmasolvex_VA_EN_Vers.05.2018... -
Page 22: Attaching Protective Grilles
2. Unscrew the grub screws (Fig. 4.2.1.A) at the upper ends of the guide rails by approx. 2 turns. 3. Place the plastic cap (Fig. 4.2.1.C) on to the edge of the guiding rail. Fig. 4.2.1 Protective grilles guide mechanism BA_Elmasolvex_VA_EN_Vers.05.2018 © Elma Schmidbauer GmbH... -
Page 23: Connecting Activated Carbon Unit Or Exhaust Air Tubes
5 metres) in the open air or connect them to an authorised central extractor. Keep ignition sources away from the ends of the exhaust air tubes. The danger areas are marked with the appropriate warning sticker. © Elma Schmidbauer GmbH BA_Elmasolvex_VA_EN_Vers.05.2018... - Page 24 ATTENTION a ventilated area and must not be immersed in water! The Elma activated carbon unit can also be connected to the exhaust air tubes if there is no on site access to the outside or if a permitted extraction unit was not installed.
-
Page 25: Filling Media Tank
Operation with unfilled or missing media tanks results in unsatisfactory cleaning results or automatic abortion of the cleaning process. © Elma Schmidbauer GmbH BA_Elmasolvex_VA_EN_Vers.05.2018... - Page 26 3. Remove the media tank from the cleaning machine using the recessed handle. 4. Open the screw cap and fill the media tank with the suitable cleaning medium up to a filling level between the Min – Max markings (Fig. 4.4.3.D). BA_Elmasolvex_VA_EN_Vers.05.2018 © Elma Schmidbauer GmbH...
- Page 27 Check by shaking and pulling on the tube coupling whether it is correctly connected. 8. Proceed in the same way with the media tanks #2 - #3 - #4 for the rinsing media. Fig. 4.4.2 Media tank cover opened © Elma Schmidbauer GmbH BA_Elmasolvex_VA_EN_Vers.05.2018...
-
Page 28: Checking Shut-Off Valves Of The Quick Couplings
(arrow direction). Media tank quick The shut-off valve (Fig. 4.4.1.1.F) is moveable and in the not coupling connected state must be flush with the guide bar (Fig. 4.4.1.1.G). Fig. 4.4.1.1 Media tank quick coupling "closed" BA_Elmasolvex_VA_EN_Vers.05.2018 © Elma Schmidbauer GmbH... - Page 29 Fig. 4.4.1.2 Media tube quick coupling "closed" Check the seal is seated correctly: Fig. 4.4.1.3.H correct Checking seal in the quick coupling of the seating. Fig. 4.4.1.4.H incorrect seating! media tube Fig. 4.4.1.3 Seal OK Fig. 4.4.1.4 Seal not OK! © Elma Schmidbauer GmbH BA_Elmasolvex_VA_EN_Vers.05.2018...
-
Page 30: Initial Commissioning
The selected language is shown on the display (Fig. 5.3.1.A). Fig. 5.3.1 Display user language The display now automatically changes to the interrogation of the filling of the media tanks (Fig. 6.1.1 Chapter 6.1). BA_Elmasolvex_VA_EN_Vers.05.2018 © Elma Schmidbauer GmbH... -
Page 31: Daily Cleaning Operation
(Chapter 4.4). Confirm the correct filling levels with Fig. 6.1.1 Display Check filling level of the media tanks The display automatically switches to the Start menu with display of the cleaning programs (Fig. 6.3.1). © Elma Schmidbauer GmbH BA_Elmasolvex_VA_EN_Vers.05.2018... -
Page 32: Loading And Inserting Basket Holder
ATTENTION and cleaning machine. Only use the original Elma basket holder. The maximum load weight of the basket holder is 100 grams. Do not clean parts or clean off dirt particles whose diameter is smaller than 0.355 mm! - Page 33 In doing so, it is not important whether all baskets are loaded. Place the basket lid (Fig. 6.2.2.D) in the top position. Lock the basket holder with the basket locking. © Elma Schmidbauer GmbH BA_Elmasolvex_VA_EN_Vers.05.2018...
- Page 34 If the cover is not correctly sealed and therefore the cleaning chamber cannot be deflated, an appropriate error message is shown on the display at the start of the cleaning process. BA_Elmasolvex_VA_EN_Vers.05.2018 © Elma Schmidbauer GmbH...
-
Page 35: Selecting And Starting Cleaning Program
(Fig. 6.3.2). If the basket holder has not yet been inserted, now load and insert the basket holder in the cleaning chamber (for procedure, see Chapter 6.2). Close the cover of the cleaning chamber. © Elma Schmidbauer GmbH BA_Elmasolvex_VA_EN_Vers.05.2018... - Page 36 The specified cleaning program is not started. The safety test is continued by pressing the button The safety test cannot be bypassed! After completion of the cleaning program, this safety test is no longer performed for the next program start. BA_Elmasolvex_VA_EN_Vers.05.2018 © Elma Schmidbauer GmbH...
- Page 37 Chapter 15 Appendix 2: Pager). Progress display of the The detailed progress of the cleaning program can be shown on cleaning program the display (Fig. 6.3.5): Press the corresponding operating button (Fig.6.3.4) to display this function. © Elma Schmidbauer GmbH BA_Elmasolvex_VA_EN_Vers.05.2018...
- Page 38 (<60 °C) and the basket holder is still CAUTION warm (<45 °C) immediately after the program end. If necessary let the basket holder cool down for some time in the cleaning chamber. BA_Elmasolvex_VA_EN_Vers.05.2018 © Elma Schmidbauer GmbH...
-
Page 39: Special Programs
Special cleaning program when using the W2V movement holder (without spinning). Epilamisation_Episurf Special program for epilamisation according to the method of the company Surfactis (on request). After Drying Program for additional drying if the standard drying was not sufficient (cleaning basket moist). © Elma Schmidbauer GmbH BA_Elmasolvex_VA_EN_Vers.05.2018... -
Page 40: Interrupting / Aborting Cleaning Program
Press Abort process without rinsing or Abort process after rinsing (Fig. 6.4.1). Information about the abortion of the cleaning program (Fig. 6.4.2) is displayed during the abortion process. BA_Elmasolvex_VA_EN_Vers.05.2018 © Elma Schmidbauer GmbH... - Page 41 (<60 °C) and the basket holder is still CAUTION warm (<45 °C) immediately after the program end. If necessary let the basket holder cool down for some time in the cleaning chamber. © Elma Schmidbauer GmbH BA_Elmasolvex_VA_EN_Vers.05.2018...
-
Page 42: Settings
Program Select List (Fig. 7.1.1) and then Unit Settings (Fig. 7.1.2). Fig. 7.1.1 Display Program Select List Press in the Program Selection display to open the Machine Settings display. Fig. 7.1.2 Display Unit Settings BA_Elmasolvex_VA_EN_Vers.05.2018 © Elma Schmidbauer GmbH... -
Page 43: Date / Time
If no changes are required, exit from the Date and time display using 4. For changes, navigate using to the relevant input fields (black background). 5. Adjust the values using 6. Press to apply the changes. Fig. 7.1.1.1 Display Date and time © Elma Schmidbauer GmbH BA_Elmasolvex_VA_EN_Vers.05.2018... -
Page 44: Administrator Pin
4. Navigate within the line of the digit selection using 5. Press to apply the selected digit. 6. Press to save the specified 4-digit Administrator PIN. A display (Fig. 7.1.2.3) is shown for confirmation of the Admin PIN by inputting it again. BA_Elmasolvex_VA_EN_Vers.05.2018 © Elma Schmidbauer GmbH... - Page 45 Procedure for Proceed as for the Admin PIN activation procedure. deactivating Admin PIN After input of the previously set Admin PIN, select the setting Off in the display (Fig. 7.1.2.1) using and confirm the selection with © Elma Schmidbauer GmbH BA_Elmasolvex_VA_EN_Vers.05.2018...
-
Page 46: Event List
The Event List (Fig. 7.1.3.1) display is shown. 3. Navigate using in the Event List to go through the saved events. The entries can only be deleted by trained staff. Fig. 7.1.3.1 Display Event List BA_Elmasolvex_VA_EN_Vers.05.2018 © Elma Schmidbauer GmbH... - Page 47 1. Navigate using in the Event List and press retrieve further information about the respective entries. The following display (Fig. 7.1.3.2) is shown. 2. Press to exit from the detail view. Fig. 7.1.3.2 Display detailed information view © Elma Schmidbauer GmbH BA_Elmasolvex_VA_EN_Vers.05.2018...
-
Page 48: Changing User Language
The Set language (Fig. 7.1.4.1) display is shown. 3. Select the required language using 4. Press to apply the changes. Press to exit from this display without changes. Fig. 7.1.4.1 Display Set language BA_Elmasolvex_VA_EN_Vers.05.2018 © Elma Schmidbauer GmbH... -
Page 49: Visible Cleaning Programs
Activated programs are marked with a checkmark. 5. Proceed in the same way if other programs should be hidden or displayed. 6. Press to apply the changes. Press to exit from this display without changes. Fig. 7.1.5.1 Display Visible Cleaning Programs © Elma Schmidbauer GmbH BA_Elmasolvex_VA_EN_Vers.05.2018... -
Page 50: Reminders
3. Using select Reminders for exchange of media in the selection list and confirm with If you would like to exit from this display, press Fig. 7.1.6.2 Display Reminders for exchange of media BA_Elmasolvex_VA_EN_Vers.05.2018 © Elma Schmidbauer GmbH... - Page 51 (Cycles / Days). 4. Press to save the settings. 5. Press to exit from the settings without saving. Fig. 7.1.6.4 Display Set reminders for exchange of media © Elma Schmidbauer GmbH BA_Elmasolvex_VA_EN_Vers.05.2018...
- Page 52 After changing the media, press All counted cycles or days are reset to 0. If you would like to perform the media change at a later time, press to be reminded again after the next program run. BA_Elmasolvex_VA_EN_Vers.05.2018 © Elma Schmidbauer GmbH...
- Page 53 General reminder in the selection list and confirm with The following screen is displayed: Assign a description to the general reminder (max. 30 characters) Fig. 7.1.6.9 4. Navigate with . Select character with save and proceed. © Elma Schmidbauer GmbH BA_Elmasolvex_VA_EN_Vers.05.2018...
- Page 54 (Cycles / Days). 9. Press to save the settings. 10. Press to exit from the settings without saving. After the specified interval (Cycles / Days) has elapsed, the Reminder display (example test Fig. 7.1.6.11) is shown. BA_Elmasolvex_VA_EN_Vers.05.2018 © Elma Schmidbauer GmbH...
-
Page 55: Display Operating Hours
Operating Hours in the selection list and confirm with The Operating Hours display is shown (Fig. 7.1.7.1). 3. Use to be able to see all entries in the list. 4. Press to exit from this display. © Elma Schmidbauer GmbH BA_Elmasolvex_VA_EN_Vers.05.2018... - Page 56 Settings Fig. 7.1.7.1 Display Operating Hours BA_Elmasolvex_VA_EN_Vers.05.2018 © Elma Schmidbauer GmbH...
-
Page 57: Setting Signal Tone For Program End
(On) or no signal tone (Off) should sound at the end of the cleaning program. 4. Press to confirm the input. Press to exit from this display without changes. Fig. 7.1.8.1 Display Signal tone setting © Elma Schmidbauer GmbH BA_Elmasolvex_VA_EN_Vers.05.2018... -
Page 58: Creating Your Own Cleaning Programs
The respective selected cursor field has a brown or grey background. Procedure In the Program Select List (Fig. 7.2.1), select Fig. 7.2.1 Display Program Select List The display (Fig. 7.2.1.1) is shown: Modify / Create programs. BA_Elmasolvex_VA_EN_Vers.05.2018 © Elma Schmidbauer GmbH... -
Page 59: Create New Cleaning Program
Using the button , you can delete already entered characters. Press to apply the selected character. To save the entered program name and continue with setting the program parameters, press Fig. 7.2.1.2 Enter a program name © Elma Schmidbauer GmbH BA_Elmasolvex_VA_EN_Vers.05.2018... - Page 60 The Rinse 1 (Fig. 7.2.1.4) display is shown. Program Parameters For setting the Rinse 1 process parameters, proceed in the Rinsing set / change same way as previously described for setting the Cleaning process parameters. Fig. 7.2.1.4 Display Process step Rinse 1 BA_Elmasolvex_VA_EN_Vers.05.2018 © Elma Schmidbauer GmbH...
- Page 61 Using the Reject changes selection, you return to the Program Select List display without saving the settings made. Using the Abort selection, you return to the previous display. © Elma Schmidbauer GmbH BA_Elmasolvex_VA_EN_Vers.05.2018...
-
Page 62: Create Cleaning Program From Copy
_0 is initially specified. The name can be changed individually as described in Chapter 7.2.1. To save the program name and continue with setting the program parameters, press Fig. 7.2.2.2 Display Program Name BA_Elmasolvex_VA_EN_Vers.05.2018 © Elma Schmidbauer GmbH... -
Page 63: Modifying Existing Cleaning Program
After selection of the cleaning program to be modified, the necessary Program name display (Fig. 7.2.2.2) is shown. The name can be changed individually or retained as described in Chapter 7.2.1. To save the program name and continue with setting the program parameters, press © Elma Schmidbauer GmbH BA_Elmasolvex_VA_EN_Vers.05.2018... -
Page 64: Delete Cleaning Program
"delete program" command. Press if the command should be discarded. For both actions, the display Delete program is reached afterwards. It is possible to delete further programs or return to the Program Select List display BA_Elmasolvex_VA_EN_Vers.05.2018 © Elma Schmidbauer GmbH... -
Page 65: Media (Cleaning / Rinsing Solutions)
In the case of doubt, contact the manufacturer or supplier. ® Exclusion of liability Elma shall not be liable for defects for the Elmasolvex cleaning machine in the case of damage caused by non- observance of the restrictions specified in Chapter 8! ©... -
Page 66: Recommended Media
Media (cleaning / rinsing solutions) Recommended media Elma provides suitable solvent-based cleaning ("elma wf pro"), rinsing ("elma suprol pro") and relubrication media ("elma unimix") from its own development and manufacture. Ask your dealer about these. The cleaning machine is always suitable for cleaning and... -
Page 67: Technical Limitations
The explosion safety requirements are not necessary in the case of exclusive use of fluorinated, non-flammable solvents. Use with chlorinated or brominated solvents is not recommended, risk of harmed sealings. © Elma Schmidbauer GmbH BA_Elmasolvex_VA_EN_Vers.05.2018... -
Page 68: Environmental Hazard From Solvent-Based Media
"elma wf pro" is classified as environmentally hazardous according to R51 and R53 and therefore has an environmental hazard pictogram while "elma suprol pro" and "elma unimix" are only classified with R52 and R53 and therefore do not have any environmental hazard pictogram. -
Page 69: Care And Maintenance Tasks
Visually inspect whether the filling level of the different media tanks is in the range between the Min and Max markings (Fig. 9.1.1.1.D). Procedure Adjust the filling level accordingly if required. Fig. 9.1.1.1 Media tanks filling level markings © Elma Schmidbauer GmbH BA_Elmasolvex_VA_EN_Vers.05.2018... -
Page 70: Cleaning The Cleaning Chamber
(collision hazard if the sieve insert has not been screwed in correctly). Heating areas / radiating surfaces of the 2 heaters with radiant heat for the drying process. Filling level sensor Empty level (installed under the sieve insert). BA_Elmasolvex_VA_EN_Vers.05.2018 © Elma Schmidbauer GmbH... -
Page 71: Cleaning Of The Drain Sieve
Push up the protective grilles on the right and on the left side of the cleaning machine (Fig. 4.4.2) and perform a visual inspection (if visible) of the specified components. Pay attention to possible media residues on the base of the cleaning machine. © Elma Schmidbauer GmbH BA_Elmasolvex_VA_EN_Vers.05.2018... -
Page 72: Continuous Maintenance Actions
Used media must be disposed of in accordance with the media regulations. No disposal via the sewer system! Dispose of the used media in accordance with the national disposal regulations for the media (see safety data sheet). BA_Elmasolvex_VA_EN_Vers.05.2018 © Elma Schmidbauer GmbH... -
Page 73: Inspect Media Tanks, Covers, Suction Filters
5. Replace the filter on the floor of the media tank and screw in the quick coupling again. Ensure that the stem of the suction filter is located in the suction tube (Fig. 9.2.2.1.C) and can move freely. © Elma Schmidbauer GmbH BA_Elmasolvex_VA_EN_Vers.05.2018... -
Page 74: Spare Parts Media Tank
Visual inspection media tank Coupling + 105 2475 Visual inspection tube Seal for coupling 105 3131 Visual inspection 105 2475 Suction filter 105 2718 Visual inspection Coupling with PTFE sealing 105 2485 Visual inspection tape BA_Elmasolvex_VA_EN_Vers.05.2018 © Elma Schmidbauer GmbH... -
Page 75: Basket Holder
The collar bushing must be replaces as soon as any wear on the toothing is recognisable (Fig. 9.2.3.5.E). Worn toothing of the collar bushing results in unbalance of the cleaning basket at higher speeds. Fig. 9.2.3.3 Basket holder underside / position of the collar bushing © Elma Schmidbauer GmbH BA_Elmasolvex_VA_EN_Vers.05.2018... -
Page 76: Spare Parts Basket Holder
Designation Art. No. Change interval Basket holder, Visual inspection 105 3905 complete Basket holder Visual inspection 105 6436 locking Visual inspection Basket holder 104 5991 Collar bushing for basket Visual inspection 106 6950 holder, complete BA_Elmasolvex_VA_EN_Vers.05.2018 © Elma Schmidbauer GmbH... -
Page 77: Maintenance Actions / Service Intervals
Safe operation of the cleaning machine is no longer guaranteed. The required service must strictly be performed to continue operating the cleaning machine. The manufacturer shall not accept any liability for injuries to persons and property damage resulting from further operation. © Elma Schmidbauer GmbH BA_Elmasolvex_VA_EN_Vers.05.2018... -
Page 78: Prescribed Parts To Be Replaced
Media tank couplings 4x sealings Media tank couplings Flange sleeve Basket support (collar bush) According to assessment criteria, it can be required to replace other components. This is at the discretion of the service point. BA_Elmasolvex_VA_EN_Vers.05.2018 © Elma Schmidbauer GmbH... -
Page 79: Service Intervals According To Display Message
Safe operation of the cleaning machine is no longer guaranteed. The required service must strictly be performed to continue operating the cleaning machine. The manufacturer shall not accept any liability for injuries to persons and property damage resulting from further operation. © Elma Schmidbauer GmbH BA_Elmasolvex_VA_EN_Vers.05.2018... -
Page 80: Replace Seal Of The Basket Rotation Unit
Therefore the seal replacement does not necessarily have to be performed by a service point; this can be done by the user. Service Kit Elma order number 108 3896 Procedure A service manual for the procedure is enclosed with the service kit. -
Page 81: 5-Year Maintenance Request
In order to continue to operate the cleaning machine, it is imperative that the required service is carried out. The manufacturer accepts no liability whatsoever for personal injury or damage to property caused by further operation! © Elma Schmidbauer GmbH BA_Elmasolvex_VA_EN_Vers.05.2018... -
Page 82: Extended Safety Test
(Fig. 4.3.1.A). The end of the exhaust air tube must be immersed in a collecting container (>= 1.5 litres) during this test. Before performing the safety test, ensure that media tank #4 is filled between the Min and Max markings. BA_Elmasolvex_VA_EN_Vers.05.2018 © Elma Schmidbauer GmbH... - Page 83 Confirm the correct filling level with (Fig. 10.3.2). The safety test is now started automatically and ends after approx. 5 minutes. The progress is shown on the display (Fig. 10.3.3). Fig. 10.3.3 Display Safety Test progress © Elma Schmidbauer GmbH BA_Elmasolvex_VA_EN_Vers.05.2018...
-
Page 84: Operating Faults
In the case of operating faults where the program still runs to the end, a warning is shown on the display during the cleaning process (see Fig. 11.1.1.A). Pressing the operating button (see Fig. 11.1.1.B) displays fault information. Fig. 11.1.1 Display Fault message (example) BA_Elmasolvex_VA_EN_Vers.05.2018 © Elma Schmidbauer GmbH... - Page 85 Working level fill level sensor and step ended. overfill level fill level sensor (Fig.9.1.4.1 A/B) soiled? Clean with suitable cloth if necessary. • Working level fill level sensor and overfill level fill level sensor (Fig.9.1.4.1 A/B) damaged (scratches, cracks)? © Elma Schmidbauer GmbH BA_Elmasolvex_VA_EN_Vers.05.2018...
- Page 86 4.4.1.4) damaged? • Gas content in cleaning medium too high? Switch off the ultrasound and basket oscillation temporarily to degas the cleaning medium. • Switch off cleaning machine and restart: Contact Service if the fault persists. BA_Elmasolvex_VA_EN_Vers.05.2018 © Elma Schmidbauer GmbH...
- Page 87 In the event of liquid discharge from ended. the bottom case outlet: For further procedure, see point Liquid discharge from bottom case opening (chapter 11.2) Clean deflagration protection (chapter. 11.3.1) Disconnect cleaning machine from the • mains power supply © Elma Schmidbauer GmbH BA_Elmasolvex_VA_EN_Vers.05.2018...
- Page 88 • Check fans for foreign bodies and remove if necessary Abortion • Switch off cleaning machine and Both fans are defective restart: Contact Service if the fault or blocked! persists. Program has not been ended. BA_Elmasolvex_VA_EN_Vers.05.2018 © Elma Schmidbauer GmbH...
- Page 89 Air intake and exhaust openings in the cleaning chamber (Fig. 3.12.1.A) clogged? • Quick couplings on the media tanks (Fig. 3.13.1. B/C) correctly engaged? • Switch off cleaning machine and restart: Contact Service if the fault persists. © Elma Schmidbauer GmbH BA_Elmasolvex_VA_EN_Vers.05.2018...
- Page 90 • Condensate separator, activated Program has not been carbon filter (if connected) clogged? ended. • Exhaust air tube (chapter 4.3) kinked? • Air intake and exhaust openings in the cleaning chamber (Fig. 3.12.1.A) clogged? BA_Elmasolvex_VA_EN_Vers.05.2018 © Elma Schmidbauer GmbH...
- Page 91 • Can the valves of the quick couplings on the media tanks (Fig. 4.4.1.1.F) be pressed in / moved correctly? • Are the quick couplings on the media tanks (Fig. 3.13.1. B/C) correctly engaged? © Elma Schmidbauer GmbH BA_Elmasolvex_VA_EN_Vers.05.2018...
- Page 92 Sieve insert in the cleaning chamber • clogged (Fig.9.1.4.1)? • Fill level in the media tank overfilled? • Can the valves of the quick couplings (Fig. 4.4.1.2.J) be pressed in / moved correctly? BA_Elmasolvex_VA_EN_Vers.05.2018 © Elma Schmidbauer GmbH...
- Page 93 • Switch off cleaning machine and safety test. restart: Contact Service if the fault persists. Critical error! Filling level sensor for overfilling faulty. Safety test not finished. See operating instructions. © Elma Schmidbauer GmbH BA_Elmasolvex_VA_EN_Vers.05.2018...
- Page 94 • Fill level sensor Empty level (Fig.9.1.4.1.F) damaged (scratches, cracks)? • Retrofit ant-reflection sleeve for Empty level fill level sensor. • Switch off cleaning machine and restart: Contact Service if the fault persists. BA_Elmasolvex_VA_EN_Vers.05.2018 © Elma Schmidbauer GmbH...
- Page 95 Air intake and exhaust openings in the during the safety test. cleaning chamber (Fig. 3.12.1.A) clogged? Abortion Critical fault! • Switch off cleaning machine and restart: Contact Service if the fault Fast venting not persists. possible. © Elma Schmidbauer GmbH BA_Elmasolvex_VA_EN_Vers.05.2018...
- Page 96 Check the following possibilities: ultrasound generator. • Switch off cleaning machine and restart: Contact Service if the fault Warning persists. Critical fault! Ultrasound generator defective. If liquid is detected at the Check the following possibilities: BA_Elmasolvex_VA_EN_Vers.05.2018 © Elma Schmidbauer GmbH...
- Page 97 See operating The manufacturer shall not accept any instructions. liability for injuries to persons and property damage resulting from further operation. © Elma Schmidbauer GmbH BA_Elmasolvex_VA_EN_Vers.05.2018...
- Page 98 This screen (Fig. 11.1.2) is always displayed if the cleaning Checking program has not been ended properly: e.g. after any fault in the cleaning machine or a power failure during cleaning. Fig. 11.1.2 Fault information for cleaning machine checking BA_Elmasolvex_VA_EN_Vers.05.2018 © Elma Schmidbauer GmbH...
-
Page 99: Cleaning Machine Faults Without Indication On The Display
/ rotating components (e.g. toothed belts). CAUTION Risk of injury from hot surfaces! The vacuum pump, solenoid valves, drives and heater can still CAUTION be hot immediately after operation of the cleaning machine. © Elma Schmidbauer GmbH BA_Elmasolvex_VA_EN_Vers.05.2018... -
Page 100: Cleaning Deflagration Protection
30 minutes in the removed condition or blow out with compressed air). 6. Reinstall the deflagration protection in the cleaning machine in reverse order (Fig. 11.3.1.1.A). Fig. 11.3.1.1 Bottom view of cleaning machine with screw connection BA_Elmasolvex_VA_EN_Vers.05.2018 © Elma Schmidbauer GmbH... - Page 101 Fig. 11.3.1.2 Service opening with deflagration protection Fig. 11.3.1.3 Tube connection with locking ring In the event of further discharge of liquid (> droplets), the cleaning machine must not be further operated. Contact your ATTENTION dealer or the manufacturer. © Elma Schmidbauer GmbH BA_Elmasolvex_VA_EN_Vers.05.2018...
-
Page 102: Manual Venting Of The Cleaning Chamber
By removal of the vacuum in the cleaning chamber, the medium should flow back into the relevant media tank. If this is not the case, contact the Service Centre. Fig. 11.3.2.1 Position of the bleed screw BA_Elmasolvex_VA_EN_Vers.05.2018 © Elma Schmidbauer GmbH... -
Page 103: Repairs
• Only use the original packaging to prevent transport damage. • Enclose an as specific as possible description with the return (error description, maintenance instructions etc.) © Elma Schmidbauer GmbH BA_Elmasolvex_VA_EN_Vers.05.2018... -
Page 104: Decommissioning And Disposal
Dispose of used cleaning and rinsing media in accordance with the applicable national regulations. Manufacturer address / contact address Elma Schmidbauer GmbH Gottlieb-Daimler-Str. 17, D-78224 Singen Phone (head office) +49 (0) 7731 / 882-0 Fax (head office) +49 (0) 7731 / 882-266 info@elma-ultrasonic.com www.elma-ultrasonic.com BA_Elmasolvex_VA_EN_Vers.05.2018 © Elma Schmidbauer GmbH... -
Page 105: Appendix 1: Activated Carbon Unit
No disposal via the sewer system! Dispose of used operating materials in accordance with the national disposal regulations for the media (see safety data sheet). Used activated carbon granulate is also taken back by the supplier or its manufacturer. © Elma Schmidbauer GmbH BA_Elmasolvex_VA_EN_Vers.05.2018... - Page 106 (K) or for wall mounting (floor bracket and feet upwards) using the cut-outs (L). PE filter can be unscrewed for maintenance interval. Maximum filling level of separated condensate (must be below the filter in the condensate separator). BA_Elmasolvex_VA_EN_Vers.05.2018 © Elma Schmidbauer GmbH...
-
Page 107: Filling / Installation / Commissioning
(A and B). 2. Insert the quick couplings (A and B) into the corresponding mating pieces of the activated carbon unit so that these are securely engaged. © Elma Schmidbauer GmbH BA_Elmasolvex_VA_EN_Vers.05.2018... - Page 108 Marking label Mark an adhesive label (included in the scope of delivery) with date and cleaning cycle (see Settings, Operating Hours) and attach it to the retaining bracket or base plate of the activated carbon unit. BA_Elmasolvex_VA_EN_Vers.05.2018 © Elma Schmidbauer GmbH...
-
Page 109: Maintenance
32 % - 150 cycles, 20 % - 100 cycles, …) • Grain size: >= 2 mm • Free of dust Activated carbon granulate recommended by the manufacturer: Type: EcoSorb BX-Plus 2 mm Manufacturer: Jacobi Germany Sales: Overlack GmbH © Elma Schmidbauer GmbH BA_Elmasolvex_VA_EN_Vers.05.2018... -
Page 110: Changing Pe Filter
There is a total of 6 PE filters in the activated carbon unit. The filters are available as a set and all four must be changed. Order number Elma order number 105 3821 Interval Annually or depending on the operating conditions: If the required cleaning time gradually becomes longer and/or if an appropriate warning message is shown on the display. - Page 111 Close the screw plug tightly. Reattach the retaining plate to the base plate. Fig. 14.3.3.1 Sectional view of activated carbon filter © Elma Schmidbauer GmbH BA_Elmasolvex_VA_EN_Vers.05.2018...
-
Page 112: Appendix
4. Press the operating button #2 (see Fig. 15.2.#2). The data transmission is performed. As soon as the LED for cleaning time on the pager lights, the data transmission is completed and the pager is activated. BA_Elmasolvex_VA_EN_Vers.05.2018 © Elma Schmidbauer GmbH... - Page 113 Rechargeable batteries with the appropriate capacity can also be used instead of batteries. Disposal of used Used batteries must be disposed of in accordance with the batteries regulations. Dispose of batteries in accordance with the national disposal regulations. © Elma Schmidbauer GmbH BA_Elmasolvex_VA_EN_Vers.05.2018...
-
Page 114: Appendix 3: Procedure And Parameter Recommendations Using Expert Mode
Clean4 of the spinning or oscillation or rotation movements of the cleaning basket can be freely programmed in the Expert Mode. The parameters • "pulse" or "normal" of the ultrasound mode, for finely matched oscillation or BA_Elmasolvex_VA_EN_Vers.05.2018 © Elma Schmidbauer GmbH... - Page 115 Rinsex.5 with parameters of the spinning or oscillation or rotation movements of the cleaning basket can be freely programmed in the Expert Mode. The parameters • "pulse" or "normal" of the ultrasound mode, © Elma Schmidbauer GmbH BA_Elmasolvex_VA_EN_Vers.05.2018...
- Page 116 Dry2 with parameters for the number, pressure and duration of the vacuum steps below this pressure and for oscillation or rotation movements of the cleaning basket in these steps can be programmed in the Expert Mode. BA_Elmasolvex_VA_EN_Vers.05.2018 © Elma Schmidbauer GmbH...
- Page 117 Clean, Rinse1 – Rinse3 or Dry steps, it is recommended to use the Expert Mode. In the following 3 chapters, process recommendations based on problem examples are given and the creation of special cleaning programs in the Expert Mode is explained. © Elma Schmidbauer GmbH BA_Elmasolvex_VA_EN_Vers.05.2018...
-
Page 118: Cleaning Parameters Recommendations In Expert Mode
• the displacement of the otherwise, also in vacuum, still remaining residual air bubble there due to the penetrating cleaning medium and • the spinning out or draining again of the cleaning medium BA_Elmasolvex_VA_EN_Vers.05.2018 © Elma Schmidbauer GmbH... -
Page 119: Rinsing Parameters Recommendations In Expert Mode
• the displacement of the, also in vacuum, still remaining residual air bubble there due to the penetrating rinsing medium and • the spinning out or draining again of the rinsing medium © Elma Schmidbauer GmbH BA_Elmasolvex_VA_EN_Vers.05.2018... -
Page 120: Drying Parameters Recommendations In Expert Mode
It is not until afterwards that the programmed spin sequence with closed drain valve under vacuum <=120 mbar starts with the programmed parameters for duration and (for logical reasons higher than 500 rpm) speed. BA_Elmasolvex_VA_EN_Vers.05.2018 © Elma Schmidbauer GmbH... - Page 121 16.3.2 Vacuum drying Both parts and basket surfaces as well as the interior surfaces of the cleaning chamber are evenly dried in the Elmasolvex VA • evaporation of the last rinsing medium from the mentioned surfaces with running removal of the evaporated rinsing medium via the vacuum outlet of the cleaning chamber •...
- Page 122 Dry2 (Fig. 16.6) using Expert Mode is recommended. This is described in more detail below after a short explanation of the programmed vacuum drying parameters: BA_Elmasolvex_VA_EN_Vers.05.2018 © Elma Schmidbauer GmbH...
- Page 123 (for example, from 120 to 100 mbar) and initially the same number of cycles. © Elma Schmidbauer GmbH BA_Elmasolvex_VA_EN_Vers.05.2018...
- Page 124 If dry parts are obtained in this way, then reduce the number of cycles gradually without further reduced pressure. This procedure is usually correct for rinsing media with high boiling points such as elma suprol pro or others with flashpoint >23 °C. The first procedure shown in the example requires that the...
- Page 125 Expert Mode Fig. 16.7: Comparison of the vapour pressure dependencies on the temperature for IPA (isopropanol, 2-propanol) and the elma suprol pro hydrocarbon mixture. The latter should be considered between the vapour pressure curves of its two components with the lowest and highest vapour pressure.
- Page 126 This results in only a slower evaporation process than the boiling makes possible – the vaporisation of the rinsing medium – when using elma suprol pro as last rinsing medium with the available vacuum down to 25-30 mbar in the elma solvex VA.
-
Page 127: Appendix 4: Expert Mode
Elmasolvex VA Expert Mode In addition to its standard mode for creating and modifying cleaning programs, the Elmasolvex VA also provides an expert mode. This mode offers advanced configuration options and allows the user to adapt the cleaning steps more accurately to suit individual requirements. -
Page 128: Creating Your Own Cleaning Programs
Your own cleaning programs have a green background. The selected cursor field has a brown or grey background. Procedure On the display screen, select Program Selection (Fig. 7.2.1). Fig. 7.2.1 Program Selection display The Select/Change Programs display appears (Fig. 7.2.1.1). BA_Elmasolvex_VA_EN_Vers.05.2018 © Elma Schmidbauer GmbH... -
Page 129: Creating A New Cleaning Program
3 lines. Use the button to delete any character that you entered. Press to apply the selected character. To save the entered program name and continue to specify program parameters, press © Elma Schmidbauer GmbH BA_Elmasolvex_VA_EN_Vers.05.2018... - Page 130 Cleaning tab to display sub-steps for cleaning (Fig. 7.2.1.4). Specifying/changing Navigate through the sub-steps of the Cleaning process the Cleaning parameters in the same way as you navigate through the tabs parameters of the entire cleaning program. BA_Elmasolvex_VA_EN_Vers.05.2018 © Elma Schmidbauer GmbH...
- Page 131 Use Save Changes to save any amended settings and return to the Program Selection display. Use Discard Changes to return to the Program Selection display without saving your changes. Use Cancel to return to the previous display screen. © Elma Schmidbauer GmbH BA_Elmasolvex_VA_EN_Vers.05.2018...
-
Page 132: Creating A Cleaning Program From A Copy
To save the program name and continue to specify program parameters, press Fig. 7.2.2.2 Program Name display Editing program After you enter the program name, the display screen with the parameters program parameters for Cleaning appears (Fig. 7.2.1.3). BA_Elmasolvex_VA_EN_Vers.05.2018 © Elma Schmidbauer GmbH... -
Page 133: Modifying An Existing Cleaning Program
The initial display screen shows program parameters for the parameters Cleaning process step (Fig. 7.2.1.3). The existing program parameters of the cleaning program selected for modification can now be changed (overwritten) individually. Use the same procedure as described previously. © Elma Schmidbauer GmbH BA_Elmasolvex_VA_EN_Vers.05.2018... -
Page 134: Deleting A Cleaning Program
Delete Program command. If you want to discard the command, press Both actions will return you to the Delete Program display. You can now delete additional programs or return to the Program Selection display BA_Elmasolvex_VA_EN_Vers.05.2018 © Elma Schmidbauer GmbH... - Page 135 Appendix 4: Expert Mode © Elma Schmidbauer GmbH BA_Elmasolvex_VA_EN_Vers.05.2018...
Need help?
Do you have a question about the Elmasolvex VA and is the answer not in the manual?
Questions and answers