Advertisement
TC-910-IP
Rev A, Feb 2017
www.commscope.com
Content
1 General
2 Kit contents
3 Installation
3.1 GENERAL
3.2 FIST-GCO2-BX
3.3 FIST-GCO2-FX
1
General product information
This kit is used to install up to 16 drop cables of max. 3 mm in one new
unused round port of a FIST-GCO2-BX and FX.
2
Kit content
Kit content FIST-GCO2-BX6
Kit content FIST-GCO2-FX/BX8
Note: The lubrication oil in the kit makes it easier to
-
install gel-seal in the closure ports
-
guide cables through ports in the gel-seal.
FIST-RSKG-16
I N S T A L L A T I O N
Gel seal for the round ports of FIST-GCO2-BX and FX splice
closure
3
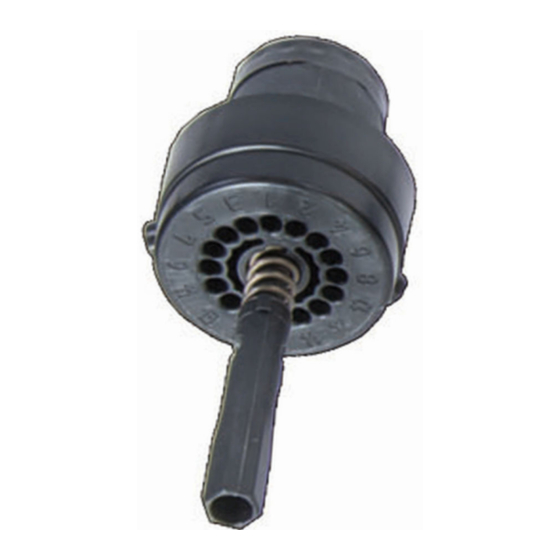
3.1
Number of ports
3.1.1
next must follow the numbering around the gel seal.
I N S T R U C T I O N
Installation
General
Thermoplastic gel seals
1
2
3
4
8
16
FOSC-OSKG
FIST-OSKG
FIST-OSKG20
First cable must be installed in the position number 1. And the
Cable range (mm)
11-14
8-11
6,5-8
4-7
3-5
0-3
6-15
5-18
16-20
Advertisement
Table of Contents

Related Manuals for CommScope FIST-RSKG-16


Summary of Contents for CommScope FIST-RSKG-16
- Page 1 FIST-RSKG-16 I N S T A L L A T I O N I N S T R U C T I O N TC-910-IP Gel seal for the round ports of FIST-GCO2-BX and FX splice Rev A, Feb 2017 closure www.commscope.com...
- Page 2 FIST-GCO2-BX6 3.2.4 Feed the drop cable through the port. Respect cable lengths. 3.2.1 Before installing the gel seal in the port, install the 2 fixation screws and all blind plugs. 3.2.5 Mark the drop cable just below the metal bracket and pull a bit further.
- Page 3 3.2.7 Pull back the cable and install the mini termination unit in the holder. Secure with the O-ring. 3.2.8 Tighten the trigger till it buts up with the flange (locking system). 3.2.6 Place the cable in the groove and route the aramid strength member through the left groove (1) and lead behind the back (2) over 3.2.9 Optional: apply some foam to the cable and secure with tie-...
- Page 4 3.3.2 Make sure that the bracket is in the center of the port. Always start with ports 3 and 8. Proceed starting again from 3.4 til 3.8. 3.2.10 To add a cable, release the trigger, remove the blind plug and insert the new cable.
- Page 5 Optional: FIST-GCO2-BX8 Optional: FIST-GCO2-FX-EXT/CF FIST-GCO2-FX cable securing frame FIST-GCO2-BX8 cable securing frame A cable securing system can be mounted on to the base of the FIST-GCO2-BX8 with 4 screws. This allows cables to be secured outside the closure. Apply some foam to the cable(s) and secure with tie-wrap(s) to the frame.
- Page 8 © 2017 CommScope, Inc. All rights reserved. web at www.commscope.com FIST and all trademarks identified by ® or ™ are registered trademarks or trademarks, respectively, of CommScope, Inc. For technical assistance, customer service, or to report any This document is for planning purposes only and is not intended to modify or supplement any specifications or warranties relating to missing/damaged parts, visit us at: CommScope products or services.
Need help?
Do you have a question about the FIST-RSKG-16 and is the answer not in the manual?
Questions and answers