Table of Contents
Advertisement
TORNADO INDUSTRIES, LLC
3101 WICHITA COURT
FORT WORTH, TX 76140
PHONE 800-VACUUMS
FAX 817-551-0719
WWW.TORNADOVAC.COM
Operations & Maintenance Manual
For Commercial Use Only
BD 14/4 COMPACT AUTO-SCRUBBER
MODEL NO: 99414
Form No. L9740 DA 05/20 ©Tornado Industries, LLC. All rights reserved
Save These Instructions
Advertisement
Table of Contents

Related Manuals for Tornado BD 14/4


Summary of Contents for Tornado BD 14/4
- Page 1 3101 WICHITA COURT FORT WORTH, TX 76140 PHONE 800-VACUUMS FAX 817-551-0719 WWW.TORNADOVAC.COM Operations & Maintenance Manual For Commercial Use Only BD 14/4 COMPACT AUTO-SCRUBBER MODEL NO: 99414 Form No. L9740 DA 05/20 ©Tornado Industries, LLC. All rights reserved Save These Instructions...
- Page 2 NOTES For warranty information go to www.tornadovac.com...
-
Page 3: Table Of Contents
Table of Contents INSTRUMENT BOARD AND CONTROLS ................... 4 MACHINE ............................. 4 TECHNICAL DESCRIPTION ........................ 5 Introduction ............................6 General Safety Rules .......................... 6 Symbols ............................... 7 Before Use ............................8 Unpacking the machine ........................8 Movement of the handle bar ....................... 8 Battery .............................. -
Page 4: Instrument Board And Controls
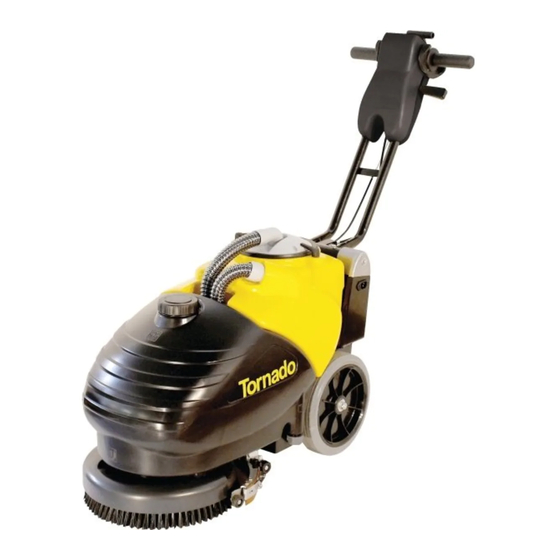
INSTRUMENT BOARD AND CONTROLS 1. MAIN SWITCH WITH LIGHT 5. SQUEEGEE LIFT LEVER 2. BRUSH MOTOR SWITCH WITH LIGHT 6. HANDLE BARS 3. VACUUM MOTOR SWITCH WITH LIGHT 7. BRUSH ACTIVATION LEVERS 4. SOLENOID VALVE SWITCH WITH LIGHT 8. HANDLE BAR RELEASE LEVER MACHINE 9. -
Page 5: Technical Description
TECHNICAL DESCRIPTION Cleaning width Inch Squeegee width Inch Battery Voltage Capacity of the batteries Power installed 430/18 Working capacity, up to Sq.ft./h 11,300 Brush diameter Inch Brush speed Brush pressure (max) Lbs. Vacuum suction Water Lift 36” Type of drive semi-automatic Maximum gradient Capacity solution tank... -
Page 6: Introduction
- Signal the areas of moist INTRODUCTION - The socket for the battery floors with suitable signs. Thank you for having chosen charger must be equipped - If the machine does not work our machine. This floor with a standard ground properly, check by conducting cleaning machine is used for system. -
Page 7: Symbols
Symbol denoting the Symbol denoting the solution valve. brake. Indicates the solution Indicates the signal lamp valve lever. Indicates the of the brake on. signal lamp of the solenoid valve functioning. Symbol denoting the brake. Symbol denoting the Indicates the lever of the brush. -
Page 8: Before Use
BEFORE USE ATTENTION: Handling of the packed machine Strictly follow manufacturer/ The machine is supplied with distributor indications for suitable packing. the maintenance and daily The total weight is 165lbs. recharge of the batteries. Packing dimensions: Specialized staff, using Base: 30 in x 16 in suitable protection Height: 24.5 in. -
Page 9: Battery Disposal
To prevent permanent damage Battery disposal ATTENTION: to the batteries, it is essential It is mandatory to hand over to completely discharge exhausted batteries, classified Always use low foam every 6 or 7 cycles, providing as dangerous waste, to detergent. for the recharge only when an authorized institution To avoid excessive foaming,... -
Page 10: Handle Bar Adjustment
8. During the first few feet check the solution flow lever. The solution flow adjustment is preset at the factory to satisfy the cleaning of most floors. If it is necessary to adjust the quantity of solution onto the floor, adjust the solution flow lever (11). -
Page 11: Daily Maintenance
DAILY MAINTENANCE Emptying and cleaning the Emptying and cleaning of the solution tank recovery tank To empty solution remaining in To empty and clean the the solution tank: recovery tank: 1. Bring the machine to an 1. Switch off the machine by appropriate place for draining pressing the main switch. -
Page 12: Brush Cleaning
3. To reassemble the brush, ORDINARY MAINTENANCE insert the coupling buttons on Brush replacement the brush into the slots of the The brush has to be replaced brush holder plate and rotate when the brush wear indicator counterclockwise until it locks. activates. -
Page 13: Front Squeegee Replacement
Front squeegee replacement Check the wear of the front squeegee and replace it when necessary. For replacement it is necessary to: 1. Rotate the squeegee lift lever (5) to lower the squeegee assembly. TROUBLESHOOTING GUIDE 5. Release the catch (4) of 2. -
Page 14: The Vacuum Motor Does Not Work
6. Check the level in the recovery tank (see under “OVERFLOW DEVICE”) and if necessary, empty the tank. Excessive foam production Check that low foam detergent has been used. Add small quantities of anti foam liquid into the recovery tank. Insufficient water on the The machine does not clean Please be aware that more... - Page 15 Damage or defect arising from abuse, neglect or other misuse is excluded from this warranty. Other items may or may not apply based on your specific machine. If any defect occurs, and service is attempted by non-Authorized Tornado Service Centers, the warranty will be void.
Need help?
Do you have a question about the BD 14/4 and is the answer not in the manual?
Questions and answers