Table of Contents
Advertisement
Quick Links
TORNADO INDUSTRIES, LLC
3101 WICHITA COURT
FORT WORTH, TX 76140
PHONE 800-VACUUMS
FAX 817-551-0719
WWW.TORNADOVAC.COM
Operations & Maintenance Manual
For Commercial Use Only
BR 28/27 RIDE ON COMPACT SCRUBBER
MODEL NO: 99775
Form No. L9775 CB 06/20 ©Tornado Industries, LLC. All rights reserved
Save These Instructions
Advertisement
Table of Contents

Related Manuals for Tornado BR 28/27


Summary of Contents for Tornado BR 28/27
- Page 1 FORT WORTH, TX 76140 PHONE 800-VACUUMS FAX 817-551-0719 WWW.TORNADOVAC.COM Operations & Maintenance Manual For Commercial Use Only BR 28/27 RIDE ON COMPACT SCRUBBER MODEL NO: 99775 Form No. L9775 CB 06/20 ©Tornado Industries, LLC. All rights reserved Save These Instructions...
- Page 2 NOTES For warranty information go to www.tornadovac.com Within 30 days, to activate the warranty, go to; https://tornadovac.com/services/warranty-registration-form.aspx...
-
Page 3: Table Of Contents
Table of Contents Automatic squeegee lift going backwards INTRODUCTORY COMMENT Working in automatic mode TECHNICAL DESCRIPTION Working in manual mode LEGEND PANEL OF CONTROLS Flow adjustment of detergent solution LEGEND MACHINE Brush pressure adjustment GENERAL RULES Electric protection SYMBOLS Overflow device BEFORE USE STOPPING MACHINE AFTER CLEANING Handling of the packed machine... -
Page 4: Introductory Comment
Please safeguard the original receipt / invoice. If you experience any problems with your unit during the warranty period, the original receipt / invoice will act as proof of purchase. Contact Tornado for any warranty inquiries. -
Page 5: Legend Panel Of Controls
LEGEND PANEL OF CONTROLS 15. SIGNAL LAMP PARKING BRAKE ON 1. DISPLAY 16. SIGNAL LAMP UP/DOWN BRUSHES 2. SIGNAL LAMP MANUAL MODE ON 17. PUSH BUTTON UP/DOWN BRUSHES 3. PUSH BUTTON CONNECTION MANUAL 18. SIGNAL LAMP STARTING BRUSHES MODE ROTATION 4. -
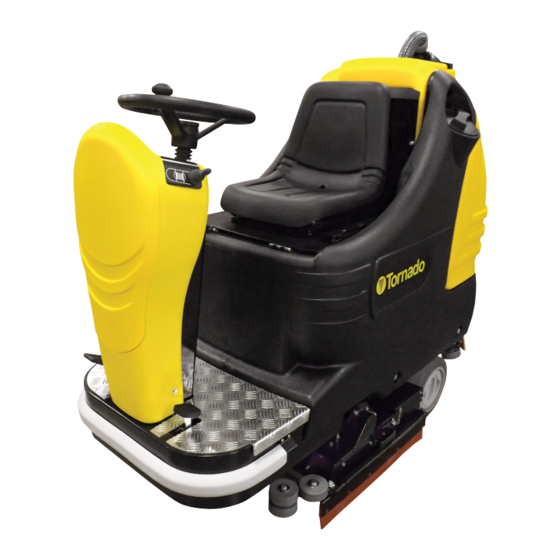
Page 6: Legend Machine
LEGEND MACHINE 13. PANEL CONTROLS 1. RECOVERY TANK 14. LEVER BLOCK/RELEASE PARKING BRAKE 2. SOLUTION TANK 15. COVER ELECTRICAL LAYOUT 3. SEAT 16. BRAKE PEDAL 4. STEERING WHEEL 17. BUMPER 5. SCREW CAP FOR SOLUTION TANK 18. ACCELERATOR PEDAL 6. SUCTION HOSE 19. -
Page 7: General Rules
Tornado - Every 200 working hours - Do not use the machine recommended accessories. have a machine check on surfaces covered with... -
Page 8: Symbols
Symbol denoting the Symbol denoting the Symbol denoting the solution valve. brake. signal lamp of the Indicates the solution Indicates the signal starting of the brushes valve lever. Indicates lamp of the brake on. rotation. the signal lamp of the solenoid valve Symbol denoting the Symbol denoting functioning. -
Page 9: Before Use
BEFORE USE ACCESS TO THE BATTERY BATTERY INSTALLATION HANDLING OF THE PACKED COMPARTMENT AND SETTING OF THE MACHINE 1.Bring the machine on a level BATTERY TYPE The machine is supplied with surface. The machine is equipped suitable packing for fork lift 2.Rotate the seat platform either with a battery in serial truck handling. -
Page 10: Battery Charger
Once the battery recharging 1. Place the battery in its ATTENTION: has been completed: 1. compartment. Disconnect the connector of 2. Connect the terminals, Never charge a WET battery the battery recharger from the respecting the polarities, with a non-suitable recharger. battery connector (1). -
Page 11: Setting Of The Battery Check Card
HOUR METER 3. the version of software of SETTING OF THE BATTERY The machine is equipped with the check card installed on the CHECK CARD an hour meter located on the machine (for example 4-6). The setting of the battery same display (1) of the battery check card can be: charge level indicator. -
Page 12: Squeegee Adjustment
SQUEEGEE ADJUSTMENT Rotate counterclockwise 1. Position the selector (8) for In order to have better drying the registers (8) to lower the the adjustment of the brush result with the squeegee, wheels or clockwise to raise pressure on position P1. 2. -
Page 13: Floor Cleaning
ATTENTION: Use only the brushes supplied with the machine or the ones indicated in the paragraph “RECOMMENDED BRUSHES”. The use of other brushes may produce poor cleaning results. FLOOR CLEANING 7. Extract the support plate RECOVERY TANK ATTENTION: (3) of the brushes by pulling Rotate the levers (2). -
Page 14: Forward And Backward Movement
FORWARD AND BACKWARD 9.In backward movement, A.When the signal lamp (7) is MOVEMENT when the machine is moving, on, the machine is functioning It is recommended to carry out an intermittent warning device in automatic (AUTO) model always the mere transfer of is activated. -
Page 15: Automatic Squeegee Lift Going Backwards
On the instrument board the When the signal lamp (7) is on, signal lamp (15) comes on then the machine is functioning in which signals that the parking automatic (AUTO) mode. brake is inserted. 3.Check that the knob of the To release the parking brake it solution valve (27) is in the is sufficient to press the brake... -
Page 16: Flow Adjustment Of Detergent Solution
2.Press the push button (17) of FLOW ADJUSTMENT OF THE Position the selector (28) up/down of the brushes base DETERGENT SOLUTION forward to choose the forward to lower the brushes. Once To adjust the detergent drive. that it is lowered, the brushes solution quantity that flows Adjust the movement speed in begin to turn. -
Page 17: Electric Protection
2.During the phase of BREAK WASHING, when the accelerator pedal is released for more than 3 seconds, the squeegee raises itself and the suction switches off automatically. 3.After three seconds, the STOP OF THE MACHINE ELECTRIC PROTECTION accelerator can be pressed AFTER CLEANING The machine is equipped with again, if a machine's transfer... -
Page 18: Daily Maintenance
DAILY MAINTENANCE ATTENTION: All the following maintenance and cleaning operations that refer to the following components that are in ATTENTION: contact with liquids and therefore: This operation must be carried •Solution and recovery tanks out using gloves to protect •collection box from contact with dangerous •Solution and recovery filters solutions. -
Page 19: Suction Filter Cleaning
SUCTION FILTER CLEANING 3.Clean with care the internal CHECK OF THE SIDE 1.Take off suction cover (4) part of the squeegee inlet RUBBERS after rotating the blocking eliminating eventual dirt With the brushes assembled, levers (5). residuals. the side rubbers must touch 2.Take off the filter (8) and its 4.Clean with care the the floor. -
Page 20: Cleaning Of The Solution Tank And Outer Filter
TROUBLESHOOTING GUIDE ATTENTION: If the machine is on, and the display and/or other functions are not activated, check the battery connection of the machine (see “CONNECTING BATTERY' AND SWITCHING CLEANING OF THE TWO-MONTH MAINTENANCE ON THE MACHINE”). If the SOLUTION TANK AND FRONT SQUEEGEE RUBBER problem persists, please OUTER FILTER... -
Page 21: The Brush Motor Does Not Work
c.check that the inner 4.Check through the signal filter of the solution tank is lamp (15) that the parking clean (see under paragraph brake is not inserted and “CLEANING OF THE INNER eventually release it (see under FILTER SOLUTION TANK”). paragraph “EMERGENCY If the problem persists, PARKING BRAKE”). -
Page 22: Excessive Foam Production
2.Check that the squeegee EXCESSIVE FOAM 5.Clean the suction filter (see rubbers are clean (see un- PRODUCTION under paragraph “SUCTION der paragraph “SQUEEGEE Check that low foam FILTER CLEANING”). CLEANING”). detergent has been used. 6.Clean the squeegee 3.Check the adjustment of the Eventually add small hose (see under paragraph height and the inclination of... -
Page 23: Recommended Brushes
RECOMMENDED BRUSHES Brushes must be chosen depending on type of floor and dirt to be removed. The employed ma- terial and the bristles diameter are the elements that distinguish different types of brushes. MATERIAL CHARACTERISTICS PPL (Polypropylene) Good wear resistance. Maintains characteristics with hot water up to 140°F (60°C).
Need help?
Do you have a question about the BR 28/27 and is the answer not in the manual?
Questions and answers