Table of Contents
Advertisement
Quick Links
Advertisement
Table of Contents

Related Manuals for Tornado BR 28/27


Summary of Contents for Tornado BR 28/27
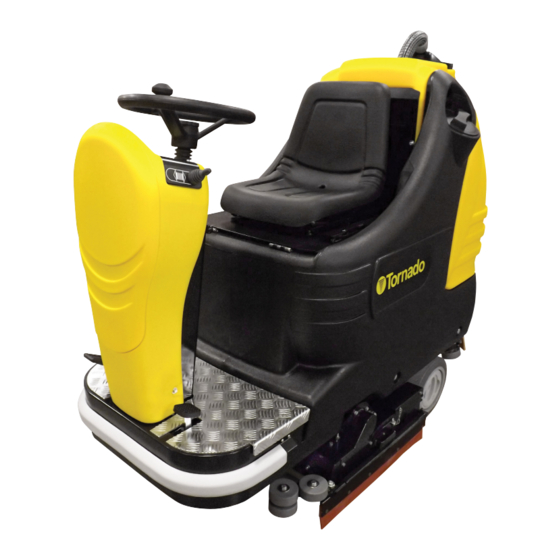
- Page 1 TORNADO INDUSTRIES, LLC 333 CHARLES COURT WEST CHICAGO, IL 60185 (630)-818-1300 FAX (630)-818-1301 WWW.TORNADOVAC.COM Operations & Maintenance Manual For Commercial Use Only COMPACT AUTOSCRUBBER BR 28/27 MODEL NO: 99775 Form No. L775AA 03/13 ©Tornado Industries, LLC. All rights reserved...
- Page 3 NOTES...
-
Page 4: Table Of Contents
SUMMARY STOP OF THE MACHINE AFTER CLEANING LONG-TERM BUYER OPERATION PROTECTION LIMITED WARRANTY DAILY MAINTENANCE LEGEND PANEL OF CONTROLS Recovery tank emptying and cleaning LEGEND MACHINE Suction filter cleaning TECHNICAL DESCRIPTION Emptying and cleaning of the INTRODUCTORY COMMENT collection box GENERAL RULES OF SECURITY Brushes cleaning SYMBOLOGY... -
Page 5: Legend Panel Of Controls
LEGEND PANEL OF CONTROLS SIGNAL LAMP PARKING BRAKE ON DISPLAY SIGNAL LAMP UP/DOWN BRUSHES SIGNAL LAMP MANUAL MODE ON PUSH BUTTON UP/DOWN BRUSHES PUSH BUTTON CONNECTION MANUAL MODE SIGNAL LAMP STARTING BRUSHES ROTATION SIGNAL LAMP MODE BREAK WASHING ON PUSH BUTTON WATER OPENING (SOLENOID VALVE) or PUSH BUTTON CONNECTION MODE BREAK WASHING PUSH BUTTON ADJUSTMENT DETERGENT DOSAGE 3SD system (OP- PUSH BUTTON CONNECTION MODE AUTOMATIC... -
Page 6: Technical Description
TECHNICAL DESCRIPTION 99775 BR 28 27 Cleaning width mm/in 700/28 Squeegee width mm/in 98038.5 Working capacity, up to sqm/h/sqft/h 3500/37,673 Diameter cylindrical brushes mm/in 2 x 150/6 Brushes Pressure on the brushes kg/lbs 45/320 max Brushes motor 2x600/25 Traction motor 500/21 Suction motor 580/24... -
Page 7: Introductory Comment
INTRODUCTORY COMMENT Symbol denoting the push button - If the machine does not work properly, check Thank you for having chosen our machine. and the signal lamp up / down of the by conducting simple maintenance procedures. This floor cleaning machine is used for the in- squeegee. -
Page 8: Optional Accessories
OPTIONAL ACCESSORIES Front light and relative switch Electric float switch 3SD System - SOLUTION SAVING SYSTEM DISPENSER... -
Page 9: Before Use
BEFORE USE To install into the compartment a battery box, it is necessary to: BATTERY RECHARGER HANDLING OF THE PACKED MACHINE 1. Rotate the seat platform forward and hook the bar Make sure that the battery recharger is suitable The machine is supplied with suitable packing (2) into position A. -
Page 10: Batteries Disposal
BATTERIES DISPOSAL 3. The batteries charge level indicator is digital and working hours and after a few seconds the work- It is compulsory to hand over exhausted bat- remains fixed on the display. The battery charge level ing minutes are shown. teries, classified as dangerous waste, to an starts from 100, which indicates the 100% of the total authorized institution according to the current... -
Page 11: Adjustment Height Side Rubbers
The bending is not uniform Adjust the squeegee inclination rotating counter- clockwise the wing nut (7) to increase the bending ATTENTION: in the central part, or clockwise to increase the This operation must be carried out using gloves bending on the extremities. to protect from contact with dangerous solutions. -
Page 12: 3Sd System Solution Saving System
The last dosing adjustment set remains stored STARTING OF THE MACHINE by the system also with the machine stopped. A safety device avoids the machine’s movement if the The dosing adjustment can be made only with operator is not seated correctly on the guiding place. the brushes moving (during operation), so that To switch on the machine: the dosing ratio cannot be modified acciden-... -
Page 13: Horn
7. Press the accelerator pedal placed on the right part of the platform to start the machine. 8. Adjust the movement speed in forward press- ing every time the push button (21) to choose the slow one (at the maximum 2.2 mph (3,6 km/h) is reached) or the fast one (at the maximum 3.1 mph (5 km/h) is reached). -
Page 14: Working Adjustments
ADJUSTMENT OF THE BRUSHES PRESSURE TO CARRY OUT THE FUNCTION OF ONLY Both in automatic as in manual mode it is DRYING: possible through the knob (10) to adjust the 1. Press the push button (11) of up/down squee- brushes pressure on the floor in eight established gee to lower the squeegee. -
Page 15: Daily Maintenance
B. by pressing the push button (3) the manual (MAN) functioning is chosen to start working in manual mode and all functions have to be re- established manually. DAILY MAINTENANCE ATTENTION: All the following maintenance and cleaning operations that refer to the following components that are in contact with liquids and therefore: •... -
Page 16: Weekly Maintenance
TWO-MONTHLY MAINTENANCE 4. Open the solution valve (see under paragraph “FLOW ADJUSTMENT OF THE DETERGENT FRONT SQUEEGEE RUBBER CHECK SOLUTION”), so that the detergent solution flows Check the wear of the squeegee rubber and down into appropriate containers. eventually replace it. 5. -
Page 17: The Brushes Motor Does Not Work
6. If, both in mode (MAN) as (AUTO), the signal 3. Check the adjustment of the height and the lamp (8) is on but the suction system does not inclination of the squeegee (see under paragraph work, please contact the authorized technical “ADJUSTMENT OF THE SQUEEGEE”). -
Page 18: Programmed Maintenance
PROGRAMMED MAINTENANCE INTERVENTION DAILY 20 HOURS 200 HOURS 1000 HOURS RECOVERY TANK CLEANING • SUCTION FILTER CLEANING • SOLUTION TANK FILTER CLEANING • BRUSHES CLEANING • BRUSHES DISASSEMBLY AND CLEANING • SQUEEGEE CLEANING • FRONT SQUEEGEE RUBBER REPLACEMENT • • REAR SQUEEGEE RUBBER REPLACEMENT •...
Need help?
Do you have a question about the BR 28/27 and is the answer not in the manual?
Questions and answers