Table of Contents
Advertisement
Available languages
Available languages
Quick Links
Quick Start Guide
DVD/CD RoboRacer LS™
Included Items
• 1 DVD/CD RoboRacer LS
• 1 Disc Output Bin Holder
• 1 100-Disc Capacity Disc Output Bin
• 1 50-Disc Capacity Disc Output Bin
• 4 100-Disc Capacity Guide Rods
• 4 50-Disc Capacity Guide Rods
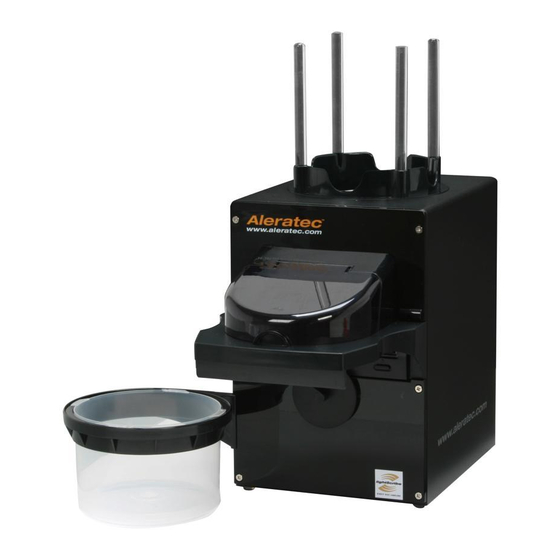
Key Items on the DVD/CD RoboRacer LS
1
5
6
2
3
4
1. Clear Plastic Disc Guide Rods
2. Power and Function Indicator LED
3. LightScribe DVD Recorder
4. Disc Tray Control Arm
Installing the Hardware
1. Remove the DVD/CD RoboRacer LS from the box and place it on a level surface.
2. Connect the power cord to the power adapter and plug the power cord into a 110-volt AC power outlet. Plug in the cord from the
power adapter to the rear of the DVD/CD RoboRacer LS.
3. Attach the DVD/CD RoboRacer LS to your PC with the included USB cable.
4. Slide the bin holder into the slot on the left side of the RoboRacer LS case and place a disc output bin into the bin holder.
5. Place the clear plastic disc guide rods in the four holes on the top of the unit.
Note: For more detailed information, please read the User Guide found on the Aleratec software CD.
Installing the Software
1. Insert the Aleratec software CD into the DVD/CD drive in your computer.
2. Install the USB Driver, RoboRacer LS Utility, and LightScribe software.
3. Remove the Aleratec software CD from your computer's DVD/CD drive and insert the Nero 7 Essentials software CD.
4. Install Nero 7 Essentials, using the "Custom" option to install only "Nero Express" and "Nero Cover Designer."
Part No. 280110
• 1 USB 2.0 Cable
• 1 Power Cord with Switch
• 1 External Power Supply
• 1 Disc Publishing Software Suite CD
• 1 Nero 7 Essentials CD
7
8
5. Disc Input Bin
6. Protective Cover
7. Disc Bin Holder
8. Disc Output Bin
B
C
A
A. Power Plug
B. High Performance Cooling Fan
C. USB 2.0 to the PC
Advertisement
Table of Contents

Related Manuals for Aleratec RoboRacer LS


Summary of Contents for Aleratec RoboRacer LS
- Page 1 • 1 Disc Output Bin Holder • 1 Power Cord with Switch • 1 100-Disc Capacity Disc Output Bin • 1 External Power Supply • 1 50-Disc Capacity Disc Output Bin • 1 Disc Publishing Software Suite CD • 4 100-Disc Capacity Guide Rods • 1 Nero 7 Essentials CD • 4 50-Disc Capacity Guide Rods Key Items on the DVD/CD RoboRacer LS 1. Clear Plastic Disc Guide Rods 5. Disc Input Bin A. Power Plug 2. Power and Function Indicator LED 6. Protective Cover B. High Performance Cooling Fan 3. LightScribe DVD Recorder 7. Disc Bin Holder C. USB 2.0 to the PC...
- Page 2 1. Launch the RoboRacer LS Utility. 2. Select “Disc Recording” and then click “Go.” 3. Use the “Browse” button to locate the desired disc “image” file, select whether it is a CD or a DVD image, and then type the number of copies you wish to make. 4. Be sure you have the appropriate number of discs in the input bin and click “OK.” Labeling with LightScribe 1. Launch the RoboRacer LS Utility. 2. Select “LightScribe Labeling” and then click “Go.” 3. Launch Nero Cover Designer and design your label, or open an existing label project. 4. Click on the “LightScribe” button in the toolbar or go to File, then “Print LightScribe Label.” 5. Select the number of LightScribe labeled discs you wish to make, and choose the desired Print Quality. 6. Make sure you have sufficient LightScribe discs in the input bin (label side down) and click “Print” to begin the labeling process. Note: For more information on Nero Cover Designer, see the on-line documentation in the program’s Help menu. Technical Support Addresses and Phone Numbers • By e-mail: support@aleratec.com / By Telephone: 1-818-678-0484 Technical Support Group can be reached 8:00 AM to 5:00 PM, Pacific Time, Monday through Friday, excluding U.S. holidays. • Access is available 24 hours a day, 365 days a year, via: The World Wide Web at: www.aleratec.com / FAX at: 1-818-678-0483 © 2011 Aleratec, Inc. 9851 Owensmouth Avenue / Chatsworth, CA 91311 U.S.A. Document Number: 9299044_ENG_Rev_D Specifications subject to change without notice.
- Page 3 • 1 Support pour le Conteneur de Sortie des Disques • 1 Cordon d’Alimentation avec Interrupteur • 1 Bloc d’Alimentation Externe • 1 Conteneur de Sortie de Capacité pour 100 Disques • 1 Conteneur de Sortie de Capacité pour 50 Disques • 1 CD avec la Suite Logicielle d’Edition Aleratec • 4 Tiges de Guidage de Capacité pour 100 Disques • 1 CD Nero 7 Essentials • 4 Tiges de Guidage de Capacité pour 50 Disques Éléments Clés du Duplicateur DVD/CD RoboRacer LS 1. Tiges de guidage des disques en plastique transparent 5. Conteneur d’entrée des disques 2. Voyant d’alimentation et de fonction 6. Couvercle de protection A. Prise d’alimentation B. Ventilateur hautes performances 3. Enregistreur de DVD LightScribe 7. Support du conteneur de disques 4. Bras de contrôle du plateau de disque...
- Page 4 3. Utilisez le bouton “Browse” pour localiser fichier “d’image” de disque désiré, sélectionnez si c’est une image d’un CD ou d’un DVD, et tapez la quantité de disques que vous souhaitez faire. 4. Assurez-vous d’avoir la quantité de disques approprié dans le conteneur d’entrée et cliquez “OK” pour démarrer la tâche. Étiquetage avec LightScribe 1. Lancez l’utilitaire “RoboRacer LS Utility.” 2. Sélectionnez l’option “LightScribe Labeling” puis cliquez “Go.” 3. Lancez Nero Cover Designer et créez votre étiquette, ou ouvrez un projet d’étiquette existant. 4. Cliquez dans le bouton “LightScribe” dans la barre d’outils, ou allez dans “File,” puis sur “Print LightScribe Label.” 5. Entrez la quantité de disques avec étiquettes LightScribe que vous souhaitez faire, et choisissez la “Print Quality.” 6. Assurez-vous d’avoir suffisamment de disques dans le conteneur d’entrée et cliquez “Print” pour démarrer le processus d’étiquetage. Pour plus d’informations sur Nero Cover Designer, reportez-vous à la documentation en ligne dans le menu Help (Aide). Adresses et Numéros de Téléphone du Support Technique • Courriel: support@aleratec.com / Téléphone: 1-818-678-0484 Le groupe du support technique peut être joint entre 08 h00 et 17 h 00 heure du Pacifique, du lundi au vendredi hors jours fériés américains. • Vous pouvez accéder 24 heures/jour, 365 jours par an au site web: www.aleratec.com / FAX at: 1-818-678-0483 © 2011 Aleratec, Inc. 9851 Owensmouth Avenue / Chatsworth, CA 91311 États-Unis Document Number: 9299044_FR_Rev_D Spécifications sujettes à modifications sans préavis.
- Page 5 • 1 Soporte por el Contenedor de Salida de Discos • 1 Cable de Alimentación con Interruptor • 1 Contenedor de Salida de Capacidad para 100 Discos • 1 Suministro Eléctrico Externo • 1 CD con el Paquete de Software Aleratec • 1 Contenedor de Salida de Capacidad para 50 Discos • 1 CD con Nero 7 Essentials • 4 Barras de Guía de Capacidad para 100 Discos • 4 Barras de Guía de Capacidad para 50 Discos Elementos Principales del DVD/CD RoboRacer LS 1. Barras guía de discos de plástico transparente 5. Contenedor de entrada de discos 2. Indicador de energía y función 6. Cubierta protectora A. Enchufe B. Ventilador de alto rendimiento 3. Grabadora de DVD LightScribe 7. Soporte de contenedor de discos 4. Brazo de control de la bandeja de discos...
- Page 6 Duplicación de Discos 1. Lance la utilidad “RoboRacer LS Utility.” 2. Seleccione “Disc Recording” y después haga clic en “Go.” 3. Utilice el botón “Browse” para localizar el archivo “imagen” de disque que usted desea duplicar, seleccione si es un imagen de un CD o de un DVD, y escribe la cantidad de discos que usted desea producir. 4. Asegúrese de que la cantidad de discos apropiada están en el contenedor de entrada, y haga clic en “OK” para comenzar la tarea. Etiquetaje con LightScribe 1. Ejecute la utilidad “RoboRacer LS Utility.” 2. Seleccione la opción “LightScribe Labeling” y después haga clic en “Go.” 3. Ejecute “Nero Cover Designer” y diseñe su etiqueta, o abra un proyecto de etiqueta existente. 4. Haga clic en el botón “LightScribe” en la barra de herramientas, o vaya al menú “File,” y haga clic en “Print LightScribe Label.” 5. Entre la cantidad de discos con etiquetas LightScribe que usted desea, y elija la “Print Quality.” 6. Asegúrese de que hay suficientes discos en el contenedor de entrada, y haga clic en “Print” para comenzar el proceso de etiquetaje. Para más información sobre Nero Cover Designer, véase la documentación en línea en el menú Help (Ayuda). Contactos Del Soporte Técnico • E-mail: support@aleratec.com / Teléfono: 1-818-678-0484 El grupo de soporte técnico está disponible de 8:00 AM a 5:00 PM, Hora del Pacífico, de lunes a viernes, excepto festivos de EE UU. • Acceso 24 horas al día, 365 días al año: Internet: www.aleratec.com / FAX at: 1-818-678-0483 © 2011 Aleratec, Inc. 9851 Owensmouth Avenue / Chatsworth, CA 91311 EE.UU Documento N0.: 9299044_ES_Rev_D Las especificaciones pueden sufrir cambios sin previo aviso.
Need help?
Do you have a question about the RoboRacer LS and is the answer not in the manual?
Questions and answers