Table of Contents
Advertisement
Quick Links
Advertisement
Table of Contents

Related Manuals for Aleratec 280112


Summary of Contents for Aleratec 280112
- Page 1 USER GUIDE Aleratec DVD/CD RoboRacer SA™ Part No. 280112, 280112EUR...
- Page 2 Date Purchased ________________________________________________ Place of Purchase ______________________________________________ The Aleratec DVD/CD RoboRacer SA is used only to back up personal data and to edit personal audio tracks. The copyright of the duplicated disc made from the DVD/CD RoboRacer SA is belonged to the author or company of the source disc.
- Page 3 Operation with non-approved equipment or unshielded cables is likely to result in interference to radio and TV reception. The user is cautioned that changes and/or modifications made to this equipment, without the approval of manufacturer, could void the user’s authority to operate this equipment. www.aleratec.com...
-
Page 4: Safety Regulations
The use of optical instruments with this product will increase eye hazard. This DVD/CD Duplicator is classified as a CLASS 1 LASER PRODUCT. The CLASS 1 LASER PRODUCT label is located on top of the internal drive enclosure. CLASS 1 LASER PRODUCT LASER KLASSE 1 PRODUKT www.aleratec.com... -
Page 5: Table Of Contents
Erase Disc ..................26 Software ID ..................27 Reset Robot ..................27 Demo Run ..................28 Nero Essentials Installation ..............29 Creating an Image with Nero ..............30 Specifications ..................34 Technical Support ................35 Service and Support ................36 Technical Support FAX Back Form ..........39 www.aleratec.com... - Page 6 www.aleratec.com...
-
Page 7: Introduction
• 4 100-Disc Capacity Guide Rods • 4 50-Disc Capacity Guide Rods • 1 USB 2.0 Cable • 1 Power Cord • Software/User Guide CD • UK Power Plug Adapter (280112EUR only) • EU Power Plug Adapter (280112EUR only) www.aleratec.com... -
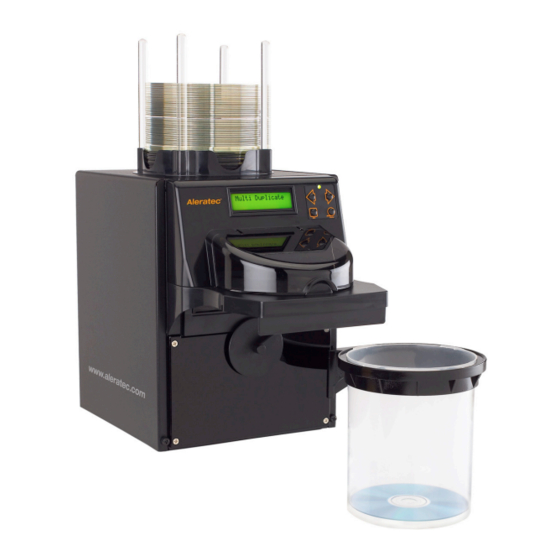
Page 8: Key Items - Dvd/Cd Roboracer Sa
Introduction Key Items – DVD/CD RoboRacer SA 1. Clear Plastic Disc Guide Rods A. Power Plug 2. LCD Display Panel B. High Performance Cooling Fan 3. Control Panel C. USB 4. Disc Tray Control Arm 5. Disc Input Bin 6. Protective Cover 7. Disc Bin Holder 8. Disc Output Bin www.aleratec.com... -
Page 9: Dvd/Cd Roboracer Sa Display Panel
Power Indicator LEFT Scroll Button RIGHT Scroll Button ENTER Button The left and right scroll buttons are used to navigate through the operating menu, while the enter and escape buttons are used to select or cancel menu settings. ESCAPE Button www.aleratec.com... -
Page 10: Precautions
• Direct sunlight • Electromagnetic radiation Operation Do not move the DVD/CD RoboRacer SA during operation. This may cause it to malfunction during operations. Note: Choose a Good Location 1. Allow adequate clearance for moving parts. 2. When placing the duplicator on the side/edge of a tabletop ensure that all four foot pads are in complete contact with the surface of the table. 3. Do not place near heat sources such as radiators or air ducts, or in a place subject to direct sunlight, excessive dust, mechanical vibration or shock. 4. Good care will help assure maximum product life. Improper operating environment and misuse may void the warranty. 5. Turn the duplicator off and leave unplugged when not in use. www.aleratec.com... -
Page 11: Overview
There are 5 main menu items that will display in the DVD/CD RoboRacer SA Display Panel. These are: Multi Duplicate Compare Image USB Mode Setup www.aleratec.com... -
Page 12: Subfunctions
Overview Subfunctions The main menu “Image” function has 4 subfunctions. These are: Image Load Image Delete Image Image Burn Image Compare www.aleratec.com... - Page 13 Over Burn Mode Read Error Skip Auto Verify CD Burn Speed DVD Burn Speed Setup Default Reload Format Hard Disk Test Mode Set System Sound Erase Disc Software ID Reset Robot Input Bin Pointer 1 Pointer 2 Demo Run www.aleratec.com...
-
Page 14: Using The Dvd/Cd Duplicator
2. Press ENTER ( ) and the machine will produce the desired number of copies of each source disc automatically. www.aleratec.com... -
Page 15: Main Menu: Compare
Main Menu: Image Four image subfunctions manage the disc images on the built in hard disk drive. These are: Image Load Image Compare Image Burn Image Delete Press the LEFT/RIGHT arrow keys ( ) to navigate to the “Image” function. Image www.aleratec.com... -
Page 16: Image Load
Press the LEFT/RIGHT arrow keys ( ) to navigate to the “Image” function. 2. Press ENTER ( ) key to enter the subfunction menu. Press the LEFT/RIGHT arrow keys ( ) to navigate to the “Image Compare”. Image Compare www.aleratec.com... -
Page 17: Image Burn
5. Press ENTER ( ) to select the partition you want. The “Quantity” menu will now display. Press the LEFT/RIGHT arrow keys ( ) to select the desired number of copies. 7. Use the ESCAPE ( ) key to return to the Main Menu. www.aleratec.com... -
Page 18: Image Delete
Delete 4. Press ENTER ( ) and select the partition to be deleted. Select Partition 4174MB 5. Press ENTER ( ) to delete the image file. 6. Use the ESCAPE ( ) key to return to the Main Menu. www.aleratec.com... -
Page 19: Main Menu: Usb Mode
You cannot see the HDD, only the DVD/CD drive in “My Computer” because the HDD is formatted with a special file format that can only be read by the RoboRacer SA controller. Only the “Image Manager” program, covered in the next pages, can send files to the HDD. www.aleratec.com... -
Page 20: Using Image Manager
4. The first screen that will appear will be the image you see below. Select the “Manage Images” button located at the lower left corner of the screen. 5. After clicking on the “Manage Images” button, you will see a table where each partition is or will be located on the HDD. www.aleratec.com... - Page 21 Nero software. The Load From .DVM file is also available. If you want to load an image such as an already existing ISO image, choose the Load From ISO file and locate the file that you wish to load. www.aleratec.com...
- Page 22 9. The Manage Images screen will appear and display the status of the image load. The screen will then disappear when the transfer is completed. 10. You will now see the image file you just loaded onto the duplicator’s HDD in the partition that you chose. www.aleratec.com...
- Page 23 14. Take the RoboRacer SA out of USB Mode by pressing the ESCAPE ( ) button and then press ENTER ( ). 15. Burn the image located in the partition just loaded by following the “Image Burn” procedure outlined on page 11 of this User Guide. www.aleratec.com...
-
Page 24: Troubleshooting Image Manager
Format HDD submenu option and press ENTER to format the HDD. Please note that any information on the HDD will be erased. If the HDD needs to be reformatted, the reason may be because the power was cut while the drive was in use. www.aleratec.com... -
Page 25: Main Menu: Setup
CD Burn Speed DVD Burn Speed Setup Default Reload Format Hard Disk Test Mode Set System Sound Erase Disc Software ID Reset Robot Input Bin Pointer 1 Pointer 2 Demo Run *The “Setup” subfunction “Reset Robot” has four additional subfunctions. www.aleratec.com... -
Page 26: Copy Mode
) to navigate to the “Setup” function. Setup Press ENTER ( ) key to enter the subfunction menu “Over burn Mode”. Setup Over burn mode 3. Press the ENTER ( ) key to navigate to the first option “Disable”. www.aleratec.com... -
Page 27: Read Error Skip
) to navigate to the second option “Enable”. Press ENTER ( ) to select the option you are viewing. The current option selected will be denoted with an “*”. 7. Use the ESCAPE ( ) key to return to the Main Menu. www.aleratec.com... -
Page 28: Auto Verify
The “CD burn speed” function allows adjustment of burn speed to increase yield and quality of copies. 1. Press the LEFT/RIGHT arrow keys ( ) to navigate to the “Setup” function. Setup Press ENTER ( ) key to enter the subfunction menu. www.aleratec.com... -
Page 29: Dvd Burn Speed
) to navigate to the other burn speed increment options. Press ENTER ( ) to select the speed you are viewing. The current option selected will be denoted with an “*”. 7. Use the ESCAPE ( ) key to return to the Main Menu. www.aleratec.com... -
Page 30: Default Reload
1. Press the LEFT/RIGHT arrow keys ( ) to navigate to the “Setup” function. Setup Press ENTER ( ) key to enter the subfunction menu. 3. Press the LEFT/RIGHT arrow keys ( ) to navigate to the “Format hard disc”. Setup Format hard disc www.aleratec.com... -
Page 31: Test Mode Set
) to navigate to the other options “Test+Copy”, and “Test”. Press ENTER ( ) to select the option you are viewing. The current option selected will be denoted with an “*”. 7. Use the ESCAPE ( ) key to return to the Main Menu. www.aleratec.com... -
Page 32: System Sound
7. Use the ESCAPE ( ) key to return to the Main Menu. Erase Disc This function erases DVD-RW and CD-RW discs. 1. Press the LEFT/RIGHT arrow keys ( ) to navigate to the “Setup” function. Setup Press ENTER ( ) key to enter the subfunction menu. www.aleratec.com... -
Page 33: Software Id
4. Press the ENTER ( ) key to navigate to the first option “Input Bin*”. 5. Press ENTER ( ) to cycle the input bin mechanism. If the mechanism has previously jammed, remove all of the discs in the input bin and activate this function to reset the mechanism. www.aleratec.com... -
Page 34: Demo Run
“Demo Run”. Demo Run Press ENTER ( ) to select the option you are viewing. The current option selected will be denoted with an “*”. 5. Use the ESCAPE ( ) key to return to the Main Menu. www.aleratec.com... -
Page 35: Nero Essentials Installation
Setup.exe, or right click on the drive icon and click “Autoplay”. 2. In the Nero Essentials installer menu, click on “Install Nero 7 Essentials” to begin the Nero installer. 3. After a short delay, Windows Installer will start the Nero installation Wizard. Follow the prompts to install the software. www.aleratec.com... -
Page 36: Creating An Image With Nero
Using the DVD/CD Duplicator Creating an Image with Nero 1. Start the Nero Express Essentials program. 2. The screen below will be displayed. For this example choose “Data” and “Data CD”. www.aleratec.com... - Page 37 4. In the final display before creating an image, make sure that “Image Recorder” in the dropdown menu to the right of “Current Recorder” is selected. Fill out the disc name if needed, and when ready, press the “Burn” button at the lower right. www.aleratec.com...
- Page 38 Type in the name you would like the image file to be called. Take note or choose where the file is to be saved so that it can be found for later use and then click the “Save” button. 6. After clicking the “Save” button the “Write Progress Screen” will appear. www.aleratec.com...
- Page 39 Using the DVD/CD Duplicator Creating an Image with Nero - continued 7. The image process is successful when Nero displays this screen. www.aleratec.com...
-
Page 40: Specifications
• 100-240 VAC (Universal Power Supply) Dimensions • 24.99cm x 35.5cm x 29.99cm (height x width x depth) • 9.84” (W) x 13.98” (D) x 11.81” (H) Weight • 5.44 kg (12.0 lbs) Warranty • Limited 1 Year Parts and Labor www.aleratec.com... -
Page 41: Technical Support
Technical Support After reading this User Guide, if you need additional assistance with this product, please contact Aleratec Technical Support. Our technical staff will be happy to assist you, but they may need your help to better assist you. Calling Aleratec Technical Support without all the necessary information can be both time consuming and frustrating. -
Page 42: Service And Support
If the product fails during normal and proper use within the warranty period, Aleratec, Inc. will, at its option, repair or replace the product at no cost (except shipping and insurance). This limited warranty does not... - Page 43 (even if Aleratec, Inc. has been advised of the possibility of such damages).
- Page 44 Duplicator, to prepay shipping charges, and to use the original shipping container or equivalent. Any service outside the scope of this limited warranty shall be at Aleratec, Inc.’s or its Authorized Service Provider’s rates and terms then in effect. This warranty gives you specific legal rights; you may also have other rights which vary from state to state.
-
Page 45: Technical Support Fax Back Form
I am experiencing the following problems with my DVD/CD Duplicator: _____________________________________________________________ _____________________________________________________________ _____________________________________________________________ _____________________________________________________________ _____________________________________________________________ By answering these questions, your problem will be solved more rapidly. Make copies as necessary. You can reach us electronically at: www.aleratec. com on the internet. www.aleratec.com... - Page 46 Document Number: 9399062_ENG_Rev. K Copyright © 2011 Specifications subject to change without notice. Aleratec, Inc. 9851 Owensmouth Avenue Chatsworth, CA 91311 U.S.A. www.aleratec.com...
Need help?
Do you have a question about the 280112 and is the answer not in the manual?
Questions and answers