Advertisement
Quick Links
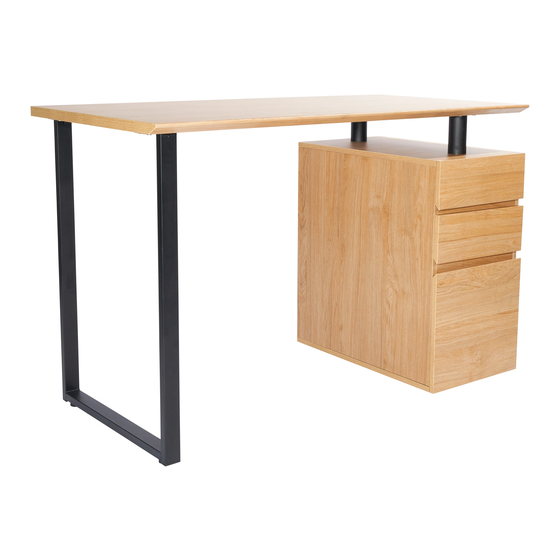
MODEL RTA-1305
ASSEMBLY INSTRUCTIONS
Thank you for purchasing one of our products.
Please read carefully the assembly instructions before the installation.
Do not discard this manual or any of the packaging material until the unit
.
has been completely assembled
Cabinet and metal frame are interchangeable:
Imported By
Advertisement

Subscribe to Our Youtube Channel
Related Manuals for Techni Mobili RTA-1305


Summary of Contents for Techni Mobili RTA-1305
- Page 1 MODEL RTA-1305 ASSEMBLY INSTRUCTIONS Thank you for purchasing one of our products. Please read carefully the assembly instructions before the installation. Do not discard this manual or any of the packaging material until the unit has been completely assembled Cabinet and metal frame are interchangeable:...
-
Page 2: Main Parts List
RTA-1305 MAIN PARTS LIST ① ② ③ ④ Small drawer left Small drawer right File drawer left File drawer right slider slider slider slider NOTE: Parts 3 and 4 are interchangeable NOTE: Parts 1 and 2 are interchangeable ⑤ ⑦... - Page 3 RTA-1305 MAIN PARTS LIST ㉑ ㉒ ㉓ Main panel Metal frame Support tube HARDWARE/SCREWS LIST: �� �� �� �� �� M5x60mm Cam lock Cam bolt M4x12mm ⌀6x30mm �� �� �� �� �� Cabinet studs M6x12mm Frame studs M6x30mm Allen wrench NOTE: You will need for the assembly a Phillips screwdriver and mallet/hammer (not included).
- Page 4 RTA-1305 ☛ This unit uses cam bolts and locks. The following explains how to use them. This is not an assembly step; it is a guide for when you are actually doing the assembly using this kind of hardware. Cam Lock Cam Bolt 1.
- Page 5 RTA-1305 ASSEMBLY STEPS STEP 1 Assemble the small drawer back panel ⑥ to the side panels ⑤ and ⑦ using screws Ⓐ as shown. Hardware/Tools: �� ⑥ ⑦ ⑤ Insert the drawer bottom panel ⑧ in between the groves of panels ⑤, ⑥ and ⑦ as STEP 2 shown.
- Page 6 RTA-1305 STEP 4 Grab all the sliders ①, ②, ③ and ④ and detach the smaller part ⓑ on all of them by pressing up or down the lever as shown. Parts ⓑ will be used on steps 5 and 9, while parts ⓐ...
- Page 7 RTA-1305 STEP 6 Using screws Ⓐ assemble the left panel ⑩ and the right panel ⑫ to the back panel ⑪ with the file tubes ⑬ inserted in between the panels ⑩ and ⑫ as shown. ☛ Tip: This drawer is for archiving Letter-size files only, but it can also be used Hardware/Tools: for regular storage if you leave it without the tubes ⑬.
- Page 8 RTA-1305 STEP 8 Assemble the drawer front panel ⑭ to the side panels ⑩ and ⑫ using cam locks Ⓑ and cam bolts Ⓒ as shown and explained in page 4. Hardware/Tools: �� �� Please refer to page 4. (NOT INCLUDED) ⑫...
- Page 9 RTA-1305 STEP 10 With the panels ⑮ and ⑯ positioned as shown, use screws Ⓓ to assemble the sliders ①ⓐ and ②ⓐ to the 2 top sets of holes for the smaller drawers, and the sliders ③ⓐ Hardware/Tools: and ④ⓐ to the bottom set of holes for the file drawer as shown.
- Page 10 RTA-1305 P.10 P.10 STEP 11 First attach the cam bolts Ⓒ to the back holes of panels ⑮ and ⑯, then for the sets of holes at the front, attach the bolts Ⓒ to the top holes and insert the wooden pins Ⓔ into the Hardware/Tools: bottom holes as shown.
- Page 11 RTA-1305 P.11 P.11 STEP 13 With the cabinet top panel ⑲ upside-down, attach the cam bolts Ⓒ to the exterior holes and insert the wooden pins Ⓔ into the interior holes as shown. Hardware/Tools: �� �� (NOT INCLUDED) ⑲ Ⓒ...
- Page 12 RTA-1305 P.12 P.12 STEP 15 First attach the cabinet studs Ⓕ to the bottom surface of bottom panel ⑳, then insert the pins Ⓔ into the interior holes on the top surface as shown. ☛ Make sure to install the pins into the interior holes, as the exterior holes are for screws on Hardware/Tools: the next step.
- Page 13 RTA-1305 P.13 P.13 STEP 17 With the main panel ㉑ upside-down, first assemble the frame ㉒ and the support tubes ㉓ using screws Ⓖ, then attach the studs Ⓗ to the structure ㉒ as shown. Hardware/Tools: �� THESE ARE THE ��...
- Page 14 RTA-1305 P.14 P.14 STEP 18 Place the top parts assembled in step 17 over the cabinet assembled in step 16, making the holes of the support tubes ㉓ align with the holes on panel ⑲, and assemble them from Hardware/Tools: inside the cabinet using screws Ⓘ...
-
Page 15: Weight Limits
RTA-1305 P.15 P.15 AFTER THE ASSEMBLY IS DONE, PLEASE READ CAREFULLY THE FOLLOWING CARE AND MAINTENANCE WARNINGS: WEIGHT LIMITS 110 Lbs. (50 Kg) 11 Lbs. (5 Kg) 11 Lbs. (5 Kg) 11 Lbs. (5 Kg) • Do not exceed the indicated weight limits.
Need help?
Do you have a question about the RTA-1305 and is the answer not in the manual?
Questions and answers