Advertisement
Quick Links
I n s t r u c t i o n M a n u a l
Flycam Vista-I Stabilizing Arm & Vest
(VSTA-I-AV )
All rights reserved
No part of this document may be reproduced, stored in a retrieval system, or transmitted by any form or by any means,
electronic, mechanical, photocopying, recording, or otherwise, except as may be expressly permitted by the applicable copyright
statutes or in writing by the publisher.
Advertisement

Subscribe to Our Youtube Channel
Related Manuals for Flycam Vista-I


Summary of Contents for Flycam Vista-I
- Page 1 I n s t r u c t i o n M a n u a l Flycam Vista-I Stabilizing Arm & Vest (VSTA-I-AV ) All rights reserved No part of this document may be reproduced, stored in a retrieval system, or transmitted by any form or by any means, electronic, mechanical, photocopying, recording, or otherwise, except as may be expressly permitted by the applicable copyright statutes or in writing by the publisher.
- Page 2 FLYCAM VISTA– I STABILIZATION SYSTEM At Flycam, our goal is to ensure 100% Customer Satisfaction in all that we do. We back our sales with a 1 year warranty from the date of purchase and work hard to resolve any problems in the unlikely event one should arise.
- Page 3 Flycam family. By purchasing your Vista-I Stabilizing Arm & Vest, you have just joined a host of designers, engineers, machinists, assembly, customer service and office staff that take great pride in all that they do.
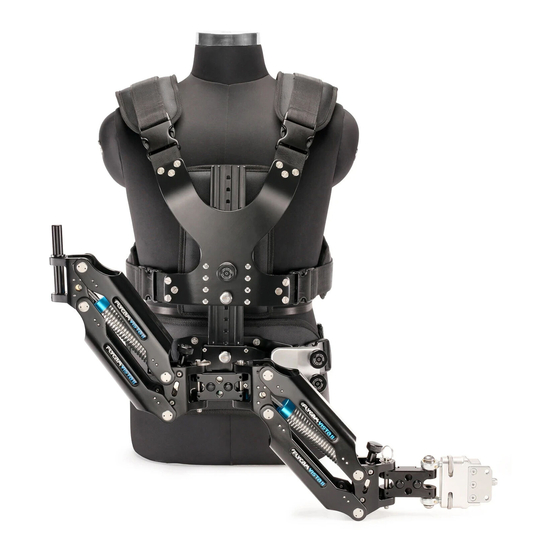
- Page 4 FLYCAM VISTA– I STABILIZATION SYSTEM INTRODUCTION Flycam unveils its new powerful combination of Vista-I Stabilizing Arm & Vest support to achieve superfine smooth moves in action. The dynamic design of sectional Vista Arm allows even beginners to learn its operation with ease. The...
- Page 5 COMPONENT FEATURES VISTA DV VEST Our Vista DV Vest is comfort designed to fit and easily distribute the weight of the FLYCAM Vista, camera and accessories across the shoulders, back and hips of the operator. With its six point suspension system, two snap locks on the shoulder pads, two 26 inch waist belts and an- other two at the center of the vest all Velcro secured, this lightweight and comfortable Support Vest can be custom adjusted to fit a wide range of body types.
- Page 6 FLYCAM VISTA– I STABILIZATION SYSTEM FLYCAM C5 The HAND HELD FLYCAM C5 with new design of weight disc and gim- bal. The C5 FLYCAM is a lightweight stabilizer. It can be used without any body support system as well. The Quick release plate of the FLYC- AM C5 is High quality quick release universal system for camera.
- Page 7 ATTACHING THE CAMERA Attach the FLYCAM Head to the central post. Secure using the provided L’ key. Insert the C5 post into the base platform and tighten with...
- Page 8 Insert the camera plate into the base plate. At the base of your FLYCAM where the base platform con- nects is a lever control that allows you to lengthen or short- en the stalk to help achieve proper balance. Loosen to ad- just the stalk up and down and make sure to re-tighten to secure.
- Page 9 When testing for correct horizontal balance pick up your FLYCAM from a flat and level sur- face (e.g. table) and let the FLYCAM hang freely as you hold it. If the FLYCAM is balanced cor- rectly on its horizontal axis, it will be leveled up right, with the Central Post in a perfect verti- cal position.
- Page 10 & aft balancing adjustments by centering the camcorder over the central post. To do this, Look at the FLYCAM C5 from the side. If the camcorder lens is tipped up or down, move the camcorder forward or backwards until the center of balance is situated over the central post.
- Page 11 Your FLYCAM is ready to mount on the Vista Arm. Once vertical and horizontal balance is achieved, mount the FLYC- AM on the gimbaled control unit of the arm.
- Page 12 Cleaning– Do not use solvents or harsh cleaners of any kind on your Vista Arm, DV Vest 7900A & FLYCAM C5. If the unit becomes dirty, use only a cloth or sponge with water and a very mild detergent to gently rub the unit clean. Rinse well.
- Page 13 Insert the center post as far as it will go and tighten so it won't slide out. Hold the handle normally and turn the FLYCAM so that it is horizontal to the ground. Let go of the stalk while keeping a firm grip on the handle and count how long it takes to return to vertical again.
- Page 14 FLYCAM VISTA– I STABILIZATION SYSTEM YOUR FLYCAM VISTA– I STABILIZATION SYSTEM ALL DRESSED UP AND READY TO GO Exclusive of Camera, Mic & Lcd Monitor WARRANTY We offer a one year warranty for our products from the date of purchase.
Need help?
Do you have a question about the Vista-I and is the answer not in the manual?
Questions and answers