Advertisement
Quick Links
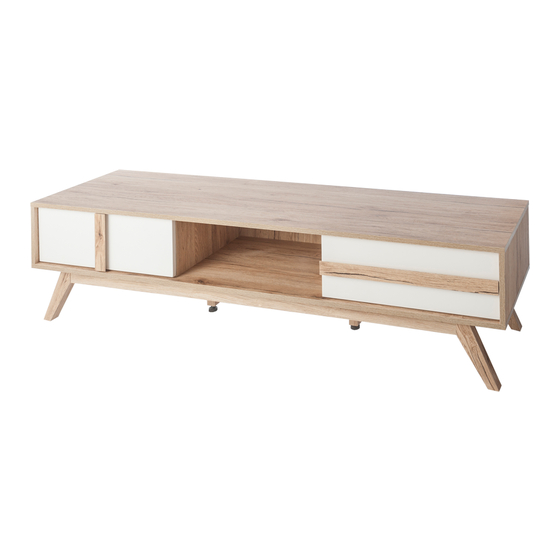
Jesse Entertainment Unit
Assembly Instructions
Thank you for your purchase.
Please follow the instructions below for correct assembly.
A
C
B
bolt
dowel
small screw
L + R
x20
x24
x16
H
G
screw
cam bolt
long screw
x8
x5
x4
M
plastic
glide x6
Hardware Supplied
mocka.co.nz | mocka.com.au | PO BOX 6171, Maroochydore BC, QLD, 4558
D
E
F
L + R
locking
cam nut
x4
nut x20
x4
x4
J
K
L
long screw
allen key
screw bolt
x28
x1
x2
Phillips & Flathead screwdrivers
and hammer required
For quicker assembly, we recommend the
use of a power drill on a low-speed setting.
W
V
WARNING:
potential to tip over in certain circumstances, i.e. if a child
attempts to climb up on the furniture or in the event of an
earthquake. Accordingly, we recommend that all furniture is
safety
screw
anchored to a wall. We supply a free safety wall anchor with all
x1
strap x1
furniture sold and we recommend these are used to prevent
your product tipping. The fixing device provided should fit most
Y
X
wall types, but please note that different wall materials may
require different fixing devices from those supplied.
wall
wall
anchor
screw
x1
x1
Z
washer
x2
Wall Mount
*We recommend using a Flathead screwdriver to tighten
all locking nuts 100% before first use.
Please clear any loose wood from the locking nut holes
before inserting the nut to ensure it locks 100%.
Any furniture that is not anchored to a wall has the
1
Advertisement

Related Manuals for Mocka Jesse Entertainment Unit


Summary of Contents for Mocka Jesse Entertainment Unit
- Page 1 For quicker assembly, we recommend the Please clear any loose wood from the locking nut holes use of a power drill on a low-speed setting. before inserting the nut to ensure it locks 100%. mocka.co.nz | mocka.com.au | PO BOX 6171, Maroochydore BC, QLD, 4558...
- Page 2 Next attach 4x rail components (D) to the inside of panels [2], [3], [4] & (B) into the table base panel [1]. [5] using 2x screws (C) in each and the holes provided. mocka.co.nz | mocka.com.au | PO BOX 6171, Maroochydore BC, QLD, 4558...
- Page 3 (E) into holes in the vertical panels and tighten with a flathead panels [2], [4], [5] and [3] as shown. Insert 8x dowels (B) into screwdriver. the top of panels [2], [3], [4] and [5]. mocka.co.nz | mocka.com.au | PO BOX 6171, Maroochydore BC, QLD, 4558...
- Page 4 (K) through the underside and tighten with allen key (L) provided. into the legs [6] & [7]. Connect all components together using 4x locking nuts (E) and 4x cam nuts (F). Tighten with a screwdriver. mocka.co.nz | mocka.com.au | PO BOX 6171, Maroochydore BC, QLD, 4558...
- Page 5 20x screws (J). Tighten with a screwdriver. and tighten with a screwdriver. Attach 6x plastic glides (M) into the panels with a hammer as shown. mocka.co.nz | mocka.com.au mocka.co.nz | mocka.com.au | PO BOX 6171, Maroochydore BC, QLD, 4558...
- Page 6 [10] or [12]. Attach side panels [14] and [15] to front panel panels as shown. by inserting 4x locking nuts (E) into holes in the side panels and tighten with a flathead screwdriver. mocka.co.nz | mocka.com.au | PO BOX 6171, Maroochydore BC, QLD, 4558...
- Page 7 [15] using 4x long screws (J) in the holes provided and a screwdriver. using 5x screws (I). Attach 2x rail components (D) to both left and right Repeat step for the second drawer. side of each drawer using 4x screws (C). mocka.co.nz | mocka.com.au | PO BOX 6171, Maroochydore BC, QLD, 4558...
- Page 8 2x central legs before first use. the feet on the 2x central legs before first use. unit as shown. unit as shown. mocka.co.nz | mocka.com.au | PO BOX 6171, Maroochydore BC, QLD, 4558...
-
Page 9: Wall Mount
1x screw (W). Tighten with a screwdriver. to wall using 1x wall plug (X), 1x washer (Z) and 1x wall screw (Y). Ensure unit is balanced and steady before use. You’re done, enjoy! mocka.co.nz | mocka.com.au | PO BOX 6171, Maroochydore BC, QLD, 4558...
Need help?
Do you have a question about the Jesse Entertainment Unit and is the answer not in the manual?
Questions and answers